Gluten Free ‘Baci di Dama’ (Hazelnut and Chocolate Cookies)

If you’re looking for the perfect bake for Valentine’s Day, look no further than these mini Hazelnut and Chocolate Cookies which are very romantically named ‘Baci di Dama’ or ‘Lady’s Kisses’.

16675738-74A1-495A-97C3-4C8197A419C0

Baci di Dama originate from the Piedmont region of Italy and were made to celebrate the excellent Hazelnuts produced there. It is thought that the cookies are called ‘Lady’s Kisses’ as the two sandwiched cookies are said to resemble lips pursed together ready to receive a kiss or the two halves symbolise two lovers kissing.

C186BD84-623A-4992-A867-533C63D3B80C

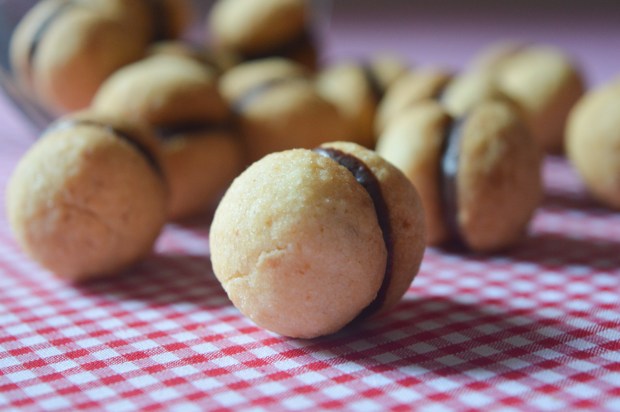
Whichever explanation you decide to opt for, there’s no doubt that these miniature cookies are incredibly cute. They are also incredibly simple to make and require just five ingredients – great for a last minute gift idea if you’re stumped for what to get someone for Valentine’s Day!

0356EA2A-451C-4269-A6B7-6EF5DBE491D7


Baci di Dama (Lady’s Kisses) – GF/EF/DF options

Ingredients

100g blanched hazelnuts
100g gluten free flour (I used Schär All Purpose Baking mix
60g caster sugar
60g unsalted butter (or a dairy free alternative, like Stork Margarine)
50g good quality dark chocolate (or dairy free alternative)

Method

1) Place a dry frying pan over a medium heat, then lightly toast the hazelnuts until golden brown.

2) Blitz the hazelnuts in a food processor until they resemble fine breadcrumbs. Place the ground hazelnuts into a large bowl, then stir through the sugar and the flour.

3) Rub the butter into the hazelnut mixture and start to bring the mixture together to a form a dough – if the mixture is a little crumbly, add a few drops of water to help it come together.

4) Wrap the dough in cling film and chill it in the refrigerator for two hours to help it firm up.

5) Preheat the oven to 160 C/140 C fan/gas mark 3. Roll the chilled dough into small ball shapes which weigh approximately 5 grams each, then place the pieces of dough onto baking trays lined with baking parchment and chill the

6) Place the balls of cookie dough into the fridge to chill for 15 minutes. Bake the cookies for 15 minutes or until they are golden brown.

7) Transfer the cookies to a wire rack to cool completely while you melt the chocolate.

8) Melt the chocolate in a heatproof bowl over a pan of gently simmering water. Allow the chocolate to cool for a few minutes, then dip the flat side of a cookie into the chocolate, then sandwich it together with another cookie – repeat until all the cookies have been sandwiched together.

4FD62847-81CB-4EC6-A7FC-904E824A8545

I love seeing your take on my recipes, so remember to share a snap of your Baci di Dama over on Facebook, twitter or Instagram using the hashtag #titchytonbakes.


Gluten Free Nutella Marble Cake

New Year is that time of year where we seek to return some balance to our lives, whether that be through setting New Year resolutions or undertaking a detox to repair our bodies after the hectic and often overindulgent festive season.

Personally, I have never managed to stick to a New Years resolution or detox diet, and although I do understand I can’t over indulge all year round, I do think that January is a time for comforting feel good food – after all, it can be a cold and bleak month.

nutella 5

As far as comforting feel good food goes, I think my Gluten Free Nutella Marble cake fits the bill… I’d just better be sure to strike some balance in my diet by making sure I eat my greens, too!

nutella 2


Nutella Marble Cake – GF/DF options

Ingredients

For the cake:
175g unsalted butter, softened
175g caster sugar
175g gluten free self raising flour
1 tsp baking powder
4 eggs
2 tbsp milk (or dairy free alternative)
1 tsp vanilla extract
2 tbsp cocoa powder
3 tbsp Nutella or similar hazelnut spread (or dairy free alternative)

For the chocolate glaze:
2 tbsp cocoa powder
4 tbsp golden syrup
25g butter (or dairy free alternative)

To decorate:
A handful of roughly chopped hazelnuts

Method:

1. Preheat the oven to 170 C/150 C fan/ mark 3, then grease and line a 2lb loaf tin with baking parchment.

2. In a large bowl, sift together the flour and baking powder.

3. In a separate bowl, cream together the butter and sugar with an electric hand mixer until light and fluffy. Add the eggs one at a time along with one tablespoon of the flour to stop the mixture from curdling. Add the remaining flour and milk, then beat until the ingredients are fully combined.

4. Divide the mixture between two bowls – add the vanilla extract to one half of the mixture, then stir the cocoa powder and the Nutella through the other half.

5. Spoon the vanilla and hazelnut mixtures into the prepared tin, alternating between the two colours – to create a marble effect, gently swirl a skewer through the mixture.

6. Bake for 60 – 80 minutes – or until a skewer inserted into the centre of the cake comes out clean.

7. Allow the cake to cool in the tin before turning it out on a wire rack. Leave to cool while you make the chocolate glaze.

8. To make the glaze: place the butter, golden syrup and cocoa powder into a small saucepan. Heat the ingredients over a medium heat and stir until the butter has melted and the ingredients are combined.

9. Drizzle the icing over the cake and finish with the chopped hazelnuts.

nutella 1

I love seeing your take on my recipes, so remember to share a snap of your marble cakes over on Facebook, twitter or Instagram using the hashtag #titchytonbakes.

Gluten Free Halloween: Chocolate Skeleton Cookies

Just in time for Halloween – here is my recipe for these rather kooky, but not so spooky cookies.

E0BB5CF0-E8DF-400F-BA1A-F1EC10DAE09D

These cookies are of course gluten free could be made dairy free, just substitute the butter for dairy free spread or dairy free butter. If you use dairy free spread make sure it is super cold, or it can make your biscuit dough a little oily – you may also need to for chill your biscuit dough for a little longer.

I also used an all purpose gluten free flour to make these biscuits – the new Schär Mix It Universal Blend – if you can’t get hold of this you could use a mix of gluten free self raising and rice flour (see the recipe below for details).

9B356FFB-C2A3-4E8B-8DFA-DCE9EED98E87


I had a lot of fun decorating these cookies and giving them rather shocked expressions! I think this recipe would be a lovely project to get children involved in over the Halloween weekend, as the cookie dough is very simple to make and they can get creative giving the skeleton men different expressions and looks!

Chocolate Skeleton Cookies – GF/DF options

Ingredients

For the chocolate biscuits:

150g sugar
150g butter (or dairy free alternative, like Stork Margarine Block)
2 tbsp cocoa powder
280g gluten free all purpose flour (I used Schär All Purpose Mix)
1 egg
1 tsp vanilla essence

For the decorations:

250g icing sugar
1 egg white

Method

1) To make the biscuit dough, combine the gluten free flour, cocoa powder and sugar in a large bowl.

2) Rub in the butter until you have a bread crumb like texture.

3) Add the egg and vanilla essence and start to bring the ingredients together using a wooden spoon.

4) Tip the contents onto a lightly floured surface and use your hands to work the ingredients into a soft dough. Don’t worry if the dough seems a little sticky as it will be refrigerated which help it to firm up – don’t be tempted to add more flour!

5) Wrap the dough in cling film and place in the fridge for at least an hour.

6) Preheat the oven to 170 C/150 C fan/gas mark 4 and line a baking tray with grease proof paper.

7) Dust a clean surface with flour. Roll out the dough using a rolling pin until it is about 5mm thick, then cut out gingerbread men shapes.

8) Transfer the cookies to tray lined with greaseproof paper using a palate knife. Bake for 10 – 12 minutes or until the cookies are firm and a light golden brown – be sure to keep an eye on them as they could quickly over-bake.

9) Once baked, leave the cookies to cool slightly on the trays to before transferring them to wire racks to finish cooling.

10) To make the royal icing: place 1 egg white in a bowl, then slowly sift in the icing sugar in batches. In between the batches of icing sugar, stir the ingredients with a wooden spoon or a balloon whisk until the icing thickens up – you can use a dash of water to encourage the ingredients to come together if necessary.

11) Transfer the icing into a piping bag fitted with a writing nozzle and decorate the Skeleton men – don’t forget to give them shocked expressions!

BEA90B84-44D3-47AD-B5F2-EB662155152D

I love seeing your take on my recipes, so remember to share a snap of your Halloween cookies over on Facebook, twitter or Instagram using the hashtag #titchytonbakes.

Gluten Free Salted Caramel Millionaire’s Shortbread (Inspired by ‘The Great British Bake Off’)

‘Bake Off’ is back and I wasn’t sure if I was going to enjoy the new series; especially as the show made a controversial move from the BBC to Channel 4 last year. I’m normally incredibly excited for the start of a new series, but this year I didn’t have quite the same enthusiasm for the show returning again. Saying that, I am I actually quite enjoying the new series and am pleased to see that the show hasn’t changed too much. I do, however, miss the old team – especially Mary Berry, can someone hurry up and make her a Dame already?!

This recipe is inspired by Caramel week,  which was a Bake Off first. We seen the bakers make Caramel before, but we’ve  never whole programme centred around it. It made for great television because Caramel can be quite unpredictable.

103F843F-2C79-454C-AC1E-259C63E1F220

I’m not sure Paul Hollywood would approve of my method of making Caramel, as it’s somewhat of a cheat to use the microwave… but, the result is perfect Caramel that sets brilliantly every time.

I’ve made Caramel on the hob many times and sometimes it’s been a bit hit and miss. Possible scenarios have included, burning myself in the process, burning the caramel to the bottom of the pan, or almost burning the house down… not with the microwave method!

74ECE43F-2091-4063-A736-BB514082ECEC

Gluten Free Millionaire’s Shortbread – GF/EF

Ingredients

For the shortbread base:
275g gluten free all purpose flour (I used Schär All Purpose Baking Mix)
175g unsalted butter, cut into cubes
100g caster sugar

For the caramel layer:
1 x 397g tin of condensed milk
100g unsalted butter
100g dark brown sugar

Approx 1/2 tsp Sea Salt – but depends on your taste!

For the chocolate layer:
250g dark chocolate
250g milk chocolate

Method:

1. Preheat oven to 160 C/140 C fan/gas mark 3 then grease and line the base and sides of a 20 x 20 square tin with greaseproof paper.

2. To make the shortbread base, mix together the flour and sugar in large bowl, then rub in the butter until left with a breadcrumb like texture.

3. Start to bring mixture together with your hands until you have a smooth ball of dough.

4. Press the dough into the tin, smoothing it into an even layer that reaches the corners of the tin.

5. Bake for 25 – 30 minutes or until golden brown, then set it aside to cool whilst you make the caramel.

6. To make the caramel, place the butter into a large microwavable bowl and heat until melted. Add the sugar and give the ingredients a good mix until you can’t feel any grains of sugar on the bottom of the bowl – you may need to heat it again for another 30 seconds or so to encourage the sugar to dissolve throughly.

7. Add the condensed milk and heat for a further two minutes before whisking the ingredients throughly with a balloon whisk. Heat the caramel for a further 5 minutes, giving it a good whisk after each 30 seconds.

8. Drop a little bit of the caramel into a glass of cold water – if the mixture can be rolled into soft ball then it’s ready to be used, otherwise it may need another 30 seconds in the microwave.

9. Stir through the sea salt and then smooth the caramel in an even layer over the shortbread base. Leave to set.

10. For the chocolate layer, gently melt the chocolate in a heatproof bowl over a pan of simmering water. Pour the chocolate over the top of the shortbread and caramel layers and smooth out with a palate knife, then leave to set before cutting the Shortbread into equally sized pieces.

E6391436-E927-45B7-9507-9B1DBD5044BB

I love seeing your take on my recipes, so remember to share a snap of your Shortbread over on Facebook, twitter or Instagram using the hashtag #titchytonbakes.

Gluten Free Double Chocolate Chip Muffins Recipe (for Coeliac Awareness Week)

Today I’m going to share with you my Gluten Free Double Chocolate Muffin recipe in honour of Coeliac Awareness Week, which is being held this week between the 8th – 14th May 2017.

IMG_5136

Coeliac UK have estimated that approximately 1 in 100 people in the UK suffer with Coeliac Disease and just 24% have been properly diagnosed – which  means there are people living with undiagnosed Coeliacs Disease all across the UK, something Coeliac Awareness week is aiming to change.

You can find out more about Coeliac Awareness Week over at Coeliac UK, including ideas about how to get involved.

If you think you have have Coeliac Disease you can find out more information about the symptoms and how to go about getting a diagnosis here.

If you’ve recently been diagnosed and are new to Gluten Free baking, there is a tonne of advice over on my Ton’s Tips and Tricks page.

My Gluten Free Double Chocolate Muffins recipe is perfect for Gluten Free baking beginners as there are no difficult techniques involved – you don’t even need to worry about the batter being lumpy!

IMG_5138

This recipe was inspired by my Gluten Free White Chocolate and Raspberry Muffins recipe which I posted last year,  in that post I listed a few extra tips and tricks to achieve perfect muffins -you can find that post here.

IMG_5139


Double Chocolate Muffins – GF/DF options

Ingredients:

275g gluten free self raising flour
25g cocoa powder
1 tsp baking powder
1/2 tsp bicarbonate of soda
175g soft brown sugar
2 large eggs
100 ml sunflower oil
200ml milk (or dairy free alternative)
1 tsp vanilla extract
150g milk chocolate chips, refrigerated (or dairy free alternative)

Method:
1. Preheat the oven to 180 C/160 C fan/gas mark 4 and line a muffin tin with 8 muffin cases.

2. In a large bowl, sift together the flour, cocoa powder, baking powder and bicarbonate of soda.

3. In separate bowl, whisk together eggs, sugar, oil, milk and vanilla extract until combined then add this to the dry ingredients.

4. Gently mix the ingredients together until they form a batter which is only just combined (don’t worry too much if there are any lumps), then stir through the chocolate chips.

5. Spoon approximately 3 tablespoons of batter into each case – the cases should be about 3 quarters full.

6. Bake the muffins for 25 minutes, until golden brown.

7. Leave to cool on a wire rack before serving.

IMG_5133

Gluten Free Easter Chocolate Log

My final Easter recipe this is year is my Gluten Free Easter Chocolate Log recipe – the perfect bake for chocoholics and a beautiful centrepiece for any Easter Sunday gathering.

IMG_4661   
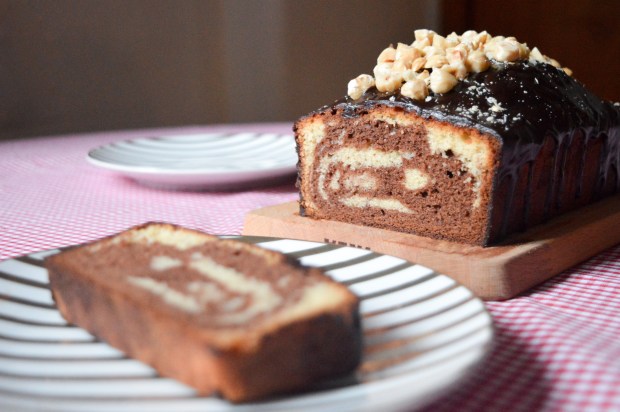
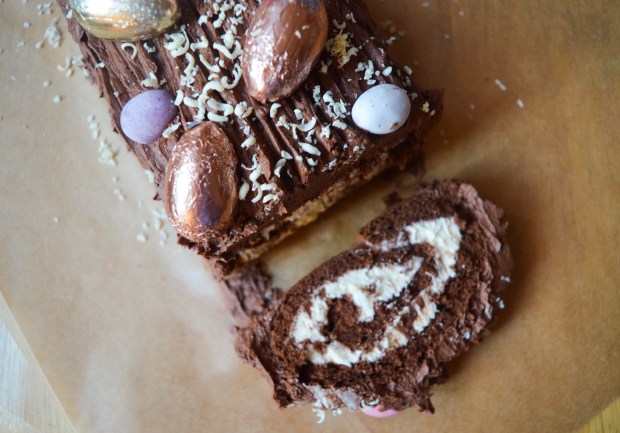
I know chocolate logs are more traditionally eaten at Christmas, but I think this fun update on a classic works for Easter too!

IMG_4704

I promise you that this recipe is much easier to make than it looks – the trick is to make sure whip up your eggs and sugar until they are super voluminous!


Easter Chocolate Log – GF

For the Swiss Roll:

80g golden caster sugar
3 large eggs
60g gluten free self raising flour
20g cocoa powder
20g butter, melted and cooled.

For the Icing:

350g butter, softened
350g icing sugar
2 tbsp cocoa powder
2 tsp vanilla extract
White chocolate, for decorating.

Method

1. Preheat the oven to 200 C/180 C fan/gas mark 6, then grease and line a Swiss roll tin or a baking tray with slightly raised sides with baking parchment.

2. Sift together the gluten free flour and cocoa powder in a large bowl then set aside.

3. Place the eggs and sugar into large bowl and beat the ingredients using an electric hand mixer for about 5 minutes, until the ingredients are pale, fluffy and have tripled in volume. Make sure the mixture has reached ‘ribbon stage’, which means that when you remove the whisk the mixture falling from the whisk leaves a ribbon like trail.

4. Fold in the flour mixture bit by bit, being careful not to knock out the air from the mixture.

5. Carefully fold through the cooled melted butter.

6. Pour the mixture into the prepared tray or tin, tilting the tray to level out he mixture.

7. Bake for 8-10 minutes, until the sponge starts to shrink away from the sides of the tin and the top is firm to touch.

8. Place a large sheet of baking paper onto a work surface. While the cake is still hot, place it upside down onto the paper, then carefully remove the tray and the baking paper.

9. Roll up the cake so that the paper is inside in the Swiss roll, then leave to cool completely.

10. To make the icing, beat the softened butter and icing sugar together until light and fluffy. Split the mixture between two separate bowls – into one mix the vanilla extract and into the other mix the cocoa powder.

11. Carefully unroll your Swiss Roll and spread the vanilla icing over the sponge, then gently roll it back up.

12. Place the Swiss Roll onto a serving plate, then cover it with the chocolate icing using a palate knife. Use a fork to make a ‘bark like’ affect, then decorate with chocolate eggs of your choice and grated chocolate.

IMG_4657

I love seeing your take on my bakes, so remember to share your a picture of your bakes over on Facebook, twitter or Instagram using the hashtag #titchytonbakes.

I hope everyone has a fantastic Easter!


Gluten Free American Style Pancakes with Chocolate Sauce

Today I’m going to share with you my recipe for Gluten Free American Style Pancakes and Chocolate Sauce – the perfect pancake recipe for the perfect Pancake Day!

image

I recently purchased a crêpe pan, so every day in February has been pancake day and this recipe has been more than triple tested!

When I put together this recipe my   scales had run out of battery, so I had to rely on measuring cups which I don’t often do with gluten free flour – but I think with batter recipes there is a little give and take with the ingredients and the recipe be easily adjusted if you accidentally add too much flour or milk.

Every time I made this batter it was spot on, but if you think your batter is a little thick and doesn’t spread out in the pan, add a little bit more milk, or, if it’s a little runny add a tablespoon of flour.

For a totally foolproof Pancake Day I highly recommend purchasing a crêpe pan or a good quality non stick frying pan – I speak from experience, as of my pancake day plans have been thwarted by a lack of a good frying pan!

image


American Pancakes with Homemade Chocolate Sauce – GF/DF options

Ingredients

For the Pancakes:

1 cup of gluten free self raising flour
1 tsp baking powder
2 tbsp caster sugar
1 tsp vanilla extract
2 tbsp melted butter, plus extra for frying (or dairy free alternative)
2  eggs
1 cup of semi skimmed milk

For the Chocolate Sauce:

100g good quality milk or dark chocolate (or dairy free alternative)
100ml double cream

You’ll also need a good quality non stick crêpe or frying pan. 

Method:

1. In a large bowl, mix together the gluten free flour, sugar and baking powder.

2. Add the egg and vanilla extract, then using a whisk start to bring the ingredients together.

3. Add the milk and butter and continue to whisk until you’re left with a smooth lump free batter.

4. Heat the oven to 100 degrees C/gas mark 1.

5. Leave the batter to stand while you heat up a non stick crêpe or frying pan. Brush the crêpe pan with butter using a pastry brush and wipe away any excess butter with kitchen towel. Place the pan over a medium to high heat until hot.

6. Spoon half a laddle of batter into the pan. Fry the pancake until bubbles form on top (this should take between 1 and 2 minutes) then flip your pancake over and cook the other side for a further minute or until golden brown. Place the pancake onto a non stick tray in the  preheated oven so that it stays warm.

7. Repeat with the remaining batter, brushing your pan with butter in between each pancake.

8. To make the chocolate sauce, gentle melt together the chocolate and the cream in heatproof bowl over a pan of simmering water. Stir until the ingredients are combined and then bring the bowl off the heat.

9. Serve the pancakes with the toppings of your choice – I highly reccomend strawberrries and chopped hazelnuts as they compliment the chocolate sauce beautifully.

image

I love seeing your take on my bakes, so remember to share your a picture of your perfect pancakes over on Facebook, twitter or Instagram using the hashtag #titchytonbakes.

Gluten Free Red Velvet Cupcakes

Today I’m going to share with you a recipe for one of my favourite bakes – Gluten Free Red Velvet Cupcakes.

image

My love affair with Red Velvet Cake started a few years ago when my little sister asked me to make a Red Velvet Cake for her Birthday. I had never eaten or made Red Velvet Cake before, but I was nevertheless happy to oblige – my Mum was less happy when my first attempt erupted all over the oven because I’d used shallow tins and too much bicarbonate of soda… sorry Mum!

It wasn’t until my first taste of Red Velvet Cake I realised what I had been missing – Chocolate sponge flavoured with sharp buttermilk, topped off with cream cheese frosting. What’s not to like?

Making a Red Velvet Cake can be quite time consuming, especially if you are going for the traditional three or more layers, so I’ve adapted my Red Velvet Cake recipe to a more simple cupcake recipe, so that you can get your Red Velvet fix much quicker!

image


Red Velvet Cupcakes – GF

Ingredients

For the Cupcakes:
100g gluten free self raising flour
10g cocoa powder
100g caster sugar
50g butter
1 large egg
100ml buttermilk
1 tsp vanilla extract
1/2 tsp red food colouring (gel not liquid)
1/2 tsp cider vinegar
1/2 tsp bicarbonate of soda

For the Cream Cheese Topping:
250g mascarpone cheese
150ml double cream
50g icing sugar
1/2 tsp vanilla extract

To Decorate:
Freeze dried raspberry pieces

Method

1) Preheat the oven to 170 C/150 C fan/gas mark 3) and a cupcake tray with cupcake cases.

2) In a large bowl sieve together the flour and cocoa powder, then set aside for later.

3) In a separate bowl cream the butter, vanilla extract and sugar together with an electric hand mixer until light and fluffy.

4) Scrape down the sides of the bowl with a spatula. With the mixer on a low speed, add the egg a bit at a time along with a tablespoon of the flour mixture. Once the egg is fully combined, add the rest of the flour.

5) Pour your buttermilk into a measuring jug, then add the red food colouring a little at a time until it turns a turns a deep red –  I found about half a teaspoon did the trick, but you may find you need more or less depending on the food colouring you are using.

6) With the mixture on a low speed, add the buttermilk to your cake mixture a bit at a time, keep mixing until all the buttermilk is combined.

7) In a small bowl mix together the bicarbonate of soda and vinegar until it starts to fizz, then quickly fold it into the cake mixture.

8) Working quickly, spoon two teaspoons of the mixture into each cupcake case

9) Bake for 15 – 18 minutes. The cupcakes are ready when they are firm to touch.

10) Leave the cupcakes to cool in the tin for a few minutes, then transfer them to a wire rack to finish cooling while you prepare the cream cheese topping.

11) Sift the icing sugar into a large bowl, add the vanilla extract and mascarpone then mix with a wooden spoon until the ingredients are just combined.

12) In a separate bowl whisk the double cream with an electric hand mixer until it almost reaches soft peaks, add the mascarpone and whisk for a couple of seconds until it is just combined.

13) Transfer the frosting into a piping bag fitted with a large star nozzle. Pipe the frosting onto each cupcake, then decorate with a sprinkling of freeze dried raspberry pieces.

image

If you give this recipe a try, or any of the other recipes on my blog remember to take a snap of your creation and share it with me on Instagram, Facebook or Twitter using the hashtag #titchytonbakes.

Gluten Free Rocky Road

During the dark and cold month of January, I am usually found seeking out delicious comfort foods to perk up my mood.

For me, nothing quite beats curling up on the sofa with a good book, a cuppa and slice of my Gluten Free Rocky Road, which is packed full of delicious sweet treats and is certain to banish those winter blues!

image


Most traditional Rocky Road recipes are not Gluten Free because they usually include biscuits, so instead of Biscuits I decided to use Nature’s Store Puffed Rice Cereal as a substitute. Puffed rice is 100% Gluten Free and a healthier option than biscuits as it contains no sugar. You can of course use Gluten Free Biscuits if you’d prefer, but I honestly prefer using puffed rice as it still provides crunch expected from Rocky Road.

This is recipe is wonderfully simple and so easily adaptable so if you fancy changing it up, why not use raisins or cranberries instead of cherries? It is also a no bake recipe (perfect if you are feeling a little bit lazy), simply pop it in the fridge and let the magic happen – what’s not to like?

Gluten Free Rocky Road – GF/DF/EF

Ingredients

300g milk or dark chocolate (or dairy free alternative)
125g butter, softened (or dairy free spread)
100g pink and white mini Marshmallows (plus an extra handful for the top)
75g glacé cherries cut in half
25g Rude Health Brown puffed rice
25g almonds
3 tbsp golden syrup

Icing Sugar to dust

Method

1) Grease and line a square tin with greaseproof paper.

2) Melt the chocolate in large heat proof bowl over a pan of simmering water.

3) In a separate pan melt together the butter and golden syrup, then add this to the melted chocolate and stir continuously until all the ingredients are combined.

4) Stir in the marshmallows, puffed rice, almonds and cherries until they are coated in a thick layer of the chocolate.

5) Pour the mixture into the prepared tin and use a greased palate knife to flatten down the mixture down and smooth it right to the corners of the tin.

6) Place a sheet of greaseproof paper on top of the mixture and press down firmly to help tightly pack the mixture into into the tin. Peel off the greaseproof paper and dot across the extra marshmallows.

7) Chill the Rocky Road in the fridge for at least two hours.

8) Use the greaseproof paper to help remove the slab of Rocky Road from the tin, then carefully cut it into equal pieces.

9) Lightly dust the Rocky Road with a little icing sugar and  enjoy!

Rocky Road should keep for up to a week stored in an airtight container, or you can keep it in the fridge if your home is a little warm.

image

If you want to keep up to date with my kitchen adventures on instagram, you can find me @titchyton.

Gluten Free American Style Chocolate Chip Cookies

Today I’m really excited to share with you my recipe for Gluten Free American Style Chocolate Chip Cookies!
image2-2
I’ve been having really bad cookie cravings since I caught a whiff of freshly baked cookies wafting out from Millie’s Cookies while I was walking around Westfield a few weeks ago…

I know you can buy gluten free cookies from the supermarket, but they’re not the same! You might think I am being picky, but supermarket versions are rather chunky and crunchy, not soft and chewy like the ones you can buy freshly made from bakeries.

I decided the only thing for it was to make my own and although I haven’t had a proper cookie in over three years, these cookies are exactly like what I remember! They have a slightly crunchy outside and a lovely soft and chewy centre bursting with chocolate chips.
image1
The trick to making the best chocolate chip cookies to make sure you don’t over bake them. I accidentally over baked the first few which made them a bit too hard, but if you take them out of the oven while they are still quite soft and leave them to set on the baking tray your cookies will retain their chewy centre.

Gluten Free American Style Chocolate Chip Cookies – GF/DF options

Ingredients
175g gluten free self raising flour
100g rice flour
2 tsp cornflour
A pinch of salt
150g butter, melted (or dairy free alternative like Stork Baking Block)
125g caster sugar
75g light brown sugar
2 tsp vanilla extract
2 egg yolks
1 tbsp milk
150g milk or dark chocolate chips (or dairy free alternative)

Method

1. In a large bowl, mix together the flours and the sugar.

2. Add the melted butter, vanilla extract, egg yolks and milk. Mix until all the ingredients are combined then fold through the chocolate chips.

3. Wrap the cookie dough in cling film, then chill the dough in the fridge for a few hours until it has firmed up.

4. Heat oven to 180 C/160 fan/gas mark 3.

5. Line two large baking trays with baking parchment.

6. Separate the dough into pieces that weigh approximately 35g each and roll each one into a ball shape.

7. Place the balls of dough on the prepared baking trays making sure you leave room for the cookies to spread out as they bake.

8. Bake the cookies for 12 – 15 minutes. The cookies should be golden brown and will remain quite soft – don’t be tempted to bake them for longer.  If the cookies have puffed up a bit, gently press them down with your fingers a few times towards the end of the bake so you don’t end up with cookies which are too dense and cake like.

9. Leave the cookies to firm up on the baking tray then carefully transfer them to a wire rack to cool completely.
image2
Tis almost the season to be jolly, so I will have plenty of Christmas recipes coming real soon. In the meantime, come and follow me over on Instagram or Facebook to see what else I’m getting up to!