Gluten Free American Style Chocolate Chip Cookies

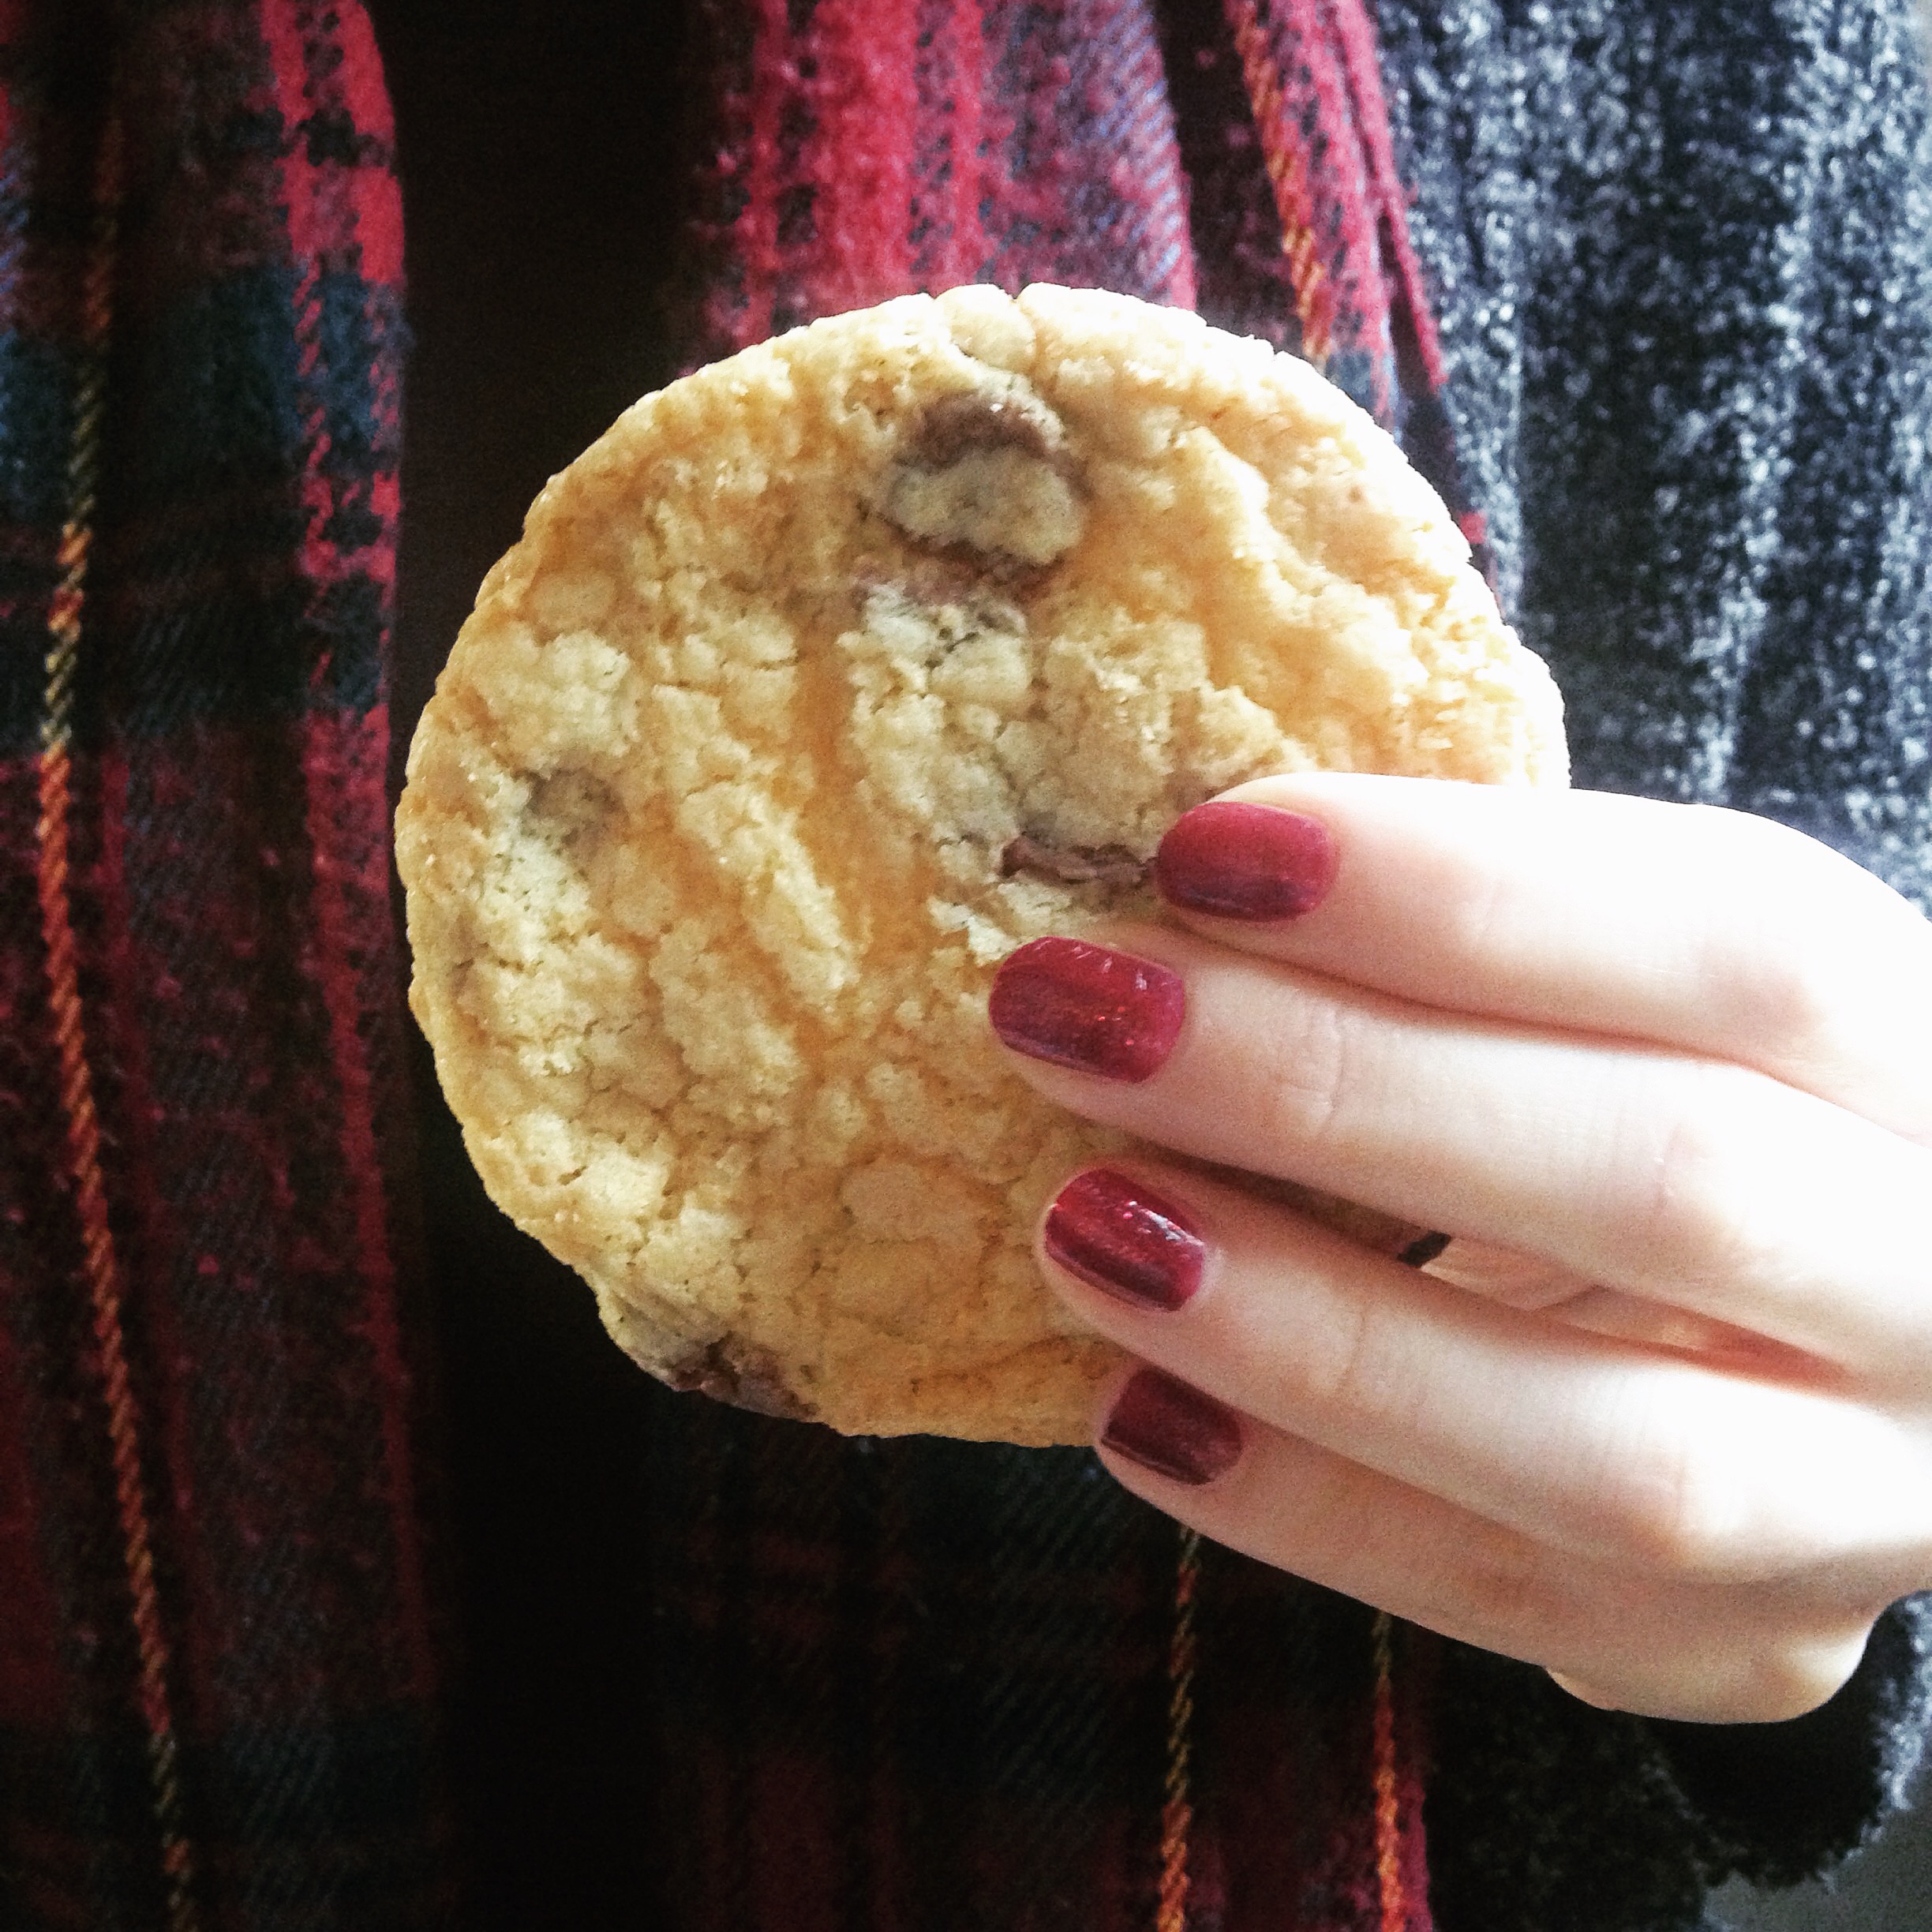
Today I’m really excited to share with you my recipe for Gluten Free American Style Chocolate Chip Cookies!
image2-2
I’ve been having really bad cookie cravings since I caught a whiff of freshly baked cookies wafting out from Millie’s Cookies while I was walking around Westfield a few weeks ago…

I know you can buy gluten free cookies from the supermarket, but they’re not the same! You might think I am being picky, but supermarket versions are rather chunky and crunchy, not soft and chewy like the ones you can buy freshly made from bakeries.

I decided the only thing for it was to make my own and although I haven’t had a proper cookie in over three years, these cookies are exactly like what I remember! They have a slightly crunchy outside and a lovely soft and chewy centre bursting with chocolate chips.
image1
The trick to making the best chocolate chip cookies to make sure you don’t over bake them. I accidentally over baked the first few which made them a bit too hard, but if you take them out of the oven while they are still quite soft and leave them to set on the baking tray your cookies will retain their chewy centre.

Gluten Free American Style Chocolate Chip Cookies – GF/DF options

Ingredients
175g gluten free self raising flour
100g rice flour
2 tsp cornflour
A pinch of salt
150g butter, melted (or dairy free alternative like Stork Baking Block)
125g caster sugar
75g light brown sugar
2 tsp vanilla extract
2 egg yolks
1 tbsp milk
150g milk or dark chocolate chips (or dairy free alternative)

Method

1. In a large bowl, mix together the flours and the sugar.

2. Add the melted butter, vanilla extract, egg yolks and milk. Mix until all the ingredients are combined then fold through the chocolate chips.

3. Wrap the cookie dough in cling film, then chill the dough in the fridge for a few hours until it has firmed up.

4. Heat oven to 180 C/160 fan/gas mark 3.

5. Line two large baking trays with baking parchment.

6. Separate the dough into pieces that weigh approximately 35g each and roll each one into a ball shape.

7. Place the balls of dough on the prepared baking trays making sure you leave room for the cookies to spread out as they bake.

8. Bake the cookies for 12 – 15 minutes. The cookies should be golden brown and will remain quite soft – don’t be tempted to bake them for longer.  If the cookies have puffed up a bit, gently press them down with your fingers a few times towards the end of the bake so you don’t end up with cookies which are too dense and cake like.

9. Leave the cookies to firm up on the baking tray then carefully transfer them to a wire rack to cool completely.
image2
Tis almost the season to be jolly, so I will have plenty of Christmas recipes coming real soon. In the meantime, come and follow me over on Instagram or Facebook to see what else I’m getting up to!

Gluten Free Ginger Cake

Autumn is here and as the weather turns colder I look forward to all the flavours the new season has to offer. Gone are the summer fruits, in are the wintery comfort foods and what could be more comforting than slice of warm and spicy ginger cake?

image

In my opinion, comfort food should be as fuss free and simple to achieve as possible. My ginger cake recipe is exactly that and requires no advanced techniques – simply mix the ingredients together and bake!

This cake certainly packs a punch and has a very strong spicy ginger flavour, so feel free to use less ginger if you’d prefer a milder flavour.

image 
Ginger Cake – GF/DF options

Ingredients:
200g gluten free self raising flour
200g light brown sugar
2 – 3 tsp ground ginger
1 tsp bicarbonate of soda
55g unsalted butter, melted (or dairy free alternative)
2 large eggs
1 tbsp golden syrup
1 tbsp black treacle
100ml strong black tea, cooled

Method:

1. Preheat the oven to 180 C/160 C fan/gas mark 4 then grease and line a 2lb loaf tin with baking parchment.

2. In a large bowl: Mix together the flour, sugar, ginger and bicarbonate of soda.

3. In a separate bowl: whisk together the eggs, golden syrup and treacle.

4. Make a well in the centre of the ingredients, add the egg mixture, melted butter and tea then mix until you are left with a smooth and lump-free batter.

5. Pour the mixture into the prepared loaf tin. Bake for 30 – 35 minutes, when the cake is done it should be firm to touch.

6. Turn the cake out onto a wire rack and leave to cool before serving.

image

This cake matures really well and tastes even better after a day or two. If you can wait, wrap your cake in some greaseproof paper and store it in an air tight container for at least 12 hours before you tuck in – the longer you leave his cake, the sticker it gets! This cake will be at it’s best for at least 5 days and keeps for up to 7 days, if stored properly in an airtight container.

Gluten Free Profiteroles (Inspired by ‘The Great British Bake Off’)

There’s only one week to go until the final of GBBO 2015 and we find out who the winner is. A few weeks ago I predicted that Ian, Tamal and Nadiya would be the remaining three bakers in the final, but it’s really hard to predict a winner because we all know that in the tent anything could happen! Tamal and Nadiya have been my favourites from the very beginning so I will be happy if either of them win.

Since my last post we have seen the remaining bakers tackle Patisserie in the Quarter-final and Chocolate in the Semi-final. Today I am going to share with you my recipe for gluten free Profiteroles which incorporates an element from both shows – Choux pastry and Chocolate!

image  
I always thought that Choux Pastry would be impossible to make gluten free but it’s actually very straight forward and not unlike making normal Choux!

I strayed slightly from the traditional method of making Choux by adding a small amount of baking powder – normally you would just use plain flour, but I’ve found that adding baking powder helps to give that extra little bit of oomph. This recipe is also Xanthan Gum free which is ideal for those who struggle to tolerate Xanthan Gum and other binding agents.

image

 Profiteroles – GF/DF options

For the Profiteroles:
60g gluten free plain flour
1/4 tsp baking powder
1 tsp caster sugar
55g unsalted butter (or dairy free alternative)
110ml cold water
1 to 2 eggs

For the filling:
350 ml double cream (or dairy free alternative)

For the topping:
100g good quality milk or dark chocolate (or dairy free alternative)
100ml double cream (or dairy free alternative)

1. Preheat the oven to 200 degrees C/Gas Mark 5.

2. Line two baking trays with greaseproof paper.

3. Sift together the baking powder and flour in a small bowl then set aside.

4. Place a heavy bottomed pan over a low to medium heat, add the water, sugar and butter and bring the ingredients to a gentle simmer.

5. Once the butter has melted, remove the pan from the heat and quickly beat in the flour until all the ingredients come together in a smooth ball.

6. Transfer the dough to a large mixing bowl and beat it gently for a few seconds with a wooden spoon to help release some steam – this will help the mixture to cool down.

7. In small bowl whisk the eggs to break up the yolks.

8. Once the pastry mixture is cool, add the eggs a bit at a time whilst beating with an electric hand mixer – don’t add the eggs whilst the mixture is hot or you will end up with scrambled eggs!

9. At first the mixture will look a little bit lumpy but keep beating and adding the egg bit by bit until the pastry becomes smooth. You won’t need to add all the egg and you want to avoid making the mixture too runny as it will be difficult to pipe – the mixture at the right stage should stretchy and have some elasticity when you remove the electric mixer.

10. Transfer the mixture to piping bag and pipe little blobs onto the baking sheets a few cm apart – you don’t need to be too neat.

11. Bake for 25 – 30 minutes until the profiteroles have puffed up and are golden brown in colour – they should be crispy and quite dark in colour or they will go soggy when you fill them.

12. Whilst the Profiteroles are in the oven, make the chocolate topping so that it has time to cool. Melt the chocolate slowly in a heatproof bowl over a pan of simmering water, then add the cream and whisk vigorously to incorporate the ingredients. Leave the mixture to cool in the fridge until required.

13. Remove the profiteroles from the oven and prick the base of each one with a cocktail stick to help release some steam. Transfer them to a wire rack to cool.

14. Whisk the cream with an electric hand mixer until it creates stiff peaks, then transfer to an icing syringe or a piping bag with a fine nozzle. Create a small hole in the base of profiterole and gently fill each one with cream – be careful not to do this too quickly as the the force could cause the pastry to tear.

15. Spread the cooled chocolate topping on the top of each profiterole, then arrange them onto a plate ready to be served!

I hope everyone is looking forward to the GBBO Final as much as I am, let me know what you’re going to bake in celebration in the comments below or come and see what I’m getting up to on Instagram or Facebook.