Gluten Free Easter Chocolate Log

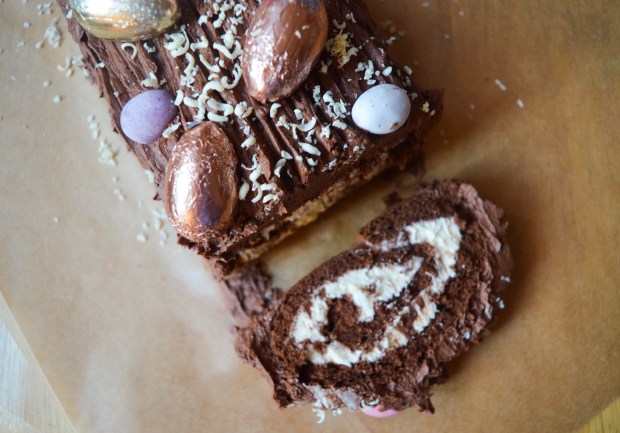
My final Easter recipe this is year is my Gluten Free Easter Chocolate Log recipe – the perfect bake for chocoholics and a beautiful centrepiece for any Easter Sunday gathering.

IMG_4661   I know chocolate logs are more traditionally eaten at Christmas, but I think this fun update on a classic works for Easter too!

IMG_4704

I promise you that this recipe is much easier to make than it looks – the trick is to make sure whip up your eggs and sugar until they are super voluminous!


Easter Chocolate Log – GF

For the Swiss Roll:

80g golden caster sugar
3 large eggs
60g gluten free self raising flour
20g cocoa powder
20g butter, melted and cooled.

For the Icing:

350g butter, softened
350g icing sugar
2 tbsp cocoa powder
2 tsp vanilla extract
White chocolate, for decorating.

Method

1. Preheat the oven to 200 C/180 C fan/gas mark 6, then grease and line a Swiss roll tin or a baking tray with slightly raised sides with baking parchment.

2. Sift together the gluten free flour and cocoa powder in a large bowl then set aside.

3. Place the eggs and sugar into large bowl and beat the ingredients using an electric hand mixer for about 5 minutes, until the ingredients are pale, fluffy and have tripled in volume. Make sure the mixture has reached ‘ribbon stage’, which means that when you remove the whisk the mixture falling from the whisk leaves a ribbon like trail.

4. Fold in the flour mixture bit by bit, being careful not to knock out the air from the mixture.

5. Carefully fold through the cooled melted butter.

6. Pour the mixture into the prepared tray or tin, tilting the tray to level out he mixture.

7. Bake for 8-10 minutes, until the sponge starts to shrink away from the sides of the tin and the top is firm to touch.

8. Place a large sheet of baking paper onto a work surface. While the cake is still hot, place it upside down onto the paper, then carefully remove the tray and the baking paper.

9. Roll up the cake so that the paper is inside in the Swiss roll, then leave to cool completely.

10. To make the icing, beat the softened butter and icing sugar together until light and fluffy. Split the mixture between two separate bowls – into one mix the vanilla extract and into the other mix the cocoa powder.

11. Carefully unroll your Swiss Roll and spread the vanilla icing over the sponge, then gently roll it back up.

12. Place the Swiss Roll onto a serving plate, then cover it with the chocolate icing using a palate knife. Use a fork to make a ‘bark like’ affect, then decorate with chocolate eggs of your choice and grated chocolate.

IMG_4657

I love seeing your take on my bakes, so remember to share your a picture of your bakes over on Facebook, twitter or Instagram using the hashtag #titchytonbakes.

I hope everyone has a fantastic Easter!


Gluten Free American Style Pancakes with Chocolate Sauce

Today I’m going to share with you my recipe for Gluten Free American Style Pancakes and Chocolate Sauce – the perfect pancake recipe for the perfect Pancake Day!

image

I recently purchased a crêpe pan, so every day in February has been pancake day and this recipe has been more than triple tested!

When I put together this recipe my   scales had run out of battery, so I had to rely on measuring cups which I don’t often do with gluten free flour – but I think with batter recipes there is a little give and take with the ingredients and the recipe be easily adjusted if you accidentally add too much flour or milk.

Every time I made this batter it was spot on, but if you think your batter is a little thick and doesn’t spread out in the pan, add a little bit more milk, or, if it’s a little runny add a tablespoon of flour.

For a totally foolproof Pancake Day I highly recommend purchasing a crêpe pan or a good quality non stick frying pan – I speak from experience, as of my pancake day plans have been thwarted by a lack of a good frying pan!

image


American Pancakes with Homemade Chocolate Sauce – GF/DF options

Ingredients

For the Pancakes:

1 cup of gluten free self raising flour
1 tsp baking powder
2 tbsp caster sugar
1 tsp vanilla extract
2 tbsp melted butter, plus extra for frying (or dairy free alternative)
2  eggs
1 cup of semi skimmed milk

For the Chocolate Sauce:

100g good quality milk or dark chocolate (or dairy free alternative)
100ml double cream

You’ll also need a good quality non stick crêpe or frying pan. 

Method:

1. In a large bowl, mix together the gluten free flour, sugar and baking powder.

2. Add the egg and vanilla extract, then using a whisk start to bring the ingredients together.

3. Add the milk and butter and continue to whisk until you’re left with a smooth lump free batter.

4. Heat the oven to 100 degrees C/gas mark 1.

5. Leave the batter to stand while you heat up a non stick crêpe or frying pan. Brush the crêpe pan with butter using a pastry brush and wipe away any excess butter with kitchen towel. Place the pan over a medium to high heat until hot.

6. Spoon half a laddle of batter into the pan. Fry the pancake until bubbles form on top (this should take between 1 and 2 minutes) then flip your pancake over and cook the other side for a further minute or until golden brown. Place the pancake onto a non stick tray in the  preheated oven so that it stays warm.

7. Repeat with the remaining batter, brushing your pan with butter in between each pancake.

8. To make the chocolate sauce, gentle melt together the chocolate and the cream in heatproof bowl over a pan of simmering water. Stir until the ingredients are combined and then bring the bowl off the heat.

9. Serve the pancakes with the toppings of your choice – I highly reccomend strawberrries and chopped hazelnuts as they compliment the chocolate sauce beautifully.

image

I love seeing your take on my bakes, so remember to share your a picture of your perfect pancakes over on Facebook, twitter or Instagram using the hashtag #titchytonbakes.

Gluten Free Cocoa Pops Recipe

Every year I make it my New Years Resolution to eat breakfast every single day – but, every year I fail miserably and just end up  feeling pretty bad about myself and my lack of willpower. So this year, instead of coming up with resolutions I know I won’t keep, I decided to challenge myself to come up with fun breakfast ideas and to just enjoy food more.

My breakfast of choice used to be cereal and wouldn’t just eat it for breakfast, I’d have it as an after school snack or for a late night feast – now, I can’t eat most cereals as a lot of popular brands aren’t gluten free, and haven’t found many gluten free cereals which I really like or that don’t contain copious amount of sugar and additives.

This morning I had a huge craving for Coco Pops, so I decided to try to make my own homemade version and I’m very pleased with how they turned out.imageThese homemade Cocoa Pops are super easy to make – you only need four very basic ingredients and they can whipped up in less than 20 minutes. The recipe uses a natural alternative to refined sugar and is both dairy and gluten free, but I promise they are delicious and taste just as good, if not better than the shop variety!

image


Cocoa Pops – GF/DF/EG

Ingredients

3 cups puffed rice
60 ml maple syrup
30 ml sunflower oil
1 tbsp cocoa powder

Method

1. Preheat the oven to 160 C/140 C/gas mark 3 and line two large baking trays with greaseproof paper.

2. Place the maple syrup, oil and cocoa powder into a sauce pan and place it over a low heat. Stir the ingredients with a wooden spoon until no lumps remain, then fold through the puffed rice until it is fully coated in the cocoa mixture.

3. Spread the mixture into a thin layer across the two baking trays. Bake for 6 – 8 minutes, until the puffed rice becomes crisp – make sure to give the cereal a stir half way through the bake time.

4. Leave the cereal to cool on the baking trays for a few minutes, then it’s ready to enjoy!

image

Gluten Free Christmas: Coconut Snow Cupcakes

It’s almost Christmas Day! It’s been a busy festive season for me, but I still have one Christmas recipe to share with you this year –  my Gluten Free Coconut Snow Cupcakes.imageThese cupcakes are a little different to your traditional Christmas bakes, perfect for anyone who isn’t a big fan of dried fruit but still festive enough to be served on Christmas Day – I think they would also be lovely served at a New Years Eve party! imageI got these cute star decorations from HEMA – they are actually cocktail sticks but I thought they would make cute cupcake toppers, but you can use any cupcake toppers or edible decorations of your choosing!


Coconut Snow Cupcakes – GF/DF options

Ingredients

For the sponge:

200g golden caster sugar

200g butter, softened (or dairy free alternative)

200 gluten free self raising flour

2 tbsp dessicated coconut

1 tsp baking powder

3 tbsp milk (or dairy free alternative)

1/2 vanilla pod deseeded (or 2 tsp of vanilla extract)

1/2 tsp coconut extract (optional)

2 large eggs

For the buttercream icing:

150g unsalted butter, softened (or dairy free alternative)

250g icing sugar, plus extra for dusting

1 tsp vanilla extract

To  decorate:

3 tbsp dessicated coconut

edible glitter (optional)

Method

1) Preheat the oven to 160 C/140 c fan/gas mark 3 and line a cupcake tray with cupcake cases.

2) In a large bowl, stir together the flour, baking powder and bicarbonate of soda.

3) In a separate bowl cream the butter, vanilla extract and sugar together with an electric hand mixer until light and fluffy.

4) Scrape down the sides of the bowl with a spatula. With the mixer on a low speed, add the egg a bit at a time along with a tablespoon of the flour mixture.

5) Once the egg is fully combined, add the rest of the flour and the milk until you are left with a smooth mixture.

6) Spoon approximately one and a half tablespoons of the mixture into each cupcake case, being careful not to overfill them.

7) Bake for approximately 20 – 22 minutes – the cupcakes are ready when they are golden brown and firm to touch.

8) Leave the cupcakes to cool in the tin for a few minutes, then transfer them to a wire rack to finish cooling while you prepare the buttercream icing.

9) To make the buttercream, beat the butter, icing sugar and vanilla extract with an electric hand mixer until light and fluffy and almost white in colour.

10) Once the cupcakes have cooled, spread the buttercream forest in over each cupcake using a palate knife, then sprinkle each one with desiccated coconut and a touch of edible glitter to finish.

image

That’s it for my Christmas recipes this year! If you’re looking for more gluten free Christmas baking inspiration why not check out my Gluten Free Stollen Muffins, Gluten Free Gingerbread Wreath or you can find a full list of my Christmas recipes over on my Recipes page.


Gluten Free Christmas: Stollen Muffins

It’s beginning to look a lot like Christmas… and I don’t know about you, but I’m rather glad. It’s been a scary and rather uncertain year with everything that has been going on in the world, so I’m grateful for a distraction and I hope that a bit of Christmas cheer will help to take my mind off it… and yours too!

So, get ready for my first Christmas recipe of the year and prepare to feel fabulously festive.

image

My Gluten Free and Dairy Free Stollen Muffins are every bit as tasty as actual Stollen and are the perfect way to get your Stollen fix, without the hassle of making bread.

Stollen is a German Christmas bread which usually contains dried fruit, almonds, marzipan and spices, such as cinnamon. These muffins are chock full of everything you’d find in traditional stollen, but with a dash of my favourite tipple for good measure, because it’s Christmas!

image


Stollen Muffins – GF/DF

Ingredients

2 – 3 tbsp Cointreau (you could also use Brandy, Rum or Amaretto)
200g mixed dried fruit (I used sultanas/raisins/cherries/mixed peel)
300g gluten free self raising flour
Zest of an orange
1 tsp ground cinnamon
1/2 tsp ground ginger
1 tsp baking powder
1/2 tsp bicarbonate of soda
150g ready to roll marzipan (chopped into small pieces)
100g caster sugar
50g light brown sugar
2 large eggs
100 ml sunflower oil
200 ml almond milk
1 tsp almond extract
1/2 vanilla extract
50g flaked almonds

Method

1) Leave the mixed fruit to soak in Cointreau overnight.

2) Preheat the oven to 180 C/160 C fan/gas mark 4 and line a muffin tin with muffin cases.

3) In a large bowl, stir together the flour, baking powder, bicarbonate of soda, orange zest, cinnamon and ginger, then stir through marzipan.

4) In a separate bowl, whisk together eggs, sugar, oil, almond milk, vanilla extract and almond extract until combined, then add this to the dry ingredients.

5) Gently mix together all the ingredients using a wooden spoon until you are left with a batter which is only just combined (don’t worry too much if there are any lumps), then stir through the dried fruit and the flaked almonds.

6) Spoon approximately 2 tablespoons of batter into each muffin case, then bake for 25 minutes, until golden brown.

7) Leave the muffins to cool completely on a wire rack, before dusting them with icing sugar to finish.

Be sure to store the muffins in an air tight container and they will last for 4 to 5 days.

image

Keep your eyes peeled for lots more Christmas recipes coming soon, but in the meantime why not try some of my Christmas recipes from previous years:

Gluten Free Gingerbread Cookies

Gluten Free Hazelnut, Cranberry and Orange Biscotti

Gluten Free Cointreau Christmas Cake

Gluten Free Kransekake (Traditional Scandinavian Cake)

Gluten Free Buckwheat and Peanut Butter Flapjacks (No Oats)

Today I’m going share with you my Gluten Free Buckwheat and Peanut Butter Flapjack recipe.

image

I have been working on this recipe for a while, after a kind request from a friend who struggles to tolerate oats. The objective was simple: create a flapjack that looks and tastes like a traditional flapjack but that doesn’t contain any oats, not even gluten free ones.

I happily excepted the challenge because there are many Coeliacs who struggle to tolerate gluten free oats (despite the fact that they are considered to be okay) and there are many looking for an alternative that will work for them.

When I was looking for an oat subsitute I came across some gluten free Buckwheat flakes in my local health food shop; they are slightly paler in colour than oats but are similar in size and texture so I thought they would work well – If you think you can tolerate buckwheat then this recipe might be worth a shot.

It took a few attempts to get the recipe just right. The first attempt resulted in a flapjack that was so crumbly that I couldn’t even cut it into squares and the second attempt was a complete disaster when I accidentally over baked them and they turned out as hard as rocks – oops!

It was definitely third time lucky. The final attempt resulted in the perfect buttery, and chewy flapjack which didn’t crumble at the slightest touch – result!

image

I deviated slightly from the brief and used peanut butter which I know isn’t particularly traditional, but I love the flavour! If you’d prefer a more traditional flapjack or have a nut allergy you can miss out this ingredient and they will work just as well.

Free Buckwheat and Peanut Butter Flapjacks – (GF/EG/DF options)

Makes approximately 16 flapjacks

Ingredients

175g unsalted butter (or dairy free alternative)
2 tbsp crunchy peanut butter
2 tbsp golden syrup
150g soft brown sugar
300g buckwheat flakes

Method

1. Preheat the oven to 150 C/130 C fan/gas mark 2, then throughly grease and line a square tin (20cm x 20cm) with greaseproof paper.

2. Melt the butter in a large heavy bottomed pan over a medium heat. Once the butter has melted add the peanut butter, golden syrup and brown sugar then stir until the sugar has completely dissolved and you can no longer feel any grains scraping the bottom of the pan.

3. Add the Buckwheat flakes and mix until all the ingredients are fully combined. Spoon the mixture into the prepared tin, spreading it right into the corners and pressing it down flat with the back of a spatula.

4. Bake for about 20 to 25 minutes. The flapjack is ready when the top becomes a beautiful golden brown and is soft to touch – do not be tempted to bake it for longer; although the flapjack will seem too soft, it will firm up as it cools down.

5. Leave the flapjack to cool completely before cutting into squares (5cm x 5cm) – if you attempt to cut the flapjacks before they are properly cold they will crumble, so patience is definitely a virtue!

I hope you like this recipe and give it try!

If you want to keep up to date with my kitchen adventures you can find me on Instagram @titchyton or on my Facebook page.

No Churn Raspberry and Mascarpone Ice Cream

After what has seemed like months of endless grey clouds and drizzle, the sun finally decided to grace the UK with its presence and Britain has just enjoyed a week of uncharacteristically warm weather, which some of us Brits are quite frankly not used to.

Despite the fact it has been uncomfortably hot at points, I have tried to make the most of the sunshine as it will be over all too soon and at the weekend I had my first (and probably last) barbecue of the year and made homemade ice cream.

image

When I think of summer one of the first things that pops into my mind is ice cream. When I was a little girl my dad worked as an ice cream man and the summer holidays consisted of playing outside with my sisters, endless supplies of ice cream and ice lollies and the occasional trip out in the ice cream van, if I was good!

So, I’m sure you’ll understand why the hot weather meant that I just had to have ice cream and what could be a more perfect excuse to make my own? It’s also surprisingly  easy – it’s a no churn recipe, so you don’t need an ice cream machine but an electric whisk is always a good idea.

When it came to choosing flavours, I decided to use mascarpone cheese as a nod to my Dad (he’s Italian so it seemed like the perfect ingredient) and raspberry which is a lovely sharp contrast to the creamy mascarpone – this recipe is incredibly versatile though, so you can go to town creating tonnes of interesting flavour combinations!

No Churn Mascarpone And Raspberry Ice Cream

For the Raspberry Sauce:
125g fresh raspberries
1 tbsp caster sugar
25 ml cold water

For the Ice Cream:
250g cheese mascarpone, room temperature
397g can sweetened condensed milk
600 ml double cream
1 tsp vanilla extract

Method: 

1. To make the raspberry sauce: place the raspberries, sugar and water into a food processor and blend to a puree. Push the purée through a sieve to remove the seeds then set it aside for later.

2. For the ice cream, soften the mascarpone cheese with an electric whisk until it is very soft, add the condensed milk and vanilla extract then whisk until the mixture is smooth. In a separate bowl, whisk the double cream until it forms soft peaks, gently fold through the condensed milk and mascarpone mixture without knocking too much volume from the cream, but ensuring that all the ingredients are combined.

3. Drizzle half of the raspberry sauce over the ice cream mixture but don’t fold it through. Spoon the mixture into a large freezable container and place in the freezer for at least 6 hours or overnight and refrigerate the remaining raspberry sauce.

4. Thaw the ice cream before serving with the remaining raspberry sauce.

Honey Roasted Chicken, Feta and Quinoa Salad with Sticky Sautéd Tomatoes

Today I’m going to share with you one of my most favourite creations, my Chicken, Feta and Quinoa Salad with Sticky Sautéd Tomatoes. This is a recipe which I come back to time and time again because it’s super easy to prepare and incredibly tasty.

image

I made this for my sister on her most recent trip to London, I had offered to make us both lunch and wanted to serve something more interesting than your usual lunchtime fodder.

Personally I think this salad ticks all the boxes. For a start, there is not a bland lettuce leaf in sight which instantly makes it infinitely more appealing. The base of my salad is made up of quinoa, a grain which is a fantastic source of protein and dietary fibre, and if prepared in the right way can be incredibly flavoursome.

The rest of the ingredients are far from boring, the chicken breast is roasted in sweet and sticky honey which contrasts wonderfully to the salty feta and refreshing cucumber, but without a doubt the absolute star of this dish is my sticky sautéd tomatoes which I am completely obesessed with – you’ll know why, once you’ve tried them!

The salad is topped off with a handful of pomegranate seeds and a bunch of parsley… I tried to get some leaves in there, somewhere!

Honey Roasted Chicken, Feta and Quinoa Salad with Sticky Sautéd Tomatoes – GF/EF

Serves 2 – 3 

For the Salad:
120g Quinoa, rinsed (I used a mix of white/black/red quinoa)
500ml water, brought to the boil
1 chicken stock cube
400g diced chicken breast
1 tbsp olive oil
2 tbsp honey
1/2 a cucumber, deseeded and chopped into half moon shapes.
50g Feta cheese
A bunch of fresh parsley
12 cherry tomatoes
1 tbsp red wine vinegar
1/2 tsp caster sugar
A handful of pomegranate seeds (optional)

For the Dressing:
Lemon juice
Olive Oil
Salt and Pepper to season

Method:

1. Preheat oven to 180 degrees C/160 fan/gas mark 4.

2. Coat the chicken in olive oil and honey, then season it with black pepper.

3. Bake the chicken in the preheated oven for 20 minutes. To check the chicken is cooked, make sure the meat is white and that no pink remains.

4. Whilst the chicken is cooking, place the quinoa into pan of boiling water and crumble over a stock cube. Stir and reduce the pan to simmer, then cook for 15 minutes until the quinoa is soft.

5. Drain quinoa and leave it cool slightly.

6. To make the sticky tomatoes: heat up a dash of olive oil in a frying pan over a medium heat. Add the cherry tomatoes and cook for a minute or two, until they start to become slightly wrinkly. Add the red wine vinegar and sugar, then stir to coat the tomatoes until they become sticky.

7. Serve your salad on a large serving plate. Start with the quinoa on the bottom, layer up the slices of cucumber, feta, chicken and tomatoes, then top with fresh parsley and pomegranate seeds.

8. Drizzle over olive oil and a squeeze of lemon. Season with black pepper and serve with wedge of lemon on the side.

image


Gluten Free Lemon Drizzle Cake

Last weekend I went to stay with my sister and her boyfriend up in Leeds and on a rather dull and grey sunday afternoon, we decided to bake a Lemon Drizzle cake.

image

My family are not coeliac or on a gluten free diet, but they are always happy to try and critique my gluten free cakes whenever I’m around and I’m happy to report that they think they taste just as good as normal cakes!

image

When I was little, my mum used to make the most delicious lemon flavoured Madeira cake and have I tried to create a gluten free version of her Madeira cake as the base of my Lemon Drizzle.

Here a few snaps of our afternoon:

Lemon Drizzle Cake – GF/DF options

Ingredients

For the cake:

175g caster sugar
175g butter, softened
225g gluten free self raising flour
1 tsp baking powder
3 large eggs
1 tbsp lemon zest from an unwaxed lemon
3 tbsp lemon juice

To decorate:
150g icing sugar
3 – 4 tsp lemon juice
Finely grated lemon zest

Method

1. Preheat oven to 170 C/150 C fan/gas mark 4 then grease and line a 2 lb loaf tin with greaseproof paper.

2. Sift together flour and baking powder then stir through lemon zest.

3. In a separate bowl, cream together the butter and sugar with an electric hand mixer until pale, light and fluffy. Add the eggs one at a time along with one tablespoon of the flour to stop the mixture from curdling.

4. Stir through the remaining flour and lemon juice and mix until all ingredients are fully combined.

5. Spoon the mixture into the prepared loaf tin, then bake for 50 – 55 mins minutes.

Insert a skewer into the middle of the cake to check if it’s cooked– if it comes out clean the cake is ready.

6. Allow the cake to cool in the tin for a few minutes, before turning it out on a wire rack to cool completely before decorating.

7. To make the icing: sift the icing sugar into a bowl, add the water slowly whilst stirring – the icing shouldn’t be too runny but should be spreadable.

8. Spread the icing over the top of the cake, allowing it drip down the sides.

To finish, sprinkle finely grated lemon zest across the top of the cake.

image

Gluten Free Easter: Mini Egg Millionaire Shortbread

It doesn’t feel like two minutes since Christmas, but March is here, Easter is almost upon us and I’m excited to be sharing with you my first Easter recipe of the year – Gluten Free Mini Egg Millionaire Shortbread.

image
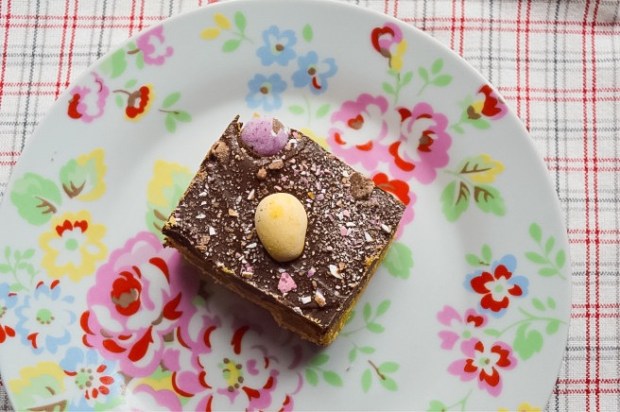
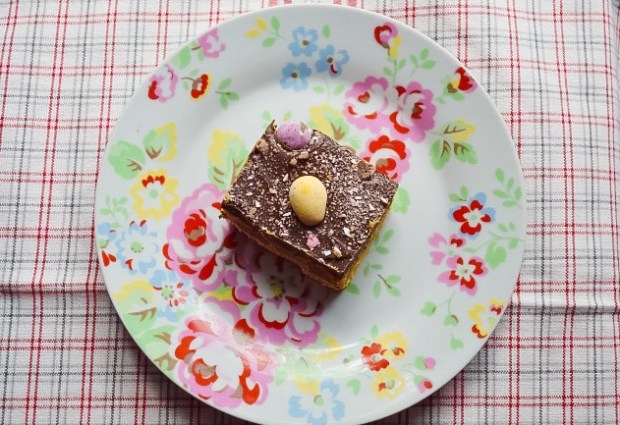
I’m rather obsessed with Millionaire Shortbread and Mini Eggs are quite possibly my favourite Easter confectionary, so I just had to put them together in a bake!

I don’t know what I’d do if Mini Eggs weren’t gluten free, but they do contain Maltodextrin, which whilst being a gluten free ingredient can sometimes prove troublesome for Coeliacs. There are a couple of supermarket alternatives out there, however, which don’t contain maltodextrin, including ‘Micro Easter Eggs‘ from Sainsbury’s and ‘Chicky Choccy Eggs’ from M&S. ‘Galaxy Golden Eggs‘ are also gluten free and would create and interesting finish.


This bake would make a lovely treat for the children after a busy Easter Egg hunt and is the perfect way to use up any left over Mini Eggs after Easter!

image

Ingredients

For the shortbread base:
275g gluten free self raising flour
175g unsalted butter, cut into cubes
100g caster sugar

For the caramel layer:
1 x 397g tin of condensed milk
100g unsalted butter
100g dark brown sugar

For the chocolate layer:
200g dark chocolate
100g milk chocolate

To decorate:
1 x bag of mini eggs

Method

1. Preheat oven to 160 degrees C/gas mark 3 then grease and line a 20 x 20 square tin with greaseproof paper.

2. To make the shortbread base, mix together the flour and sugar in large bowl, then rub in the butter until you are left with a breadcrumb like texture.

3. Start to bring mixture together with your hands until you have a smooth ball of dough.

4. Press the dough into the tin, smoothing it into an even layer that reaches the corners of the tin.

5. Bake for 25 – 30 minutes or until golden brown, then set it aside to cool whilst you make the caramel.

6. To make the caramel, place the butter into a large microwavable bowl and heat until melted. Add the sugar and give the ingredients a good mix until you can’t feel any grains of sugar on the bottom of the bowl – you may need to heat it again for another 30 seconds or so to encourage the sugar to dissolve throughly.

7. Add the condensed milk and heat for a further two minutes before whisking the ingredients throughly with a balloon whisk. Heat the caramel for a further 4 – 5 minutes, giving it a good whisk after each minute.

8. Drop a little bit of the caramel into a glass of cold water – if the mixture can be rolled into soft ball then it’s ready to be used, otherwise it may need another 30 seconds in the microwave.

9. Smooth the caramel in an even layer over the shortbread base, then leave to set.

10. For the chocolate layer, gently melt the chocolate in a heatproof bowl over a pan of simmering water. Pour the chocolate over the top of the shortbread and caramel layers and smooth out with a palate knife.

11. Decorate the top with mini eggs – I broke up a few mini eggs by bashing the bag with a rolling pin which I then scattered across the top – then leave to set before cutting into equally sized pieces.

image

There will be more Easter bakes coming up very soon, but in the meantime, you can keep up to date with my kitchen adventures on Instagram or on my Facebook Page.

UPDATE – Here in the UK Mini Eggs are definitely Gluten Free, but I’ve been informed that Mini Eggs in the US may contain gluten due to potential cross contamination risks during the manufacturing process.