Gluten Free Salted Caramel Millionaire’s Shortbread (Inspired by ‘The Great British Bake Off’)

‘Bake Off’ is back and I wasn’t sure if I was going to enjoy the new series; especially as the show made a controversial move from the BBC to Channel 4 last year. I’m normally incredibly excited for the start of a new series, but this year I didn’t have quite the same enthusiasm for the show returning again. Saying that, I am I actually quite enjoying the new series and am pleased to see that the show hasn’t changed too much. I do, however, miss the old team – especially Mary Berry, can someone hurry up and make her a Dame already?!

This recipe is inspired by Caramel week,  which was a Bake Off first. We seen the bakers make Caramel before, but we’ve  never whole programme centred around it. It made for great television because Caramel can be quite unpredictable.

103F843F-2C79-454C-AC1E-259C63E1F220

I’m not sure Paul Hollywood would approve of my method of making Caramel, as it’s somewhat of a cheat to use the microwave… but, the result is perfect Caramel that sets brilliantly every time.

I’ve made Caramel on the hob many times and sometimes it’s been a bit hit and miss. Possible scenarios have included, burning myself in the process, burning the caramel to the bottom of the pan, or almost burning the house down… not with the microwave method!

74ECE43F-2091-4063-A736-BB514082ECEC

Gluten Free Millionaire’s Shortbread – GF/EF

Ingredients

For the shortbread base:
275g gluten free all purpose flour (I used Schär All Purpose Baking Mix)
175g unsalted butter, cut into cubes
100g caster sugar

For the caramel layer:
1 x 397g tin of condensed milk
100g unsalted butter
100g dark brown sugar

Approx 1/2 tsp Sea Salt – but depends on your taste!

For the chocolate layer:
250g dark chocolate
250g milk chocolate

Method:

1. Preheat oven to 160 C/140 C fan/gas mark 3 then grease and line the base and sides of a 20 x 20 square tin with greaseproof paper.

2. To make the shortbread base, mix together the flour and sugar in large bowl, then rub in the butter until left with a breadcrumb like texture.

3. Start to bring mixture together with your hands until you have a smooth ball of dough.

4. Press the dough into the tin, smoothing it into an even layer that reaches the corners of the tin.

5. Bake for 25 – 30 minutes or until golden brown, then set it aside to cool whilst you make the caramel.

6. To make the caramel, place the butter into a large microwavable bowl and heat until melted. Add the sugar and give the ingredients a good mix until you can’t feel any grains of sugar on the bottom of the bowl – you may need to heat it again for another 30 seconds or so to encourage the sugar to dissolve throughly.

7. Add the condensed milk and heat for a further two minutes before whisking the ingredients throughly with a balloon whisk. Heat the caramel for a further 5 minutes, giving it a good whisk after each 30 seconds.

8. Drop a little bit of the caramel into a glass of cold water – if the mixture can be rolled into soft ball then it’s ready to be used, otherwise it may need another 30 seconds in the microwave.

9. Stir through the sea salt and then smooth the caramel in an even layer over the shortbread base. Leave to set.

10. For the chocolate layer, gently melt the chocolate in a heatproof bowl over a pan of simmering water. Pour the chocolate over the top of the shortbread and caramel layers and smooth out with a palate knife, then leave to set before cutting the Shortbread into equally sized pieces.

E6391436-E927-45B7-9507-9B1DBD5044BB

I love seeing your take on my recipes, so remember to share a snap of your Shortbread over on Facebook, twitter or Instagram using the hashtag #titchytonbakes.

Gluten Free Strawberries and Cream Cheesecake Jars

It’s been a little too hot to bake recently, as here in the UK we’ve been experiencing a heatwave – I do like to see the sun out at last, but our country is not built to cope with heat… and neither are us Brits!

So, I’ve been eating a lot of lazy food; lots of salads (my particular favourite is a watermelon, cucumber and feta salad) and cured meats, like salami and prosciutto – basically anything that doesn’t involve standing in front of a hot stove.

I have been feeling a little sick of ice cream, so I wanted to come up with a quick, easy and refreshing no bake dessert to satisfy my sweet tooth.

My Gluten Free Strawberries and Cream Cheesecake Jars tick all the boxes – they take a matter of minutes to put together, there is no baking required and they don’t  need to be left to set.

IMG_5468

Strawberries are at their best right now and I absolutely adore them – but you could also use Raspberries or a mix of both if you prefer.

For the biscuit layer, I used Schär Gluten Free Digestive Biscuits – I prefer this brand because they are also free from oats, but you can use any kind of biscuits you like.

IMG_5473

These Cheesecake jars are best served right away, but they can be made ahead of time and popped in the fridge. They are also ideal for a picnic as they are portable – simply put the lids on and pop them in a cool bag to keep them fresh!

IMG_5471

Strawberries and Cream Cheesecake Jars – GF/EF

Makes 4 (depending on the size of your jars)

Ingredients

180g Philadelphia cheese, cold
330ml whipping cream
1 tsp vanilla extract
2 tablespoons icing sugar
150g gluten free digestive biscuits (I prefer ones by Schär, as they are also free from oats)
500g fresh strawberries, halved
Fresh mint to decorate

Method

1. Blitz the biscuits in a food processor (or crush them by hand) until they are the consistency of breadcrumbs.

2. In a large bowl, gently mix the cream cheese, icing sugar and vanilla extract together until combined. Add the whipping cream and whisk using a electric hand mixer until the ingredients form soft peaks.

3. Add a layer of the biscuit crumbs to the base of each jar, followed a layer of cream and a layer of strawberries. Repeat until the jars are full and top with mint leaves to decorate.

IMG_5474

I love seeing your take on my bakes, so remember to share your a picture of your Cheesecakes over on Facebook, twitter or Instagram using the hashtag #titchytonbakes.


Gluten Free Double Chocolate Chip Muffins Recipe (for Coeliac Awareness Week)

Today I’m going to share with you my Gluten Free Double Chocolate Muffin recipe in honour of Coeliac Awareness Week, which is being held this week between the 8th – 14th May 2017.

IMG_5136

Coeliac UK have estimated that approximately 1 in 100 people in the UK suffer with Coeliac Disease and just 24% have been properly diagnosed – which  means there are people living with undiagnosed Coeliacs Disease all across the UK, something Coeliac Awareness week is aiming to change.

You can find out more about Coeliac Awareness Week over at Coeliac UK, including ideas about how to get involved.

If you think you have have Coeliac Disease you can find out more information about the symptoms and how to go about getting a diagnosis here.

If you’ve recently been diagnosed and are new to Gluten Free baking, there is a tonne of advice over on my Ton’s Tips and Tricks page.

My Gluten Free Double Chocolate Muffins recipe is perfect for Gluten Free baking beginners as there are no difficult techniques involved – you don’t even need to worry about the batter being lumpy!

IMG_5138

This recipe was inspired by my Gluten Free White Chocolate and Raspberry Muffins recipe which I posted last year,  in that post I listed a few extra tips and tricks to achieve perfect muffins -you can find that post here.

IMG_5139


Double Chocolate Muffins – GF/DF options

Ingredients:

275g gluten free self raising flour
25g cocoa powder
1 tsp baking powder
1/2 tsp bicarbonate of soda
175g soft brown sugar
2 large eggs
100 ml sunflower oil
200ml milk (or dairy free alternative)
1 tsp vanilla extract
150g milk chocolate chips, refrigerated (or dairy free alternative)

Method:
1. Preheat the oven to 180 C/160 C fan/gas mark 4 and line a muffin tin with 8 muffin cases.

2. In a large bowl, sift together the flour, cocoa powder, baking powder and bicarbonate of soda.

3. In separate bowl, whisk together eggs, sugar, oil, milk and vanilla extract until combined then add this to the dry ingredients.

4. Gently mix the ingredients together until they form a batter which is only just combined (don’t worry too much if there are any lumps), then stir through the chocolate chips.

5. Spoon approximately 3 tablespoons of batter into each case – the cases should be about 3 quarters full.

6. Bake the muffins for 25 minutes, until golden brown.

7. Leave to cool on a wire rack before serving.

IMG_5133

Gluten Free Easter Chocolate Log

My final Easter recipe this is year is my Gluten Free Easter Chocolate Log recipe – the perfect bake for chocoholics and a beautiful centrepiece for any Easter Sunday gathering.

IMG_4661   
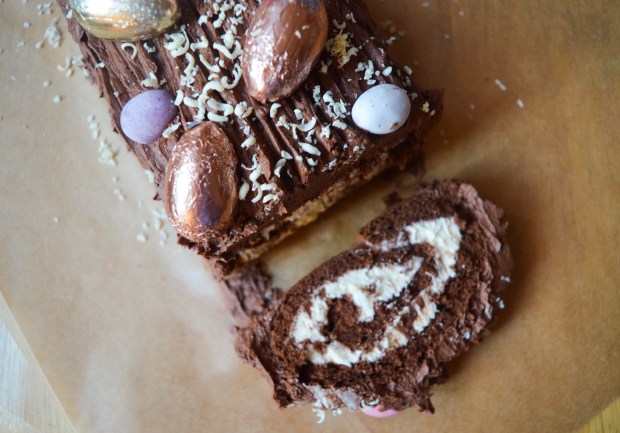
I know chocolate logs are more traditionally eaten at Christmas, but I think this fun update on a classic works for Easter too!

IMG_4704

I promise you that this recipe is much easier to make than it looks – the trick is to make sure whip up your eggs and sugar until they are super voluminous!


Easter Chocolate Log – GF

For the Swiss Roll:

80g golden caster sugar
3 large eggs
60g gluten free self raising flour
20g cocoa powder
20g butter, melted and cooled.

For the Icing:

350g butter, softened
350g icing sugar
2 tbsp cocoa powder
2 tsp vanilla extract
White chocolate, for decorating.

Method

1. Preheat the oven to 200 C/180 C fan/gas mark 6, then grease and line a Swiss roll tin or a baking tray with slightly raised sides with baking parchment.

2. Sift together the gluten free flour and cocoa powder in a large bowl then set aside.

3. Place the eggs and sugar into large bowl and beat the ingredients using an electric hand mixer for about 5 minutes, until the ingredients are pale, fluffy and have tripled in volume. Make sure the mixture has reached ‘ribbon stage’, which means that when you remove the whisk the mixture falling from the whisk leaves a ribbon like trail.

4. Fold in the flour mixture bit by bit, being careful not to knock out the air from the mixture.

5. Carefully fold through the cooled melted butter.

6. Pour the mixture into the prepared tray or tin, tilting the tray to level out he mixture.

7. Bake for 8-10 minutes, until the sponge starts to shrink away from the sides of the tin and the top is firm to touch.

8. Place a large sheet of baking paper onto a work surface. While the cake is still hot, place it upside down onto the paper, then carefully remove the tray and the baking paper.

9. Roll up the cake so that the paper is inside in the Swiss roll, then leave to cool completely.

10. To make the icing, beat the softened butter and icing sugar together until light and fluffy. Split the mixture between two separate bowls – into one mix the vanilla extract and into the other mix the cocoa powder.

11. Carefully unroll your Swiss Roll and spread the vanilla icing over the sponge, then gently roll it back up.

12. Place the Swiss Roll onto a serving plate, then cover it with the chocolate icing using a palate knife. Use a fork to make a ‘bark like’ affect, then decorate with chocolate eggs of your choice and grated chocolate.

IMG_4657

I love seeing your take on my bakes, so remember to share your a picture of your bakes over on Facebook, twitter or Instagram using the hashtag #titchytonbakes.

I hope everyone has a fantastic Easter!


Gluten Free Easter: Marmalade Simnel Cake

Today I am going to share with you my Gluten Free Marmalade Simnel Cake recipe.

IMG_4506For me, it simply wouldn’t be Easter without Simnel Cake – a traditional cake made up of a lightly spiced fruit sponge with a hidden marzipan layer. It is topped with 11 marzipan balls which are said to represent the 11 apostles, minus Judas.

My recipe is a slight twist on the traditional Simnel Cake. I have added a little more liquid in order to create a moist sponge, as Gluten Free Flour requires more moisture than normal flour – Simnel cakes are usually slowly baked on a low temperature for a long time, so the extra moisture is necessary to prevent a dry cake.

I also used Orange Zest instead of Lemon zest and instead of apricot jam I brushed the cake in a generous layer of marmalade.

IMG_4516

Simnel Cake would make a beautiful centrepiece for a special Easter Sunday meal, it is also easily prepared in advance and will comfortably feed a large family.

Orange and Marmalade Simnel Cake – GF/DF options

Ingredients

For the cake:

200g butter, softened (or dairy free butter/spread)
200g light brown sugar
1/2 tsp baking powder
200g gluten free self raising flour, sifted
3 large eggs, whisked
500g sultanas, raisins, mixed peel
Zest 1 orange, plus 2 tbsp of juice
2 tbsp marmalade, gently warmed
2 tsp ginger
1 tsp cinnamon
300g Marzipan, for the centre

To decorate:
2 tbsp Marmalade
500g Marzipan, to decorate

Method:

1) Preheat the oven to 140 C/120 C fan/gas mark 1 and grease and line a loose-bottomed cake tin.

2) In a large bowl cream together the butter and sugar with an electric hand mixer or a wooden spoon.

3) In a separate bowl mix together the dry ingredients: sift together the flour, baking powder and spices, then fold through the fruit and the orange zest.

4) Add the eggs one at a time to the wet ingredients along with a tablespoon of dry ingredients to stop the mixture from splitting. Ensure each egg is fully combined before adding the next one.

5) Fold in all the remaining dry ingredients, then add the marmalade and orange juice and mix until fully combined.

6) Spoon half the mixture into the prepared cake tin and smooth out with a spatula.

7) Roll out 300g of marzipan into a circle large enough to fit the tin and place it on top of the cake mixture

8) Spoon the remaining mixture on top of the marzipan and smooth out with spatula.

9) Bake in a preheated oven for 1 hour 40 – 50 minutes, until the cake is deep golden brown and firm to touch.

10) Leave the cake to cool in the tin slightly before turning it out onto a cooling rack to cool completely.

11) Once cake is cool, brush the top with a generous amount of marmalade which which will help the cake to stay moist.

12) Roll out 400g of Marzipan into a circle large enough to cover the top of the cake.

13) Place the marzipan on top of the cake and divide the remaining marzipan into 11 equal pieces. Roll the pieces into 11 balls and arrange them around the edge of the cake in a circle.

14) Place the cake under a grill high heat for a minute or so until the marzipan is golden brown – watch it like a hawk or the marzipan could burn!

15) Place the cake onto a serving plate and wrap it in a pretty ribbon.

You are now ready to proudly display your beautiful and entirely gluten free Easter centre piece for all the family to admire!

IMG_4512

I love seeing your take on my bakes, so remember to share your a picture of your bakes over on Facebook, twitter or Instagram using the hashtag #titchytonbakes.

Gluten Free Chouquettes

Out of all the cuisines the world has to offer, I have to admit (albeit with some trepidation) that French food is an area that I have left largely unexplored.

Maybe I am unsophisticated, or perhaps I’ve just been misled by the notion that French food is a little tricky – at this point I am thinking about my miserable attempts at Petit Four or Macarons…

After watching Rachel Khoo’s ‘Little Paris Kitchen’ (which is currently being re-aired on BBC 2) I’ve been feeling a little more enthusiastic about revisiting French cuisine – thanks to the show I’ve achieved the gooiest of Chocolate Fondants and have fine tuned my gluten free Choux pastry recipe.

Speaking of Choux, I have made it in the past – and quite successfully (see my Profiteroles recipe) – but this time I definitely feel like I have perfected it.

One of the recipes on the show was Chouquettes – a petit viennoiserie, consisting of  Choux pastry which are most often topped with pearl sugar or chocolate chips, although sometimes you might come across Chouquettes which have been dipped in chocolate or filled with mousse.

image

I decided to go for the traditional Chouquettes sprinkled with Pearl Sugar (or nib sugar) which I found in my local Waitrose and I also used Rachel Khoo’s recipe from the show, but with some vital tweaks to make the recipe work gluten free.

image

Chouquettes are definitely best eaten on the day they are baked, and I will be very surprised if they don’t gobbled up immediately!


Gluten Free Chouquettes

Recipe adapted from Rachel Khoo’s Little Paris Kitchen (recipe found on Almost Always Hungry).

Ingredients: 

170ml water

170ml semi skimmed milk

1 tsp salt

1 tsp sugar

100g butter

170g gluten free self-raising flour

1 tsp baking powder

3 eggs

Icing sugar for sprinkling

Pearl sugar to decorate (I found this in my local Waitrose).

Method:

1. Preheat the oven to 200c/ 180c fan/gas mark 6 and line two trays with greaseproof paper.

2. In a heavy bottomed pan, stir together the water, milk, salt and sugar. Place the pan over a medium heat, then add the butter and bring the ingredients to the boil. Once the butter has melted bring the pan off the heat.

3. In a separately bowl, stir together the gluten free flour and the baking powder. Add the flour mixture to the wet ingredients and beat vigorously until no flour remains and you are left with a smooth dough.

4. Transfer the dough to a bowl and leave it to cool for a few minutes. Stir the dough to help release the steam – once  the mixture has cooled down add the eggs, one at a time, beating until dough is smooth, glossy and elastic.

5. Place dough into a piping bag fitted with a plain nozzle and pipe bite-sized dollops onto a lined baking tray.

6. Sprinkle each dollop with icing sugar and pearl sugar, then give them another sprinkling of icing sugar.

7. Bake the Chouquettes in the oven for 25-30 minutes or until evenly browned. In the last few minutes, pierce the bottom of the Chouquettes with cocktail stick to help the insides to dry out – this will stop them from going soggy and help them to stay crisp.

8. Transfer the Chouquettes to a wire rack to finish cooling.

image

I love seeing your take on my bakes, so remember to share your a picture of your Chouquettes over on Facebook, twitter or Instagram using the hashtag #titchytonbakes.


Gluten Free American Style Pancakes with Chocolate Sauce

Today I’m going to share with you my recipe for Gluten Free American Style Pancakes and Chocolate Sauce – the perfect pancake recipe for the perfect Pancake Day!

image

I recently purchased a crêpe pan, so every day in February has been pancake day and this recipe has been more than triple tested!

When I put together this recipe my   scales had run out of battery, so I had to rely on measuring cups which I don’t often do with gluten free flour – but I think with batter recipes there is a little give and take with the ingredients and the recipe be easily adjusted if you accidentally add too much flour or milk.

Every time I made this batter it was spot on, but if you think your batter is a little thick and doesn’t spread out in the pan, add a little bit more milk, or, if it’s a little runny add a tablespoon of flour.

For a totally foolproof Pancake Day I highly recommend purchasing a crêpe pan or a good quality non stick frying pan – I speak from experience, as of my pancake day plans have been thwarted by a lack of a good frying pan!

image


American Pancakes with Homemade Chocolate Sauce – GF/DF options

Ingredients

For the Pancakes:

1 cup of gluten free self raising flour
1 tsp baking powder
2 tbsp caster sugar
1 tsp vanilla extract
2 tbsp melted butter, plus extra for frying (or dairy free alternative)
2  eggs
1 cup of semi skimmed milk

For the Chocolate Sauce:

100g good quality milk or dark chocolate (or dairy free alternative)
100ml double cream

You’ll also need a good quality non stick crêpe or frying pan. 

Method:

1. In a large bowl, mix together the gluten free flour, sugar and baking powder.

2. Add the egg and vanilla extract, then using a whisk start to bring the ingredients together.

3. Add the milk and butter and continue to whisk until you’re left with a smooth lump free batter.

4. Heat the oven to 100 degrees C/gas mark 1.

5. Leave the batter to stand while you heat up a non stick crêpe or frying pan. Brush the crêpe pan with butter using a pastry brush and wipe away any excess butter with kitchen towel. Place the pan over a medium to high heat until hot.

6. Spoon half a laddle of batter into the pan. Fry the pancake until bubbles form on top (this should take between 1 and 2 minutes) then flip your pancake over and cook the other side for a further minute or until golden brown. Place the pancake onto a non stick tray in the  preheated oven so that it stays warm.

7. Repeat with the remaining batter, brushing your pan with butter in between each pancake.

8. To make the chocolate sauce, gentle melt together the chocolate and the cream in heatproof bowl over a pan of simmering water. Stir until the ingredients are combined and then bring the bowl off the heat.

9. Serve the pancakes with the toppings of your choice – I highly reccomend strawberrries and chopped hazelnuts as they compliment the chocolate sauce beautifully.

image

I love seeing your take on my bakes, so remember to share your a picture of your perfect pancakes over on Facebook, twitter or Instagram using the hashtag #titchytonbakes.

Gluten Free & Dairy Free Jammy Dodger Recipe

Today I’m going to share with you my Gluten Free & Dairy Free Jammy Dodger Recipe – this recipe is also free from eggs and so is suitable for vegans.

image

I found gluten free biscuits a little tricky at first, but I’ve discovered over the course of many biscuit based experiments that success comes down to two things:

1. What type of flour(s) you use.

2. How you bind your ingredients.

I’ve found that good gluten free biscuits require a mix of different flours. I usually start with gluten free self raising flour as my base, then add other types of flour depending what kind of texture I want the finished bake to have. For biscuits, I wouldn’t recommend using self raising flour alone, as the biscuits will rise too much and be more cake like. Gluten free self raising flour is a useful base though, as it usually has added raising and binding agents, like Xanthan gum which helps to bind the ingredients together. To the self raising flour I like to add cornflour, which also helps bind the ingredients together, and ground almonds to add some bulk  – although I don’t like to add too much, as this could cause the biscuits to crumble.

In most of my cookie recipes I usually add an egg yolk to help bind the ingredients together – without an egg, I usually find that the dough is too crumbly and too difficult to handle. This time I decided to experiment with golden syrup, which in my opinion did the job just as well as an egg yolk – great news for vegans!

image


Jammy Dodgers – Gluten Free/Dairy Free/Egg Free/Vegan

Makes approximately 18 cookies

Ingredients

For the biscuits:

250g gluten free self raising flour

60g cornflour

40g ground almonds

100g caster sugar

150g dairy free spread

2 tbsp golden syrup

2 tsp vanilla extract

For the filling:

200g strawberry or seedless raspberry jam

1 tbsp cold water

Icing sugar for dusting

Method

1. In a large bowl, stir together the gluten free self raising flour, cornflour, ground almonds and sugar.

2. Rub the dairy free spread into the flour mixture until it starts to form a bread crumb like texture. Add the vanilla extract and golden syrup then start to bring the mixture together with your hands until it forms a dough – don’t worry if the dough seems quite soft at this point.

3. Wrap the dough in cling film then leave it to chill in a refrigerator for at least 30 minutes.

4. Whilst the dough chills, preheat the oven to 170 degrees C/gas mark 3 and line two large baking trays with baking parchment.

5. Roll out the dough onto a floured surface. Using a 6cm crimped scone or pastry cutter, stamp out 36 cookies – transfer the cookies to the baking trays using a palate knife or splatula.

6. Once the cookies are on the tray, cut holes in the centre of half the biscuits using small cookie cutters in any shape you fancy – I used a tiny flower cutters and a piping nozzle to cut out circles.

7. Bake the cookies for approximately 10 to 12 minutes or until golden brown – don’t worry if the cookies are a little soft, they will firm up when they cool down.

8. Leave the cookies to cool and firm up on the baking tray for a few minutes, then transfer them to a wire rack to finish cooling.

9. In a small bowl mix together strawberry jam (or the jam of you choice) with some cold water to make it more spreadable.

10. Lightly dust the cookies with the hole in the centre with icing sugar.

11. Spread the jam over the base of  the cookies without the holes, then sandwich them together the remaining cookies, so that the jam peeks through!

image


Gluten Free Cocoa Pops Recipe

Every year I make it my New Years Resolution to eat breakfast every single day – but, every year I fail miserably and just end up  feeling pretty bad about myself and my lack of willpower. So this year, instead of coming up with resolutions I know I won’t keep, I decided to challenge myself to come up with fun breakfast ideas and to just enjoy food more.

My breakfast of choice used to be cereal and wouldn’t just eat it for breakfast, I’d have it as an after school snack or for a late night feast – now, I can’t eat most cereals as a lot of popular brands aren’t gluten free, and haven’t found many gluten free cereals which I really like or that don’t contain copious amount of sugar and additives.

This morning I had a huge craving for Coco Pops, so I decided to try to make my own homemade version and I’m very pleased with how they turned out.imageThese homemade Cocoa Pops are super easy to make – you only need four very basic ingredients and they can whipped up in less than 20 minutes. The recipe uses a natural alternative to refined sugar and is both dairy and gluten free, but I promise they are delicious and taste just as good, if not better than the shop variety!

image


Cocoa Pops – GF/DF/EG

Ingredients

3 cups puffed rice
60 ml maple syrup
30 ml sunflower oil
1 tbsp cocoa powder

Method

1. Preheat the oven to 160 C/140 C/gas mark 3 and line two large baking trays with greaseproof paper.

2. Place the maple syrup, oil and cocoa powder into a sauce pan and place it over a low heat. Stir the ingredients with a wooden spoon until no lumps remain, then fold through the puffed rice until it is fully coated in the cocoa mixture.

3. Spread the mixture into a thin layer across the two baking trays. Bake for 6 – 8 minutes, until the puffed rice becomes crisp – make sure to give the cereal a stir half way through the bake time.

4. Leave the cereal to cool on the baking trays for a few minutes, then it’s ready to enjoy!

image

Gluten Free Christmas: Coconut Snow Cupcakes

It’s almost Christmas Day! It’s been a busy festive season for me, but I still have one Christmas recipe to share with you this year –  my Gluten Free Coconut Snow Cupcakes.imageThese cupcakes are a little different to your traditional Christmas bakes, perfect for anyone who isn’t a big fan of dried fruit but still festive enough to be served on Christmas Day – I think they would also be lovely served at a New Years Eve party! imageI got these cute star decorations from HEMA – they are actually cocktail sticks but I thought they would make cute cupcake toppers, but you can use any cupcake toppers or edible decorations of your choosing!


Coconut Snow Cupcakes – GF/DF options

Ingredients

For the sponge:

200g golden caster sugar

200g butter, softened (or dairy free alternative)

200 gluten free self raising flour

2 tbsp dessicated coconut

1 tsp baking powder

3 tbsp milk (or dairy free alternative)

1/2 vanilla pod deseeded (or 2 tsp of vanilla extract)

1/2 tsp coconut extract (optional)

2 large eggs

For the buttercream icing:

150g unsalted butter, softened (or dairy free alternative)

250g icing sugar, plus extra for dusting

1 tsp vanilla extract

To  decorate:

3 tbsp dessicated coconut

edible glitter (optional)

Method

1) Preheat the oven to 160 C/140 c fan/gas mark 3 and line a cupcake tray with cupcake cases.

2) In a large bowl, stir together the flour, baking powder and bicarbonate of soda.

3) In a separate bowl cream the butter, vanilla extract and sugar together with an electric hand mixer until light and fluffy.

4) Scrape down the sides of the bowl with a spatula. With the mixer on a low speed, add the egg a bit at a time along with a tablespoon of the flour mixture.

5) Once the egg is fully combined, add the rest of the flour and the milk until you are left with a smooth mixture.

6) Spoon approximately one and a half tablespoons of the mixture into each cupcake case, being careful not to overfill them.

7) Bake for approximately 20 – 22 minutes – the cupcakes are ready when they are golden brown and firm to touch.

8) Leave the cupcakes to cool in the tin for a few minutes, then transfer them to a wire rack to finish cooling while you prepare the buttercream icing.

9) To make the buttercream, beat the butter, icing sugar and vanilla extract with an electric hand mixer until light and fluffy and almost white in colour.

10) Once the cupcakes have cooled, spread the buttercream forest in over each cupcake using a palate knife, then sprinkle each one with desiccated coconut and a touch of edible glitter to finish.

image

That’s it for my Christmas recipes this year! If you’re looking for more gluten free Christmas baking inspiration why not check out my Gluten Free Stollen Muffins, Gluten Free Gingerbread Wreath or you can find a full list of my Christmas recipes over on my Recipes page.