Gluten Free ‘HP Sauce’

Today I had a bacon Sandwich with HP Sauce for the first time in almost 3 years… it was glorious!

DSC_0125

If you asked me which foods I miss the most since giving up gluten, top of my list would be HP Sauce – a staple condiment on the British dinner table.

It has always been my favourite, and is a firm fixture on my family’s dinner table. In fact, we couldn’t live without it so much that we would take it on holiday to Italy with us – that, and Yorkshire Tea!

I was upset once I realised I could no longer eat HP Sauce as it contains malt vinegar… but, I am a firm believer that with creativity it’s possible to eat everything thing I used to before, and so, I decided it was finally time to attempt making my own HP Sauce. The aim? To make it as close to the real deal as possible.

DSC_0126

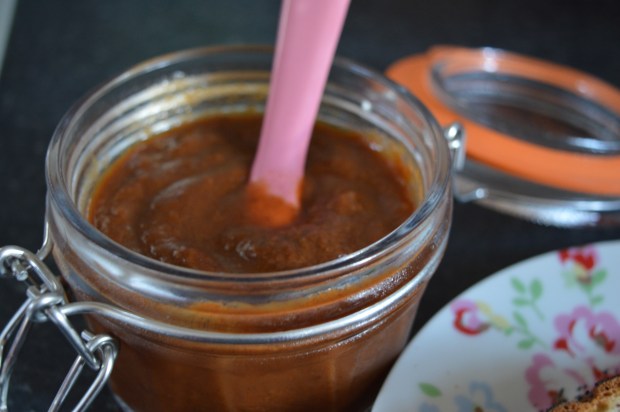
Gluten Free HP Sauce – GF/DF/EF

This recipe makes approximately 500ml.

You will need one 550ml Glass Preserve Bottle or a Twist Top Bottle which you will need to Sterilise as follows:

1. Remove the wax seal or lid. Wash the bottle in hot soapy water, rinse well then and leave to dry.
2. Place the bottle in an oven on a low temperature (140 degrees C/ Gas Mark 1) for 15 minutes, do this shortly before the sauce is ready so that the bottle remains warm.
3. Sterilise the wax seal or lid in a pan of boiling water for 10 minutes.
4. If you are using a clip top bottle, replace the wax seal once the bottle has been sterilised.

Ingredients:

1 tbsp olive oil
4 shallots, finely chopped
2 garlic cloves, finely chopped
65g dates, with the stones removed and chopped.
2 tbsp tomato puree
250 ml water
1 tsp ground ginger
1 tsp ground cinnamon
1/2 tsp turmeric powder
1 tsp ground pepper
50ml apple juice
150ml cider vinegar
50ml balsamic vinegar
1 tbsp molasses or black Treacle
1/2 tbsp dark brown sugar
1 tbsp cornflour

Method:

1) Heat the olive oil in a large heavy bottomed pan over a medium heat.

2) Fry the shallots and garlic for 4 -5 minutes until soft, then add the dates and 150 ml of the water.

3) Using a hand blender, blend the ingredients into a thick paste.

4) Add the another 50 ml water (you should still have 50 ml left for later), tomato puree, ginger, cinnamon, ground pepper, and turmeric powder. Give it a good stir and then simmer the ingredients over a low heat for 10 minutes.

5) Remove the pan from the heat, then press the mixture through a sieve with a wooden spoon into a clean pan.

6) Add the remaining water, apple juice, cider vinegar, balsamic vinegar, molasses and sugar then return the pan to the heat and boil the sauce for 5 minutes.

7) Place the cornflour into a small bowl, then add a few tablespoon of liquid from the sauce to to make a paste.

8) Add the cornflour paste to the sauce and then whisk with a balloon whisk to ensure there are no lumps.

9) Boil the sauce for a further 4 minutes whilst whisking continuously.

Tip. Don’t worry if there are a few lumps after you’ve added the cornflour – just sieve the sauce again.

10) Remove the sauce from the heat and leave to cool slightly before carefully pouring the sauce into your sterilised bottle –  you may need to use a funnel to help you do this safely.

11) Leave the sauce to cool before storing -the sauce should keep up to 3 – 4 weeks in the fridge.

I hope you give my recipe a try this weekend. If you are looking for Gluten Free inspiration you can check out all the recipes I have posted to date on my Recipes page.

Remember that you can also keep up to date with all my kitchen adventures on:
Instagram or on my Facebook page.

BBC Good Food Eat Well Show

Recently, I attended the first ever BBC Good Food Eat Well Show –  an event dedicated to healthy eating and special dietary needs, including gluten free diets. 11037763_832116943527074_8783331699261664250_n

This was the first time I have attended a food show and I was hugely impressed at the amount on offer, which included over 70 stalls where you could try out and purchase various products, the ‘Eat Well Forum’ and an Interview Stage where you could query the experts, a Dietitian’s Clinic and the ‘Healthy Kitchen’ where you could watch celebrities and chefs creating exciting dishes from which to grab inspiration. I attended on the Sunday so I saw Hemsley + Hemsley and Lorraine Pascale!

Among the exhibitors I spotted various Gluten Free companies including, BFree, Delicious Alchemy and HECK to name just a few. It was great to speak to the companies first hand, get better idea of the products available and to try before you buy! The ladies at the BFree Stand were particularly helpful and were happy for me to sample everything, they also had some great offers available and I managed to stock up on gluten free bread and wraps at very reasonable price.

I would highly recommend attending the BBC Eat Well Show and I am already looking forward to next year – I hope they will expand the show to include more gluten free products. These shows are also a very good idea for newly diagnosed Coeliacs to attend, as it gives them the opportunity to try gluten free products without spending a fortune and to stock up very cheaply.

You can also find out more about the BBC Good Food Eat Well Show at http://www.bbcgoodfoodeatwellshow.com. 

If you want to keep up to date with my kitchen adventures you can follow me @titchyton on Instagram or you can find me on my Facebook page.

Gluten Free Gnocchi

I have always been a keen baker, but I can’t say I have always been the most confident cook – until I gave up gluten!

When I started my Gluten Free diet over two years ago I decided to become a better cook, believing that if I had better cooking skills I would find a way to eat everything I used to before.  What I didn’t expect was how enthusiastic I would become about food and how much it’s taken over my life. I love experimenting to find away to eat ‘normal’ dishes and this newfound enthusiasm has prevented me from feeling down about the food I can’t eat.

Now, as well as baking all the sweet treats I love, I have started to develop savoury recipes and today I’m going to share with you one of the first savoury recipes on my blog, this very easy Gluten Free Gnocchi recipe.

image
Making food from scratch is so rewarding but can often be very time consuming. I’m pleased to say this recipe is very quick as you only need 4 ingredients and you won’t require any specialist equipment. Gnocchi also cooks in a matter of minutes, making it a quicker option than pasta.

Gluten Free Gnocchi – GF/DF
Serves 3 – 4 people.

Ingredients:
800g potato (approximately 2 Large Potatoes)
200g all purpose gluten free flour
1 large egg
1/2 tsp Salt

Method:

1) Peel and cut the potatoes into similar sized chunks to ensure the potatoes cook evenly.

2) Place the potato into a steamer and cook for approximately 20 mins until it starts to become soft – but do not over cook.

You can boil the potatoes but I prefer to use a steamer as it prevents the potatoes from soaking up too much moisture. If you boil the potatoes you will need to ensure you drain the potatoes well and soak up any excess moisture with paper towels.

3) Drain the potatoes and leave them to cool on kitchen paper in order to help them dry out.

4) Finely grate the cooled potatoes – you can also use a potato ricer.

5) Place the flour and salt onto a clean work surface, make a well in the middle of the flour for the potatoes, then add the egg.
image     image
6) Use your hands to work the ingredients together until it starts to form a smooth dough.
7) Work the dough into a rectangle and then cut the dough into slices using a dough cutter.
image
8) Roll out each piece of dough into a ‘rope’.
image
9) Cut each rope into inch long pieces.
image
1
0) Roll each piece up into a ball then indent them with a fork to create the classic gnocchi indentation.
image
11) Place the Gnocchi in boiling water and cook for 2 – 3 minutes – you will know the Gnocchi is cooked when they float to the surface. Remove the Gnocchi from the heat immediately and drain to prevent it from over cooking.

Gnocchi is so versatile, so you can experiment with a variety of toppings. I like to top mine with tomato sauce and mozzarella cheese then gently bake it in the oven to create a Gnocchi Bake.  Delicious!

Gluten Free Black Forest Gâteau Recipe + My Gluten Free Birthday Party

Happy Monday Everyone!

I hope I can help get your week off to good start with my Gluten Free Black Forest Gâteau recipe, a quadruple layer cake, which I made for my Birthday last week.image

My birthday is usually a rather quiet affair, as it falls just after Christmas and people are usually a little too down to do anything because of Post-Christmas Blues.

I decided this year that I was going to have a little party, and that hopefully that would help to cheer people up! I wanted to come up with a menu that was both fun and most importantly quick, because when I have friends round for dinner I usually end up in the kitchen all night, rather than socialising.

Some of my guests were Vegetarian, so I decided to make the menu entirely Vegetarian as well as Gluten Free so that no one felt left out. One of my guests was also Egg Free and as my Black Forest Gateau contained eggs, I made them an alternative Egg Free dessert.

My Birthday Menu:

Drinks:
Lime and Pomegrante Fizz Mocktail (Recipe at www.whatjessicabaked.com)

Prosecco

Nibbles:

Toasty Cups filled with Spicy Five

Bean Salad & Salsa (Inspired by this recipe on BBC Food)

Paneer Cheese Bites coated in

Sesame Seeds with a Chutney Dip

Cheesy Nachos with Homemade Salsa

Desserts:

Gluten Free Black Forest Gâteau

Homemade Nutella Ice Cream (Recipe at www.whatjessicabakednext.com)

image

The party went off without a hitch because the majority of the food was prepared the day before, such as the cake sponges and the ice cream, meaning the hours leading up to the party were just for finishing touches, including assembling the cake.

What I was most happy with was that the food was suitable for everyone attending, proving that with a little imagination you can prepare a menu suitable for all sorts of different dietary requirements.

Now, back to the main event and the showstopper of my party – my Gluten Free Black Forest Gâteau:
image

Black Forest Gâteau – GF

Ingredients

For the Sponges:
200g butter, softened
200g caster sugar
175 gluten free self raising flour
25g cocoa powder
1 tsp baking powder
4 large eggs
3 – 4 tbsp milk

To assemble the cake:
2 tbsp kirsch (optional, miss out if you want a non alcoholic version)
600ml double cream
400g black cherry jam
200g milk chocolate
A handful of black cherries to decorate

Method:

1. Preheat the oven to 180 C/160 fan/gas mark 4

2. Grease and line the bases of two 9 inch cake tins.

3. In a large mixing bowl sift together the gluten free flour, baking powder, and cocoa powder.

4. In a separate mixing bowl cream together the butter and sugar with an electric hand mixer until light and fluffy.

5. In a small separate bowl add the eggs and whisk them throughly with a fork.

6. Using your electric hand mixture, beat the egg alternated with large spoonfuls of the flour mixture into the butter and sugar. Scrape the bowl down well in between additions and continue until all the egg and flour has been fully incorporated.
Then, gently fold in the milk until fully combined.

7. Carefully spoon the cake mixture into the cake tins, ensuring both tins contain equal amounts of cake mixture.

8. Bake in the preheated oven for approximately 20 – 25 minutes. If baking the sponges on separate shelves, remember to swap the sponges around towards the end of the bake to ensure they are evenly baked.

9. To test the sponges insert a skewer into the centre of both sponges. If the skewer comes out clean the sponges are baked.

10. Leave the sponges to cool in their tins slightly before turning them out onto cooling racks. Allow both sponges to cool completely before storing them in the fridge to chill overnight (or for a few hours, at least). This will help make the cake easier to assemble.

11. Once the sponges have been chilled you are ready to assemble your cake: Firstly, use a wire cake cutter or a sharp knife to cut each sponge half horizontally so that you are left with 4 sponges.

12. Next whip the cream with an electric hand mixer until it resembles soft peaks and gently sieve the jam so that it spreads onto the sponges easier.

13.  Take your first piece of sponge and lay it flat onto your serving plate. Prick the sponge with a cocktail stick and gentle spoon over 1/2 tbsp kirsch (if using) then spread over a generous layer of cherry jam.

14. Using a palate knife gently spread a layer of cream over the the jam then place your second piece of sponge on top and repeat the steps until you have four layers of sponge and three layers of cream and jam. You should save some cream to decorate the top of the cake later.

15. Gently melt 175g of chocolate in a heatproof bowl over a pan of simmering water, saving the remaining 25g to decorate the top of the cake later.

15. Spread the chocolate over the top of the cake and leave to set.

16. Once the chocolate has set, pipe the remaining cream around the edge of cake to create a frame, then grate the remaining chocolate into the centre of the cake and gently place the fresh cherries around the the edge.

Voilà! One Black Forest Gâteau Showstopper!

Gluten Free Florentines

Happy New Year! January is here and I’m sure most of you are getting back into the swing of things after a busy (but hopefully not too stressful) festive season.

If you are feeling the winter blues, fear not! My Gluten Free Florentines recipe is bound to bring a little sunshine into your life.

image

Florentines are traditional Italian biscuits, they typically contain nuts and candied peel which are melted together with butter and sugar then smothered in a delicious layer of chocolate.

image

I first attempted to make Florentines after they were featured as a technical challenge on last years ‘The Great British Bake Off’. They were relatively easy to adapt into a Gluten Free version as they don’t contain very much flour, however, they were tricky little devils to get right!

After a few trials and a bit of research I have discovered that all they require is a little bit of patience. I would recommend setting yourself a good bit of time to make Florentines and make sure you give the biscuits your full attention as they will need to be watched like a hawk! Mary Berry recommends that you weigh the ingredients out very carefully so use electric scales to measure your ingredients if you can.

Gluten Free Florentines – GF/EF/DF options

(Recipe adapted from Mary Berry’s Recipe on BBC food as featured on ‘The Great British Bake Off)

50g Butter

50g Demerara Sugar

50g Honey

50g Gluten Free Plain Flour (I used Doves)

50g Glacè Cherries – finely chopped

50g Candied Peel – finely Chopped

25g Flaked almonds -finely Chopped

25g Desiccated Coconut

200g of good quality Plain Chocolate (or Milk Chocolate if you prefer!)

Can I make these dairy free? Sure! You can substitute butter for Stork (the hard baking Block) and the chocolate for dairy free chocolate, which can be found the in FreeFrom section of most supermarkets.

Method

1) Preheat your oven to 180C/Gas 4 and line three baking trays with baking parchment.

Tip. I have very small oven so I decided to bake each tray separately. If you have enough shelves you can bake them all at once, but you will need to swap the trays around to ensure they are all evenly baked. 

2) In small heavy bottomed pan measure the butter, sugar and honey. Heat the ingredients over a low to medium heat until the butter has melted.

3) Remove the pan from the heat. Add the Gluten Free flour, Cherries, Candied Peel, Almonds and Coconut and mix well.

4) Spoon six teaspoonfuls of the Florentine mixture onto each of your baking trays – make sure you leave plenty of space in-between each one to allow them to spread out as they bake.

5) Bake the Florentines for 8-10 minutes or until golden-brown.

Tip. Make sure you keep an eye on your Florentines. A couple of seconds could mean the difference between beautiful golden brown florentines or completely burnt ones!

6) Remove your florentines from the oven and leave them to cool before using a palate knife to lift them onto a cooling rack.

Tip. Don’t attempt to remove your Florentines from the trays whilst they are still warm as they will just fall to pieces.

7) To make the chocolate coating, gently melt the chocolate in a heatproof bowl over a pan of simmering water.

Tip. Try not to let the bowl touch the water as it will burn the chocolate.

8) Spread melted chocolate over the bottom of each florentine, then using a fork, make the classic zigzag pattern through the chocolate.

Tip. Traditionally Florentines are quite lacy which means some chocolate may bleed through to the other side of the biscuit. I recommend gently painting the chocolate on each one using a pastry brush!

9) Leave your florentines to set on the cooling rack with the chocolate side facing up then serve with an espresso. Delicious!

Gluten Free Christmas: Gingerbread Cookies with Royal Icing

It’s almost Christmas which means time for preparing those bakes for the big day!

IMG_9827

Today I’m going to share with you a recipe for Gluten Free Gingerbread Cookies which would make a lovely gift or edible tree decoration!
Gingerbread is my favourite and I have lovely memories of making it with my mum and sister during the Christmas holidays, but until now I’ve never made it gluten free!

In the past I have found making Gluten Free biscuits quite tricky, usually they would end up rising, lose their shape and the texture would be far too chewy. After a few experiments with different types of flour, I have come up with the perfect Gingerbread Cookie recipe that has both the taste and texture of proper Gingerbread – I guarantee no one would be able to tell they are Gluten Free!

These cookies would also make a lovely homemade Christmas gift. The recipe makes a very large batch (perfect if you’ve got lots of special people to give presents to) and the cookies keep well if stored in an airtight container or a clip top jar.

image3

Gingerbread Cookies with Royal Icing – GF/DF Options

Ingredients

For the Cookies:
125g gluten free self raising flour blend
200g rice flour, plus extra for dusting
1 tsp bicarbonate of soda
2 tsp ground ginger
2 tsp cinnamon
125g unsalted butter (to make dairy free, use Stork Original Baking Block)
150g soft dark brown sugar
2 tbsp golden syrup
1 tbsp black treacle
1 large egg

For the Royal Icing:
1 egg white
250g Icing Sugar

Method:

1) In a large bowl, sift together the flours, bicarbonate of soda, ginger and cinnamon.

2) Using your hands, rub the butter into the dry ingredients until it becomes like fine bread crumbs and then stir through the dark brown sugar.

3) In a separate bowl whisk the egg with a fork, then add this to the cookie mixture along with the golden syrup and black treacle.

4) Mix until the ingredients come together. The cookie dough will appear quite wet at this stage but don’t be tempted to add more flour or you will dry out the dough!

5) Gently knead the dough on a floured surface with floured hands until it turns into a smooth, soft and slightly sticky ball of dough. Dust the dough with rice flour as you knead to stop it sticking to the work surface.

6) Wrap the dough in cling film and leave to chill in the fridge for at least 2 hours – chilling helps the dough to firm up so it can be rolled out.

7) Heat your oven to 180 C/160 C fan/gas mark 4.

8) Roll out the cookie dough on a floured surface. Using festive cookie cutters, cut out the shapes you want then arrange the cookies on a baking tray lined with greaseproof paper.

9) The cookies will take different times to bake depending on their sizes:

Small Cookies – 8 to 10 minutes
Medium Cookies – 10 to 12 minutes
Large Cookies – 12 to 15 minutes

You will know when the cookies are done if they lift off the baking sheet easily. The cookies shouldn’t get too brown – watch out for burnt edges!

10. Transfer the cookies to a wire wrack to cool.

11. To make the Royal Icing, place 1 egg white in a bowl and slowly sift in the icing sugar in batches. In between each batch of sugar stir the icing with a wooden spoon or a balloon whisk until the icing thickens up.

12. Transfer the icing into a piping bag, if you are not using your icing straight away cover the bowl with cling film to prevent air getting to it which will cause it to harden.

13. Finally, have fun decorating your cookies however you choose!

I am taking a well deserved holiday, but I will be back in the New Year with more gluten free recipes for you all to try.  In the meantime, come and check out my out my Instagram page to see what else I get up to over Christmas!

Wishing you all a very Merry Christmas and a Happy New Year!  xxx

Gluten Free Amaretti Biscuits Recipe

A lot of my recent bakes have been quite challenging, so today I am taking it back to  basics with my Italian Amaretti Biscuits Recipe.

Amaretti Biscuits are bite-sized almond flavoured biscuits which you will often find served alongside a cup of coffee. Traditionally they are made using Ground Almonds instead of flour which makes them Gluten Free, unfortunately a lot of shop bought versions are bulked out with wheat flour which makes them unsuitable for Coeliacs.

image

Luckily they are incredibly quick and easy to make at home! This recipe makes approximately 44 small biscuits from only 4 ingredients and takes less than 30 minutes to do.

Amaretti Biscuits – GF/DF

Ingredients

1 egg white

85g ground almonds

85g caster sugar

1/2 tsp vanilla extract

Method

1) Preheat the oven to 190 C/170 C fan/gas mark 4.

2) In a mixing bowl whisk the egg whites with an electric hand mixer until they become firm.

3) Fold in the ground almonds, caster sugar and vanilla extract until the mixture comes together to form a paste. Do not over mix the paste or it will become too runny.

4) Line three baking sheets with greaseproof baking paper and lightly grease with butter using a pastry brush. You can use a diary free alternative such as oil or dairy free spread instead of butter if you wish.

5) Transfer the paste into a piping bag with a medium plain nozzle and pipe small round blobs onto the baking sheets, leaving space in between each one to allow the biscuits to expand in the oven.

If you are not confident with piping you can use a teaspoon to place each blob on to the baking trays, I just think piping gives a neater finish.

6) Bake the biscuits in a preheated oven for 10 to 12 minutes or until they are a lovely golden brown.

7) Once you have removed your biscuits from the oven leave them to cool on the baking tray for a few moments, they should then lift off the baking paper quite easily.

Amaretti Biscuits will keep up to two weeks if you store them properly, either in a clip top jar or in an airtight container.

Gluten Free Sticky Toffee Pudding

Welcome to my first ever blog post!

This August I will have been on a gluten free diet for two years; from day one I refused to be restricted by my diet and was determined to enjoy every little bit of what I eat. I believe that it’s possible to enjoy food and to eat everything I used to eat before but that it often just takes a little bit of experimenting to get things right. I spend the majority of my spare time developing gluten free recipes and testing my bakes on my friends who always tell me that I should share my recipes, so that leads me to the blog!

I thought long and hard about the first recipe I would share, it needed to be a recipe goes down well every time I make it – it had to be my Sticky Toffee Pudding recipe.

I have tried and tested this recipe many times, and on gluten eaters! They thought it tastes every bit as good as a “normal” sticky toffee pudding – so if you’re on a gluten free diet, and you feel like you are missing out on real puddings, give this recipe a try. I promise you won’t be disappointed!

Gluten Free Sticky Toffee Pudding – GF/DF options

Serves 8

Ingredients
Sponge:
150g chopped dates
200ml strong black tea
150g butter, unsalted (or dairy free spread)
150g dark brown sugar
150g self raising gluten free flour
2 large eggs

Sauce:
50g Light brown sugar
50g butter (or dairy free spread)
120ml double cream (or dairy free alternative)
1tbsp black treacle
1 tbsp golden syrup

Method

1. Heat the oven to 200 C/180 C fas/gas mark 6.

2. Grease 2 glass dishes with butter (I used 2 glass dishes because that’s what I had lying around but you could use just one big glass dish or a cake tin, you may need to adjust the cooking time to ensure the sponge is cooked through).

3. Soak the dates in the tea and set aside to cool.

4. Cream the butter and sugar until light and fluffy, making sure you’ve worked out any of the lumps in the brown sugar. Add the eggs and flour then mix until all the ingredients are fully combined.

6. When adding the dates it entirely up to you whether to blend them or leave them chunky – I like to blend the tea and dates into a paste but either way is absolutely fine. Add the dates and tea into the sponge batter and mix until fully combined, then spoon the mixture into the prepared dishes and smooth it out with a spatula.

7. Bake in a preheated oven for approximately 25 – 30 minutes. To check the sponge is cooked through, test the middle with a skewer, if it comes out clean the sponge is cooked.

8. To make the sauce place the sugar, golden syrup, treacle and butter in a pan over a low heat. Once the butter has melted stir in the double cream.

9. Drizzle the sauce over a slice of the pudding to serve!