Gluten Free Profiteroles (Inspired by ‘The Great British Bake Off’)

There’s only one week to go until the final of GBBO 2015 and we find out who the winner is. A few weeks ago I predicted that Ian, Tamal and Nadiya would be the remaining three bakers in the final, but it’s really hard to predict a winner because we all know that in the tent anything could happen! Tamal and Nadiya have been my favourites from the very beginning so I will be happy if either of them win.

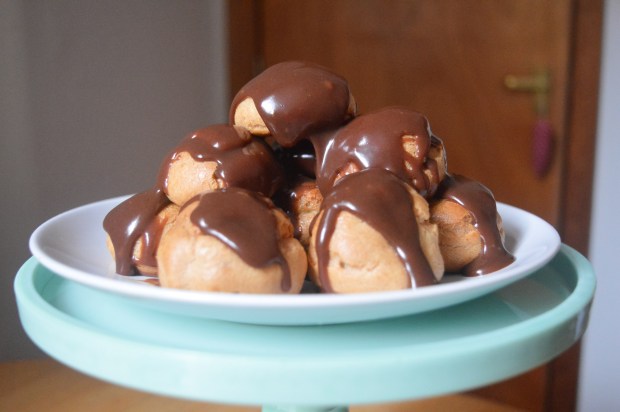
Since my last post we have seen the remaining bakers tackle Patisserie in the Quarter-final and Chocolate in the Semi-final. Today I am going to share with you my recipe for gluten free Profiteroles which incorporates an element from both shows – Choux pastry and Chocolate!

image  
I always thought that Choux Pastry would be impossible to make gluten free but it’s actually very straight forward and not unlike making normal Choux!

I strayed slightly from the traditional method of making Choux by adding a small amount of baking powder – normally you would just use plain flour, but I’ve found that adding baking powder helps to give that extra little bit of oomph. This recipe is also Xanthan Gum free which is ideal for those who struggle to tolerate Xanthan Gum and other binding agents.

image

 Profiteroles – GF/DF options

For the Profiteroles:
60g gluten free plain flour
1/4 tsp baking powder
1 tsp caster sugar
55g unsalted butter (or dairy free alternative)
110ml cold water
1 to 2 eggs

For the filling:
350 ml double cream (or dairy free alternative)

For the topping:
100g good quality milk or dark chocolate (or dairy free alternative)
100ml double cream (or dairy free alternative)

1. Preheat the oven to 200 degrees C/Gas Mark 5.

2. Line two baking trays with greaseproof paper.

3. Sift together the baking powder and flour in a small bowl then set aside.

4. Place a heavy bottomed pan over a low to medium heat, add the water, sugar and butter and bring the ingredients to a gentle simmer.

5. Once the butter has melted, remove the pan from the heat and quickly beat in the flour until all the ingredients come together in a smooth ball.

6. Transfer the dough to a large mixing bowl and beat it gently for a few seconds with a wooden spoon to help release some steam – this will help the mixture to cool down.

7. In small bowl whisk the eggs to break up the yolks.

8. Once the pastry mixture is cool, add the eggs a bit at a time whilst beating with an electric hand mixer – don’t add the eggs whilst the mixture is hot or you will end up with scrambled eggs!

9. At first the mixture will look a little bit lumpy but keep beating and adding the egg bit by bit until the pastry becomes smooth. You won’t need to add all the egg and you want to avoid making the mixture too runny as it will be difficult to pipe – the mixture at the right stage should stretchy and have some elasticity when you remove the electric mixer.

10. Transfer the mixture to piping bag and pipe little blobs onto the baking sheets a few cm apart – you don’t need to be too neat.

11. Bake for 25 – 30 minutes until the profiteroles have puffed up and are golden brown in colour – they should be crispy and quite dark in colour or they will go soggy when you fill them.

12. Whilst the Profiteroles are in the oven, make the chocolate topping so that it has time to cool. Melt the chocolate slowly in a heatproof bowl over a pan of simmering water, then add the cream and whisk vigorously to incorporate the ingredients. Leave the mixture to cool in the fridge until required.

13. Remove the profiteroles from the oven and prick the base of each one with a cocktail stick to help release some steam. Transfer them to a wire rack to cool.

14. Whisk the cream with an electric hand mixer until it creates stiff peaks, then transfer to an icing syringe or a piping bag with a fine nozzle. Create a small hole in the base of profiterole and gently fill each one with cream – be careful not to do this too quickly as the the force could cause the pastry to tear.

15. Spread the cooled chocolate topping on the top of each profiterole, then arrange them onto a plate ready to be served!

I hope everyone is looking forward to the GBBO Final as much as I am, let me know what you’re going to bake in celebration in the comments below or come and see what I’m getting up to on Instagram or Facebook.

Gluten Free Cranberry, Almond and White Chocolate Biscotti (Inspired by ‘The Great British Bake Off’)

Today I’m going to share with you another gluten free version of a bake featured on ‘The Great British Bake Off’.

This week’s episode was Biscuit Week in which the remaining contestants baked no less than 748 biscuits plus a show-stopping edible and ornate biscuit box each, which had to be sturdy enough to encase their biscuits.

The Signature Challenge saw the bakers take on Italian Biscotti. Biscotti basically means the biscuits are ‘twice baked’ and are traditionally dry and quite hard biscuits, filled with nuts and fruit. They can be a little tricky to get right because whilst the biscuits need to be dry, there is a danger they will end up so brittle that they will break your teeth! The bakers had a relatively short amount of time in which to bake the Biscotti, which needs to be cooled down completely before it’s baked again so that it doesn’t crumble when sliced.

I decided to have a go at creating a gluten free version of the signature challenge and went for the quite classic flavour combination of cranberry, almond and white chocolate.
image
The key to baking excellent gluten free biscotti is to start with a slightly wetter mixture than you’d expect. Although Biscotti are typically quite dry biscuits, remember that gluten free flour requires more moisture than normal flour – without the extra moisture the Biscotti won’t survive being baked twice and will be a crumbly mess. If you follow my method carefully you should have no problems baking your very own gluten free Biscotti which has the texture and taste of proper Biscotti.

Gluten Free White Chocolate, Almond and Cranberry Biscotti – GF/DF options

Ingredients:
150g caster sugar
1 tsp baking powder
300g gluten free self raising flour + extra for shaping the dough
30g ground almonds
3 large eggs
125g dried cranberries
75g chopped blanched almonds
25g chopped cashew nuts
1 tsp lemon zest
1/2 tsp almond extract

To decorate:
300g good quality white chocolate (or dairy free alternative)

Method:

1. Preheat oven to 180 degrees C/160 C fan/gas mark 4 and line a large baking tray with greaseproof paper.

2. In a large bowl, stir together the caster sugar, baking powder, flour and ground almonds.

3. Add the eggs, cranberries and nuts then mix until all the ingredients are combined. The mixture will be much wetter than expected so please don’t panic and add more flour. Remember that gluten free flour needs more moisture than regular flour and these biscuits are going to be baked twice – if you add more flour you’ll end up with a very dry dough which will result in an overly dry biscotti that cannot be baked twice.

4. Separate the mixture into two halves and generously dust a work surface with a flour.

5. Spoon one half of the mixture onto the work surface into a rough log shape then dust the mixture with a generous layer of flour – do not knead or roll the mixture but gently use your hands to shape the mixture into a log shape. The flour will stick to the mixture like a coating which will help the log keep it shape whilst allowing the inside to stay soft.
image   image
6. Transfer to the log to a baking tray (you could use a cake lifter to help) then flatten the log slightly so it’s approximately the width of a ciabatta. Repeat the with the other half of the mixture then place the second log on the tray – make sure you leave a little room between to allow them to expand slightly.
image
7. Bake for 20 to 22 minutes, until the biscotti is golden brown. Remove the biscotti from the oven and transfer to a wire rack to cool completely. Leave the oven on.
image
8. Once the biscotti is cool, slice it diagonally across into inch thick slices. Do not attempt to slice the biscotti whilst still warm or it will crumble.

9. Transfer the biscotti back onto the baking tray and bake again for 6 to 8 minutes on both sides, then leave the biscotti to cool on a wire rack.
image
10. Melt the chocolate slowly in a heatproof bowl over a pan of simmering water. Dip the base of each biscuit into the chocolate, gently shake off any excess chocolate, then leave each one to set on a sheet of greaseproof paper.

Once set, enjoy in the traditional Italian style with a cup of coffee!
image
If you’re not feeling all baked out, why not check out my take on the classic Madeira cake as featured on episode one of this years ‘Bake Off’.

The Allergy & Free From Show (London Olympia) Review

Yesterday I attended the first day of The Allergy and Free From Show, which is being held this weekend (3 – 5 July 2015) at the London Olympia.

The show prides itself as being ‘Europe’s largest free-from family day out’ so I was really looking forward to seeing what was on offer and anticipated bagging myself a bargain or two.

Upon arrival I was directed into a huge hall and I was taken aback by the sheer number of exhibitors attending the show – 221 to be exact!

I am someone who ends up shopping at a number of different supermarkets in order to have more choice and to compare the deals on offer, so it was a wonderful to have so many products all under one roof – let’s just say, I was like the proverbial kid in a candy shop.

A huge benefit of attending a show like this is getting the opportunity to try before you buy and the majority of the exhibitors also offer special deals on their products, so it’s worth bringing a bag and stocking up on your favourites.

As you’d expect, there were lots of well known brands in attendance, including:

  • Udi’s (who also sponsored the show)
  • Sainsburys
  • Tesco
  • ASDA
  • Doves Farm
  • DS (soon to be Schär)
  • Genius
  • Warburtons Newburn Bakehouse
  • Nairns
  • Bfree
  • Delicious Alchemy
  • Mrs Crimbles
  • Nak’d

image  image
image  image
A lot of companies, especially the big brands, were showcasing new products and it was a great to opportunity to speak to companies face to face and give them feedback, which they were more than happy to receive.

I also discovered so many brands I hadn’t heard of before, including Pudology, Sweet Rebellion, Venice Bakery and Dohertys.

As you’d expect from an Allergy and Free From show, the majority of exhibitors were focused mainly on Gluten Free, Wheat Free, Egg Free and Dairy Free products, but there also quite a few companies exhibiting Nut Free and Sugar Free Products.

Despite the fact that the majority of food on offer was suitable for Coeliacs you still need to exercise some caution when sampling products as it’s not just a gluten free show. A lot of companies had signs up stating any allergens that their products might contain, but be sure to double check with the stall holders before you sample anything – they were all really friendly and more than willing to help.

image

Meeting the lovely ladies at Delicious Alchemy

There were also other things to do at the show besides shopping, including cooking and baking demonstrations and a ‘speakers corner’ where people could share their experiences. There was also an activity for children called ‘Allergy Adventures’ which helped educate children with allergies on how to stay safe and healthy.

In the same hall there were two other food shows, the Love V show (for Vegetarians & Vegans) and the Love Natural Love Organic Show – both of which you could also attend if you had tickets to the Allergy and Free From Show.

Overall, I was highly impressed with the amount the show had to offer and I had such a lovely time meeting like minded people and chatting to the companies about their products. This year you could get hold of free tickets for the show which meant more to spend on bargains so it was totally worth attending! I heartily recommend this show to everyone, including those who might have friends or family who suffer from food allergies, Coeliacs Disease or IBS.

image

Just a few of the bargains I picked up at the show!

Tomorrow (Sunday 5th July) is the last day you can catch the show at London Olympia but if you miss it, there is also a show in Liverpool on the 7th and 8th of November 2015 and according to their website they are planning to launch a show in Scotland in March 2016.

For more information visit: http://www.allergyshow.co.uk/london/ or for a full list of exhibitors click here.

Coeliac Awareness Week: Gluten Free Cheese Scones

Here in the UK it is Coeliac Awareness Week and to help raise awareness of this important campaign I am posting very simple Gluten Free recipes to help any newly diagnosed Coeliacs get started.

My first post was my Victoria Sandwich Recipe and today I will be sharing my recipe for Gluten Free Cheese Scones.
image
Scones are a true classic and a bake that should be in every baker’s repertoire. They are perfect for beginners (they were certainly the first thing I learnt to make) and possible to achieve Gluten Free – you just need to make sure the dough is moist enough!

Gluten Free Cheese Scones – GF/DF options

This recipe makes approximately 8 scones.

Ingredients:
250g gluten free self raising flour
1 tsp baking powder
75g butter, unsalted
A pinch of salt
75g mature cheddar, plus extra for the top.
2 eggs (one for glazing)
75ml milk (or dairy free alternative)

Method:

1) Preheat the oven to 220 C/200 fan C/gas mark 6.

2) In a large bowl, sift together the flour, baking powder and salt.

3) Rub together the butter and flour mixture until you have a breadcrumb like texture, then stir through the cheese.

4) Add an egg and start to bring the mixture together using a wooden spoon.

5) Add the milk bit by bit and use your hands to bring the mixture together in a smooth dough.

6) Lightly dust a work surface with flour then roll out the dough to 3/4cm thick – don’t roll out the dough too flat or you will have very flat scones!

7) Place the scones on a baking tray lined with greaseproof paper. Lightly brush the top of each scone with beaten egg then sprinkle over a little bit more cheese.

8) Bake the scones in a preheated oven for 15 – 18 minutes until they are golden brown.

9) Leave the scones to cool on a wire rack or enjoy warm with lashings of butter! To refresh the scones, sprinkle them with a little cold water and gently warm them in the oven.

Please don’t forget to check out my Victoria Sandwich Recipe for Coeliac Awareness Week or if you are looking for more inspiration take a look at my Recipes Page.

You can also keep up to date with my kitchen adventures on:
Instagram: https://instagram.com/titchyton/
Facebook – https://www.facebook.com/titchyton