Mojito Recipe

Could there be a more perfect summer cocktail than the Mojito? Easy to make and super refreshing – I’ll definitely be making my fair share of these over the the bank holiday weekend.

C4E5C9CB-9F0C-44C9-A6F9-FFF34E8369B8

I am sure many Mixologists would baulk at the thought of 7up in a Mojito – but l when you don’t have all the ingredients to hand, sometimes you’ve got to improvise! And so, I have named my version of this drink the “mo-chea-to” because it’s not a traditional mojito, but it definitely tastes as good.


Mojito Recipe

Makes 1 Cocktail

Ingredients

Half a lime, cut into four pieces

8 fresh mint leaves, plus extra for garnish 

35ml White Rum 

A dash of 7 Up Free (or Sprite)

A few handfuls of crushed ice

Method: 

1) Place the lime and the mint leaves into glass or a kilner jar. Gently muddle the ingredients until the lime start to release  its juice.

2) Add a few handful of ice, followed by the rum. Top up with 7up and garnish each glass with a sprig of mint and a paper straw.

11FF1E66-65CF-4C97-AD8A-5414365C051D

Gluten Free Strawberries and Cream Cheesecake Jars

It’s been a little too hot to bake recently, as here in the UK we’ve been experiencing a heatwave – I do like to see the sun out at last, but our country is not built to cope with heat… and neither are us Brits!

So, I’ve been eating a lot of lazy food; lots of salads (my particular favourite is a watermelon, cucumber and feta salad) and cured meats, like salami and prosciutto – basically anything that doesn’t involve standing in front of a hot stove.

I have been feeling a little sick of ice cream, so I wanted to come up with a quick, easy and refreshing no bake dessert to satisfy my sweet tooth.

My Gluten Free Strawberries and Cream Cheesecake Jars tick all the boxes – they take a matter of minutes to put together, there is no baking required and they don’t  need to be left to set.

IMG_5468

Strawberries are at their best right now and I absolutely adore them – but you could also use Raspberries or a mix of both if you prefer.

For the biscuit layer, I used Schär Gluten Free Digestive Biscuits – I prefer this brand because they are also free from oats, but you can use any kind of biscuits you like.

IMG_5473

These Cheesecake jars are best served right away, but they can be made ahead of time and popped in the fridge. They are also ideal for a picnic as they are portable – simply put the lids on and pop them in a cool bag to keep them fresh!

IMG_5471

Strawberries and Cream Cheesecake Jars – GF/EF

Makes 4 (depending on the size of your jars)

Ingredients

180g Philadelphia cheese, cold
330ml whipping cream
1 tsp vanilla extract
2 tablespoons icing sugar
150g gluten free digestive biscuits (I prefer ones by Schär, as they are also free from oats)
500g fresh strawberries, halved
Fresh mint to decorate

Method

1. Blitz the biscuits in a food processor (or crush them by hand) until they are the consistency of breadcrumbs.

2. In a large bowl, gently mix the cream cheese, icing sugar and vanilla extract together until combined. Add the whipping cream and whisk using a electric hand mixer until the ingredients form soft peaks.

3. Add a layer of the biscuit crumbs to the base of each jar, followed a layer of cream and a layer of strawberries. Repeat until the jars are full and top with mint leaves to decorate.

IMG_5474

I love seeing your take on my bakes, so remember to share your a picture of your Cheesecakes over on Facebook, twitter or Instagram using the hashtag #titchytonbakes.


No Churn Raspberry and Mascarpone Ice Cream

After what has seemed like months of endless grey clouds and drizzle, the sun finally decided to grace the UK with its presence and Britain has just enjoyed a week of uncharacteristically warm weather, which some of us Brits are quite frankly not used to.

Despite the fact it has been uncomfortably hot at points, I have tried to make the most of the sunshine as it will be over all too soon and at the weekend I had my first (and probably last) barbecue of the year and made homemade ice cream.

image

When I think of summer one of the first things that pops into my mind is ice cream. When I was a little girl my dad worked as an ice cream man and the summer holidays consisted of playing outside with my sisters, endless supplies of ice cream and ice lollies and the occasional trip out in the ice cream van, if I was good!

So, I’m sure you’ll understand why the hot weather meant that I just had to have ice cream and what could be a more perfect excuse to make my own? It’s also surprisingly  easy – it’s a no churn recipe, so you don’t need an ice cream machine but an electric whisk is always a good idea.

When it came to choosing flavours, I decided to use mascarpone cheese as a nod to my Dad (he’s Italian so it seemed like the perfect ingredient) and raspberry which is a lovely sharp contrast to the creamy mascarpone – this recipe is incredibly versatile though, so you can go to town creating tonnes of interesting flavour combinations!

No Churn Mascarpone And Raspberry Ice Cream

For the Raspberry Sauce:
125g fresh raspberries
1 tbsp caster sugar
25 ml cold water

For the Ice Cream:
250g cheese mascarpone, room temperature
397g can sweetened condensed milk
600 ml double cream
1 tsp vanilla extract

Method: 

1. To make the raspberry sauce: place the raspberries, sugar and water into a food processor and blend to a puree. Push the purée through a sieve to remove the seeds then set it aside for later.

2. For the ice cream, soften the mascarpone cheese with an electric whisk until it is very soft, add the condensed milk and vanilla extract then whisk until the mixture is smooth. In a separate bowl, whisk the double cream until it forms soft peaks, gently fold through the condensed milk and mascarpone mixture without knocking too much volume from the cream, but ensuring that all the ingredients are combined.

3. Drizzle half of the raspberry sauce over the ice cream mixture but don’t fold it through. Spoon the mixture into a large freezable container and place in the freezer for at least 6 hours or overnight and refrigerate the remaining raspberry sauce.

4. Thaw the ice cream before serving with the remaining raspberry sauce.

Honey Roasted Chicken, Feta and Quinoa Salad with Sticky Sautéd Tomatoes

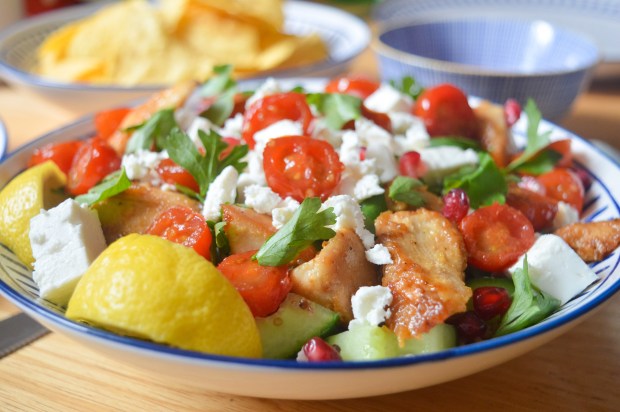
Today I’m going to share with you one of my most favourite creations, my Chicken, Feta and Quinoa Salad with Sticky Sautéd Tomatoes. This is a recipe which I come back to time and time again because it’s super easy to prepare and incredibly tasty.

image

I made this for my sister on her most recent trip to London, I had offered to make us both lunch and wanted to serve something more interesting than your usual lunchtime fodder.

Personally I think this salad ticks all the boxes. For a start, there is not a bland lettuce leaf in sight which instantly makes it infinitely more appealing. The base of my salad is made up of quinoa, a grain which is a fantastic source of protein and dietary fibre, and if prepared in the right way can be incredibly flavoursome.

The rest of the ingredients are far from boring, the chicken breast is roasted in sweet and sticky honey which contrasts wonderfully to the salty feta and refreshing cucumber, but without a doubt the absolute star of this dish is my sticky sautéd tomatoes which I am completely obesessed with – you’ll know why, once you’ve tried them!

The salad is topped off with a handful of pomegranate seeds and a bunch of parsley… I tried to get some leaves in there, somewhere!

Honey Roasted Chicken, Feta and Quinoa Salad with Sticky Sautéd Tomatoes – GF/EF

Serves 2 – 3 

For the Salad:
120g Quinoa, rinsed (I used a mix of white/black/red quinoa)
500ml water, brought to the boil
1 chicken stock cube
400g diced chicken breast
1 tbsp olive oil
2 tbsp honey
1/2 a cucumber, deseeded and chopped into half moon shapes.
50g Feta cheese
A bunch of fresh parsley
12 cherry tomatoes
1 tbsp red wine vinegar
1/2 tsp caster sugar
A handful of pomegranate seeds (optional)

For the Dressing:
Lemon juice
Olive Oil
Salt and Pepper to season

Method:

1. Preheat oven to 180 degrees C/160 fan/gas mark 4.

2. Coat the chicken in olive oil and honey, then season it with black pepper.

3. Bake the chicken in the preheated oven for 20 minutes. To check the chicken is cooked, make sure the meat is white and that no pink remains.

4. Whilst the chicken is cooking, place the quinoa into pan of boiling water and crumble over a stock cube. Stir and reduce the pan to simmer, then cook for 15 minutes until the quinoa is soft.

5. Drain quinoa and leave it cool slightly.

6. To make the sticky tomatoes: heat up a dash of olive oil in a frying pan over a medium heat. Add the cherry tomatoes and cook for a minute or two, until they start to become slightly wrinkly. Add the red wine vinegar and sugar, then stir to coat the tomatoes until they become sticky.

7. Serve your salad on a large serving plate. Start with the quinoa on the bottom, layer up the slices of cucumber, feta, chicken and tomatoes, then top with fresh parsley and pomegranate seeds.

8. Drizzle over olive oil and a squeeze of lemon. Season with black pepper and serve with wedge of lemon on the side.

image


The Allergy & Free From Show (London Olympia) Review

Yesterday I attended the first day of The Allergy and Free From Show, which is being held this weekend (3 – 5 July 2015) at the London Olympia.

The show prides itself as being ‘Europe’s largest free-from family day out’ so I was really looking forward to seeing what was on offer and anticipated bagging myself a bargain or two.

Upon arrival I was directed into a huge hall and I was taken aback by the sheer number of exhibitors attending the show – 221 to be exact!

I am someone who ends up shopping at a number of different supermarkets in order to have more choice and to compare the deals on offer, so it was a wonderful to have so many products all under one roof – let’s just say, I was like the proverbial kid in a candy shop.

A huge benefit of attending a show like this is getting the opportunity to try before you buy and the majority of the exhibitors also offer special deals on their products, so it’s worth bringing a bag and stocking up on your favourites.

As you’d expect, there were lots of well known brands in attendance, including:

  • Udi’s (who also sponsored the show)
  • Sainsburys
  • Tesco
  • ASDA
  • Doves Farm
  • DS (soon to be Schär)
  • Genius
  • Warburtons Newburn Bakehouse
  • Nairns
  • Bfree
  • Delicious Alchemy
  • Mrs Crimbles
  • Nak’d

image  image
image  image
A lot of companies, especially the big brands, were showcasing new products and it was a great to opportunity to speak to companies face to face and give them feedback, which they were more than happy to receive.

I also discovered so many brands I hadn’t heard of before, including Pudology, Sweet Rebellion, Venice Bakery and Dohertys.

As you’d expect from an Allergy and Free From show, the majority of exhibitors were focused mainly on Gluten Free, Wheat Free, Egg Free and Dairy Free products, but there also quite a few companies exhibiting Nut Free and Sugar Free Products.

Despite the fact that the majority of food on offer was suitable for Coeliacs you still need to exercise some caution when sampling products as it’s not just a gluten free show. A lot of companies had signs up stating any allergens that their products might contain, but be sure to double check with the stall holders before you sample anything – they were all really friendly and more than willing to help.

image

Meeting the lovely ladies at Delicious Alchemy

There were also other things to do at the show besides shopping, including cooking and baking demonstrations and a ‘speakers corner’ where people could share their experiences. There was also an activity for children called ‘Allergy Adventures’ which helped educate children with allergies on how to stay safe and healthy.

In the same hall there were two other food shows, the Love V show (for Vegetarians & Vegans) and the Love Natural Love Organic Show – both of which you could also attend if you had tickets to the Allergy and Free From Show.

Overall, I was highly impressed with the amount the show had to offer and I had such a lovely time meeting like minded people and chatting to the companies about their products. This year you could get hold of free tickets for the show which meant more to spend on bargains so it was totally worth attending! I heartily recommend this show to everyone, including those who might have friends or family who suffer from food allergies, Coeliacs Disease or IBS.

image

Just a few of the bargains I picked up at the show!

Tomorrow (Sunday 5th July) is the last day you can catch the show at London Olympia but if you miss it, there is also a show in Liverpool on the 7th and 8th of November 2015 and according to their website they are planning to launch a show in Scotland in March 2016.

For more information visit: http://www.allergyshow.co.uk/london/ or for a full list of exhibitors click here.