Mojito Recipe

Could there be a more perfect summer cocktail than the Mojito? Easy to make and super refreshing – I’ll definitely be making my fair share of these over the the bank holiday weekend.

C4E5C9CB-9F0C-44C9-A6F9-FFF34E8369B8

I am sure many Mixologists would baulk at the thought of 7up in a Mojito – but l when you don’t have all the ingredients to hand, sometimes you’ve got to improvise! And so, I have named my version of this drink the “mo-chea-to” because it’s not a traditional mojito, but it definitely tastes as good.


Mojito Recipe

Makes 1 Cocktail

Ingredients

Half a lime, cut into four pieces

8 fresh mint leaves, plus extra for garnish 

35ml White Rum 

A dash of 7 Up Free (or Sprite)

A few handfuls of crushed ice

Method: 

1) Place the lime and the mint leaves into glass or a kilner jar. Gently muddle the ingredients until the lime start to release  its juice.

2) Add a few handful of ice, followed by the rum. Top up with 7up and garnish each glass with a sprig of mint and a paper straw.

11FF1E66-65CF-4C97-AD8A-5414365C051D

Gluten Free Blueberry and Almond Muffins

Today I am going to share with you my recipe for my favourite weekend breakfast treat – Gluten Free Almond and Blueberry Muffins.

blueberry

When it comes to breakfast muffins, I think Blueberry muffins are right at the top of my list, but the flavour combination of almond and blueberry muffins is sheer heaven and are perfect with a frothy cappuccino.

bb2

These muffins are an ideal weekend bake – good for mornings where you typically have a bit more time to spare, but want a  treat which can whipped up quickly enough, leaving plenty of time to do that crossword in the morning paper.


Gluten Free Blueberry and Almond Muffins – GF/DF options
Makes 8

Ingredients:

300g gluten free self raising flour
1 tsp baking powder
1/2 tsp bicarbonate of soda
150g caster sugar
2 large eggs
75 ml sunflower oil
200ml milk
1 tsp vanilla extract
150g flaked almond
8 tsp blueberry jam

Method:

1. Preheat the oven to 180 C/160 C fan/gas mark 4 and line a muffin tin with 8 muffin cases.

2. In a large bowl, sift together the flour, baking powder and bicarbonate of soda, then stir through 100g of the almonds.

3. In separate bowl, whisk together eggs, sugar, oil, milk and vanilla extract until combined then add this to the dry ingredients.

4. Gently mix the ingredients together until they form a batter which is only just combined (don’t worry too much if there are any lumps).

5. Spoon approximately 1 and a half tablespoons of batter into each case, followed by a teaspoon of jam then fill the muffin cases with a further tablespoon of batter, ensuring the jam is fully covered. Top each muffin with the remaining flaked almonds.

6. Bake the muffins for 25 minutes, until golden brown.

7. Enjoy warm, or leave them to cool on a wire rack before storing in an airtight container. Finish the muffins off with a dusting of icing sugar, if you wish.

bb4

I love seeing your take on my recipes, so remember to share a snap of your muffins over on Facebook, twitter or Instagram using the hashtag #titchytonbakes.

Gluten Free Halloween: Chocolate Skeleton Cookies

Just in time for Halloween – here is my recipe for these rather kooky, but not so spooky cookies.

E0BB5CF0-E8DF-400F-BA1A-F1EC10DAE09D

These cookies are of course gluten free could be made dairy free, just substitute the butter for dairy free spread or dairy free butter. If you use dairy free spread make sure it is super cold, or it can make your biscuit dough a little oily – you may also need to for chill your biscuit dough for a little longer.

I also used an all purpose gluten free flour to make these biscuits – the new Schär Mix It Universal Blend – if you can’t get hold of this you could use a mix of gluten free self raising and rice flour (see the recipe below for details).

9B356FFB-C2A3-4E8B-8DFA-DCE9EED98E87


I had a lot of fun decorating these cookies and giving them rather shocked expressions! I think this recipe would be a lovely project to get children involved in over the Halloween weekend, as the cookie dough is very simple to make and they can get creative giving the skeleton men different expressions and looks!

Chocolate Skeleton Cookies – GF/DF options

Ingredients

For the chocolate biscuits:

150g sugar
150g butter (or dairy free alternative, like Stork Margarine Block)
2 tbsp cocoa powder
280g gluten free all purpose flour (I used Schär All Purpose Mix)
1 egg
1 tsp vanilla essence

For the decorations:

250g icing sugar
1 egg white

Method

1) To make the biscuit dough, combine the gluten free flour, cocoa powder and sugar in a large bowl.

2) Rub in the butter until you have a bread crumb like texture.

3) Add the egg and vanilla essence and start to bring the ingredients together using a wooden spoon.

4) Tip the contents onto a lightly floured surface and use your hands to work the ingredients into a soft dough. Don’t worry if the dough seems a little sticky as it will be refrigerated which help it to firm up – don’t be tempted to add more flour!

5) Wrap the dough in cling film and place in the fridge for at least an hour.

6) Preheat the oven to 170 C/150 C fan/gas mark 4 and line a baking tray with grease proof paper.

7) Dust a clean surface with flour. Roll out the dough using a rolling pin until it is about 5mm thick, then cut out gingerbread men shapes.

8) Transfer the cookies to tray lined with greaseproof paper using a palate knife. Bake for 10 – 12 minutes or until the cookies are firm and a light golden brown – be sure to keep an eye on them as they could quickly over-bake.

9) Once baked, leave the cookies to cool slightly on the trays to before transferring them to wire racks to finish cooling.

10) To make the royal icing: place 1 egg white in a bowl, then slowly sift in the icing sugar in batches. In between the batches of icing sugar, stir the ingredients with a wooden spoon or a balloon whisk until the icing thickens up – you can use a dash of water to encourage the ingredients to come together if necessary.

11) Transfer the icing into a piping bag fitted with a writing nozzle and decorate the Skeleton men – don’t forget to give them shocked expressions!

BEA90B84-44D3-47AD-B5F2-EB662155152D

I love seeing your take on my recipes, so remember to share a snap of your Halloween cookies over on Facebook, twitter or Instagram using the hashtag #titchytonbakes.

Gluten Free American Style Pancakes with Chocolate Sauce

Today I’m going to share with you my recipe for Gluten Free American Style Pancakes and Chocolate Sauce – the perfect pancake recipe for the perfect Pancake Day!

image

I recently purchased a crêpe pan, so every day in February has been pancake day and this recipe has been more than triple tested!

When I put together this recipe my   scales had run out of battery, so I had to rely on measuring cups which I don’t often do with gluten free flour – but I think with batter recipes there is a little give and take with the ingredients and the recipe be easily adjusted if you accidentally add too much flour or milk.

Every time I made this batter it was spot on, but if you think your batter is a little thick and doesn’t spread out in the pan, add a little bit more milk, or, if it’s a little runny add a tablespoon of flour.

For a totally foolproof Pancake Day I highly recommend purchasing a crêpe pan or a good quality non stick frying pan – I speak from experience, as of my pancake day plans have been thwarted by a lack of a good frying pan!

image


American Pancakes with Homemade Chocolate Sauce – GF/DF options

Ingredients

For the Pancakes:

1 cup of gluten free self raising flour
1 tsp baking powder
2 tbsp caster sugar
1 tsp vanilla extract
2 tbsp melted butter, plus extra for frying (or dairy free alternative)
2  eggs
1 cup of semi skimmed milk

For the Chocolate Sauce:

100g good quality milk or dark chocolate (or dairy free alternative)
100ml double cream

You’ll also need a good quality non stick crêpe or frying pan. 

Method:

1. In a large bowl, mix together the gluten free flour, sugar and baking powder.

2. Add the egg and vanilla extract, then using a whisk start to bring the ingredients together.

3. Add the milk and butter and continue to whisk until you’re left with a smooth lump free batter.

4. Heat the oven to 100 degrees C/gas mark 1.

5. Leave the batter to stand while you heat up a non stick crêpe or frying pan. Brush the crêpe pan with butter using a pastry brush and wipe away any excess butter with kitchen towel. Place the pan over a medium to high heat until hot.

6. Spoon half a laddle of batter into the pan. Fry the pancake until bubbles form on top (this should take between 1 and 2 minutes) then flip your pancake over and cook the other side for a further minute or until golden brown. Place the pancake onto a non stick tray in the  preheated oven so that it stays warm.

7. Repeat with the remaining batter, brushing your pan with butter in between each pancake.

8. To make the chocolate sauce, gentle melt together the chocolate and the cream in heatproof bowl over a pan of simmering water. Stir until the ingredients are combined and then bring the bowl off the heat.

9. Serve the pancakes with the toppings of your choice – I highly reccomend strawberrries and chopped hazelnuts as they compliment the chocolate sauce beautifully.

image

I love seeing your take on my bakes, so remember to share your a picture of your perfect pancakes over on Facebook, twitter or Instagram using the hashtag #titchytonbakes.

Gluten Free & Dairy Free Jammy Dodger Recipe

Today I’m going to share with you my Gluten Free & Dairy Free Jammy Dodger Recipe – this recipe is also free from eggs and so is suitable for vegans.

image

I found gluten free biscuits a little tricky at first, but I’ve discovered over the course of many biscuit based experiments that success comes down to two things:

1. What type of flour(s) you use.

2. How you bind your ingredients.

I’ve found that good gluten free biscuits require a mix of different flours. I usually start with gluten free self raising flour as my base, then add other types of flour depending what kind of texture I want the finished bake to have. For biscuits, I wouldn’t recommend using self raising flour alone, as the biscuits will rise too much and be more cake like. Gluten free self raising flour is a useful base though, as it usually has added raising and binding agents, like Xanthan gum which helps to bind the ingredients together. To the self raising flour I like to add cornflour, which also helps bind the ingredients together, and ground almonds to add some bulk  – although I don’t like to add too much, as this could cause the biscuits to crumble.

In most of my cookie recipes I usually add an egg yolk to help bind the ingredients together – without an egg, I usually find that the dough is too crumbly and too difficult to handle. This time I decided to experiment with golden syrup, which in my opinion did the job just as well as an egg yolk – great news for vegans!

image


Jammy Dodgers – Gluten Free/Dairy Free/Egg Free/Vegan

Makes approximately 18 cookies

Ingredients

For the biscuits:

250g gluten free self raising flour

60g cornflour

40g ground almonds

100g caster sugar

150g dairy free spread

2 tbsp golden syrup

2 tsp vanilla extract

For the filling:

200g strawberry or seedless raspberry jam

1 tbsp cold water

Icing sugar for dusting

Method

1. In a large bowl, stir together the gluten free self raising flour, cornflour, ground almonds and sugar.

2. Rub the dairy free spread into the flour mixture until it starts to form a bread crumb like texture. Add the vanilla extract and golden syrup then start to bring the mixture together with your hands until it forms a dough – don’t worry if the dough seems quite soft at this point.

3. Wrap the dough in cling film then leave it to chill in a refrigerator for at least 30 minutes.

4. Whilst the dough chills, preheat the oven to 170 degrees C/gas mark 3 and line two large baking trays with baking parchment.

5. Roll out the dough onto a floured surface. Using a 6cm crimped scone or pastry cutter, stamp out 36 cookies – transfer the cookies to the baking trays using a palate knife or splatula.

6. Once the cookies are on the tray, cut holes in the centre of half the biscuits using small cookie cutters in any shape you fancy – I used a tiny flower cutters and a piping nozzle to cut out circles.

7. Bake the cookies for approximately 10 to 12 minutes or until golden brown – don’t worry if the cookies are a little soft, they will firm up when they cool down.

8. Leave the cookies to cool and firm up on the baking tray for a few minutes, then transfer them to a wire rack to finish cooling.

9. In a small bowl mix together strawberry jam (or the jam of you choice) with some cold water to make it more spreadable.

10. Lightly dust the cookies with the hole in the centre with icing sugar.

11. Spread the jam over the base of  the cookies without the holes, then sandwich them together the remaining cookies, so that the jam peeks through!

image


Gluten Free Viennese Whirls (Inspired by ‘The Great British Bake Off’)

Bake Off is finally back on our TV screens, so queue the nationwide baking frenzie and attempts to recreate bakes from the show at home – sometimes with varing success!

This was certainly the case when I attempted to make a gluten free version of Viennese Whirls, the technical challenge from this year’s Biscuit Week.

image

I discovered Mary Berry’s recipe on the BBC Food website and decided to give it a whirl (see what I did there?) – I thought a gluten free version would work quite well and that all I needed to do was change the flour… I was quite wrong!

I followed Mary’s recipe to the letter and all the the tips the bakers mentioned on the show, including insuring the butter was soft enough and chilling the whirls before baking. Unfortunately, they turned out a crumbly mess and I couldn’t even get them off the baking tray without them disintegrating into a million pieces

The recipe definitely required a few further tweaks to work gluten free, so it was back to the drawing board.

I think that the first attempt went wrong because the mixture was too soft and a bit oily which resulted in the mixture melting in oven, despite the fact that I’d chilled the whirls in the freezer for 15 minutes prior to baking.

On my second attempt I decided to use margarine instead of butter, which combatted some of the oiliness, and I added a touch more dry ingredients, which resulted in a firm but pipeable mixture. Again, I  chilled the whirls before baking which helped them to keep their shape.

This time they came out overbaked, which I think is due to the oven temperature being quite high in Mary’s recipe – if you don’t check the biscuits every 30 seconds after the first 13 minutes, you might accidentally overbake them and I definitely wouldn’t recommend leaving them for the full 15 minutes without checking them!

By the third attempt, I knew I had found the right balance of ingredients but decided to drop the oven temperature from 190 degrees to 180 to help to slow down any potential overbaking.

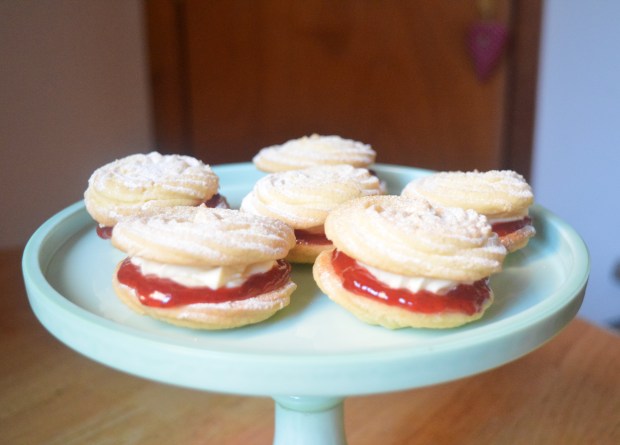
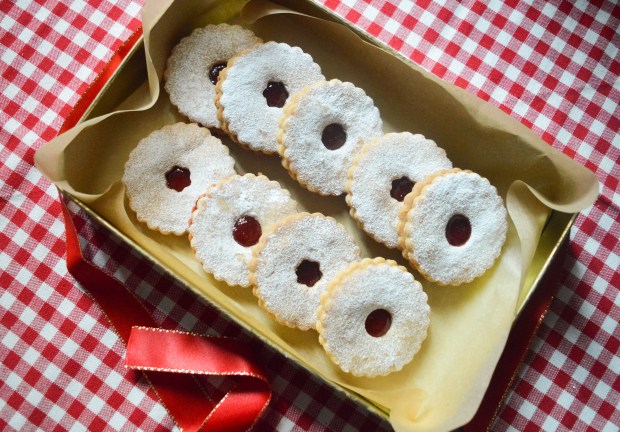
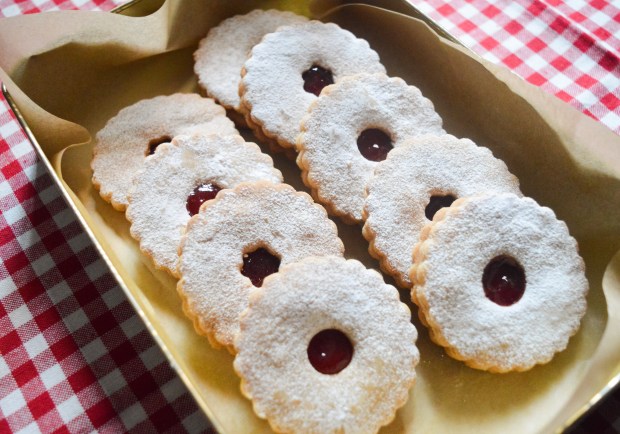
It was definitely third time lucky. The result was a whirl that had kept its shape, was golden but not over baked and was actually stable enough to get off baking tray and be filled. They also tasted delicious and melted in the mouth – heaven!

image

Viennese Whirls – GF/EF/DF OPTIONS

Recipe adapted from Mary Berry’s Viennese Whirl Recipe from ‘The Great British Bake Off’ found on the BBC Food website.

Ingredients

For the biscuits:

250g soft margarine (or dairy free alternative)

70g icing sugar

225g gluten free self raising flour

50g cornflour

1/2 tsp vanilla extract

For the filling:

Strawberry Jam (Mary’s recipe said Raspberry, but I prefer Strawberry)

100g unsalted butter (or dairy free alternative)

200g icing sugar, plus extra for dusting

1/2 tsp vanilla extract

Method

1. Preheat the oven to 180 C/160 C fan/gas mark 4.

2. Line 3 baking trays with baking paper, then use a 5cm cutter to draw 8 circles onto each sheet of paper, making sure they are well spaced out. Turn the paper over so the circles are underneath.

3. In large bowl, cream together the margarine, sugar and vanilla with an electric hand mixer until light and fluffy. Add the gluten free flour and cornflour and beat with the hand mixer until all the ingredients are fully combined.

4. Transfer the mixture into a piping bag fitted with a medium star nozzle – I like to use plastic disposable piping bags because I think they are easier to use.

5. Pipe 24 swirls inside the circles on the baking sheets. Place the baking sheets in the freezer for 10 – 15 minutes to help the swirls firm up before baking.

6. Bake for 13—15 minutes, until  pale golden-brown in colour. I reccomend checking them every 30 seconds after the first 13 minutes as the edges can catch and they can easily overbake.

7. Leave the whirls to cool on the baking sheets for a few minutes then transfer them to wire rack to cool completely.

8. To make the butter cream, beat the butter, icing sugar and vanilla extract with an electric hand mixer until light and fluffy and almost white in colour. Transfer into a piping bag fitted with a large star nozzle.

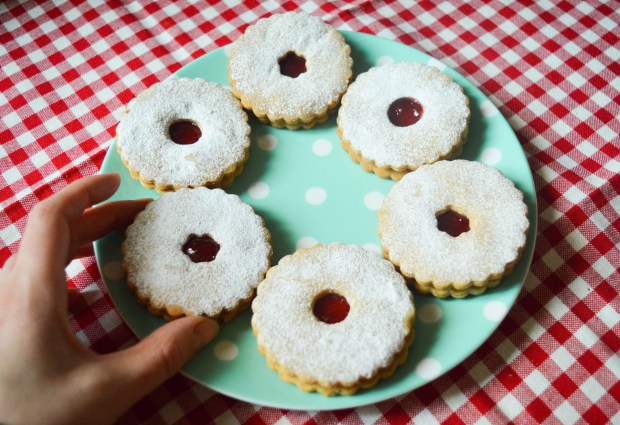
9. To decorate: Spoon a little jam onto the flat side of half of the biscuits, then pipe a swirl of buttercream over the top. Place a biscuit on top of each one to create a sandwich, then dust with a little icing sugar to finish.

image

Gluten Free Lemon Drizzle Cake

Last weekend I went to stay with my sister and her boyfriend up in Leeds and on a rather dull and grey sunday afternoon, we decided to bake a Lemon Drizzle cake.

image

My family are not coeliac or on a gluten free diet, but they are always happy to try and critique my gluten free cakes whenever I’m around and I’m happy to report that they think they taste just as good as normal cakes!

image

When I was little, my mum used to make the most delicious lemon flavoured Madeira cake and have I tried to create a gluten free version of her Madeira cake as the base of my Lemon Drizzle.

Here a few snaps of our afternoon:

Lemon Drizzle Cake – GF/DF options

Ingredients

For the cake:

175g caster sugar
175g butter, softened
225g gluten free self raising flour
1 tsp baking powder
3 large eggs
1 tbsp lemon zest from an unwaxed lemon
3 tbsp lemon juice

To decorate:
150g icing sugar
3 – 4 tsp lemon juice
Finely grated lemon zest

Method

1. Preheat oven to 170 C/150 C fan/gas mark 4 then grease and line a 2 lb loaf tin with greaseproof paper.

2. Sift together flour and baking powder then stir through lemon zest.

3. In a separate bowl, cream together the butter and sugar with an electric hand mixer until pale, light and fluffy. Add the eggs one at a time along with one tablespoon of the flour to stop the mixture from curdling.

4. Stir through the remaining flour and lemon juice and mix until all ingredients are fully combined.

5. Spoon the mixture into the prepared loaf tin, then bake for 50 – 55 mins minutes.

Insert a skewer into the middle of the cake to check if it’s cooked– if it comes out clean the cake is ready.

6. Allow the cake to cool in the tin for a few minutes, before turning it out on a wire rack to cool completely before decorating.

7. To make the icing: sift the icing sugar into a bowl, add the water slowly whilst stirring – the icing shouldn’t be too runny but should be spreadable.

8. Spread the icing over the top of the cake, allowing it drip down the sides.

To finish, sprinkle finely grated lemon zest across the top of the cake.

image

Gluten Free Christmas: Hazelnut, Cranberry and Orange Biscotti Recipe

It’s December which means one thing and one thing only… IT’S CHRISTMAS!!!

We are only a week into December and my friends have already accused me of Buddy The Elf levels of excitement at least a hundred times… but I can’t help it because Christmas is my favourite time of the year!
image1
The decorations are up, I’ve made my first batch of gingerbread, I’ve drunk my first mulled wine of the season and I’ve listened to my Christmas playlist on loop for about a week so I can confirm that I am officially in full Christmas mode.
PicCollage
For me, the best thing about Christmas is the food. I love all the flavours that the season has to offer more than any other time of year and quite frankly it’s not christmas without spicy gingerbread, chewy chestnuts, juicy clementines or even Brussels sprouts!

Following a gluten free diet has never stopped me enjoying Christmas either. If anything, I’ve found more enjoyment in food because having to bake my own festive treats is all part of the fun.

I have tonnes of Christmas recipes which I cannot wait to share with you but I’m going to start with my Hazelnut, Cranberry and Orange Biscotti recipe.
image2
Since I shared my Cranberry, Almond and White Chocolate Biscotti recipe a few months back I’ve had it in my mind to create a version using more festive flavours for Christmas.

When my family and I arrive home from church on Christmas morning we usually enjoy a cup of tea or coffee with a sweet treat just before opening all the presents. I think this year these Biscotti would be absolutely perfect and I will definitely be making a batch for the big day.
image3
Hazelnut, Cranberry and Orange Biscotti – GF/DF

Ingredients:
150g caster sugar
1 tsp baking powder
300g gluten free self raising flour, plus extra for shaping the dough
3 large eggs
150g blanched hazelnuts, roughly chopped
75g dried cranberries
1 tsp orange zest
2 tsp hazelnut syrup or extract (I used Monin Hazelnut Syrup)

Method:

1. Preheat oven to 180 C/160 C fan/gas mark 4.

2. Line a large baking tray with greaseproof paper.

3. In a large bowl, stir together the caster sugar, baking powder and flour.

4. Add the eggs, cranberries and hazelnuts then mix until all the ingredients are combined.

The mixture will be slightly wetter than expected so please don’t panic and add more flour. Remember that gluten free flour needs more moisture than regular flour and these biscuits are going to be baked twice – if you add more flour you’ll end up with a very dry dough which will result in an overly dry biscotti that cannot be baked twice.

5. Separate the mixture into two halves and generously dust a work surface with a flour.

6. Spoon one half of the mixture onto the work surface into a rough log shape then dust the mixture with a generous layer of flour – do not knead or roll the mixture but gently use your hands to shape the mixture into a log shape. The flour will stick to the mixture like a coating which will help the log keep it shape whilst allowing the inside to stay soft.
image    image
7. Transfer to the log to a baking tray (you could use a cake lifter to help) then flatten the log slightly so it’s approximately the width of a ciabatta. Repeat the with the other half of the mixture then place the second log on the tray – make sure you leave a little room between to allow them to expand slightly.

8. Bake for 20 to 25 minutes or until the biscotti is golden brown. Transfer the biscotti to a wire rack to cool completely. Leave the oven on.

9. Once the biscotti is cool, slice it diagonally across into inch thick slices. Do not attempt to slice the biscotti whilst still warm or it will crumble.

10. Transfer the biscotti back onto the baking tray and bake for a further 6 to 8 minutes on each side. Leave the biscotti to cool completely before serving.
image1
I can’t wait to show you what else I have planned for Christmas, but if you are looking for more Christmas inspiration in the meantime, why not take a look at my Gluten Free Gingerbread Cookies recipe which I posted last Christmas, or, follow me over on Instagram or Facebook to see what else I’m getting up to.

Gluten Free Cranberry, Almond and White Chocolate Biscotti (Inspired by ‘The Great British Bake Off’)

Today I’m going to share with you another gluten free version of a bake featured on ‘The Great British Bake Off’.

This week’s episode was Biscuit Week in which the remaining contestants baked no less than 748 biscuits plus a show-stopping edible and ornate biscuit box each, which had to be sturdy enough to encase their biscuits.

The Signature Challenge saw the bakers take on Italian Biscotti. Biscotti basically means the biscuits are ‘twice baked’ and are traditionally dry and quite hard biscuits, filled with nuts and fruit. They can be a little tricky to get right because whilst the biscuits need to be dry, there is a danger they will end up so brittle that they will break your teeth! The bakers had a relatively short amount of time in which to bake the Biscotti, which needs to be cooled down completely before it’s baked again so that it doesn’t crumble when sliced.

I decided to have a go at creating a gluten free version of the signature challenge and went for the quite classic flavour combination of cranberry, almond and white chocolate.
image
The key to baking excellent gluten free biscotti is to start with a slightly wetter mixture than you’d expect. Although Biscotti are typically quite dry biscuits, remember that gluten free flour requires more moisture than normal flour – without the extra moisture the Biscotti won’t survive being baked twice and will be a crumbly mess. If you follow my method carefully you should have no problems baking your very own gluten free Biscotti which has the texture and taste of proper Biscotti.

Gluten Free White Chocolate, Almond and Cranberry Biscotti – GF/DF options

Ingredients:
150g caster sugar
1 tsp baking powder
300g gluten free self raising flour + extra for shaping the dough
30g ground almonds
3 large eggs
125g dried cranberries
75g chopped blanched almonds
25g chopped cashew nuts
1 tsp lemon zest
1/2 tsp almond extract

To decorate:
300g good quality white chocolate (or dairy free alternative)

Method:

1. Preheat oven to 180 degrees C/160 C fan/gas mark 4 and line a large baking tray with greaseproof paper.

2. In a large bowl, stir together the caster sugar, baking powder, flour and ground almonds.

3. Add the eggs, cranberries and nuts then mix until all the ingredients are combined. The mixture will be much wetter than expected so please don’t panic and add more flour. Remember that gluten free flour needs more moisture than regular flour and these biscuits are going to be baked twice – if you add more flour you’ll end up with a very dry dough which will result in an overly dry biscotti that cannot be baked twice.

4. Separate the mixture into two halves and generously dust a work surface with a flour.

5. Spoon one half of the mixture onto the work surface into a rough log shape then dust the mixture with a generous layer of flour – do not knead or roll the mixture but gently use your hands to shape the mixture into a log shape. The flour will stick to the mixture like a coating which will help the log keep it shape whilst allowing the inside to stay soft.
image   image
6. Transfer to the log to a baking tray (you could use a cake lifter to help) then flatten the log slightly so it’s approximately the width of a ciabatta. Repeat the with the other half of the mixture then place the second log on the tray – make sure you leave a little room between to allow them to expand slightly.
image
7. Bake for 20 to 22 minutes, until the biscotti is golden brown. Remove the biscotti from the oven and transfer to a wire rack to cool completely. Leave the oven on.
image
8. Once the biscotti is cool, slice it diagonally across into inch thick slices. Do not attempt to slice the biscotti whilst still warm or it will crumble.

9. Transfer the biscotti back onto the baking tray and bake again for 6 to 8 minutes on both sides, then leave the biscotti to cool on a wire rack.
image
10. Melt the chocolate slowly in a heatproof bowl over a pan of simmering water. Dip the base of each biscuit into the chocolate, gently shake off any excess chocolate, then leave each one to set on a sheet of greaseproof paper.

Once set, enjoy in the traditional Italian style with a cup of coffee!
image
If you’re not feeling all baked out, why not check out my take on the classic Madeira cake as featured on episode one of this years ‘Bake Off’.

The Allergy & Free From Show (London Olympia) Review

Yesterday I attended the first day of The Allergy and Free From Show, which is being held this weekend (3 – 5 July 2015) at the London Olympia.

The show prides itself as being ‘Europe’s largest free-from family day out’ so I was really looking forward to seeing what was on offer and anticipated bagging myself a bargain or two.

Upon arrival I was directed into a huge hall and I was taken aback by the sheer number of exhibitors attending the show – 221 to be exact!

I am someone who ends up shopping at a number of different supermarkets in order to have more choice and to compare the deals on offer, so it was a wonderful to have so many products all under one roof – let’s just say, I was like the proverbial kid in a candy shop.

A huge benefit of attending a show like this is getting the opportunity to try before you buy and the majority of the exhibitors also offer special deals on their products, so it’s worth bringing a bag and stocking up on your favourites.

As you’d expect, there were lots of well known brands in attendance, including:

  • Udi’s (who also sponsored the show)
  • Sainsburys
  • Tesco
  • ASDA
  • Doves Farm
  • DS (soon to be Schär)
  • Genius
  • Warburtons Newburn Bakehouse
  • Nairns
  • Bfree
  • Delicious Alchemy
  • Mrs Crimbles
  • Nak’d

image  image
image  image
A lot of companies, especially the big brands, were showcasing new products and it was a great to opportunity to speak to companies face to face and give them feedback, which they were more than happy to receive.

I also discovered so many brands I hadn’t heard of before, including Pudology, Sweet Rebellion, Venice Bakery and Dohertys.

As you’d expect from an Allergy and Free From show, the majority of exhibitors were focused mainly on Gluten Free, Wheat Free, Egg Free and Dairy Free products, but there also quite a few companies exhibiting Nut Free and Sugar Free Products.

Despite the fact that the majority of food on offer was suitable for Coeliacs you still need to exercise some caution when sampling products as it’s not just a gluten free show. A lot of companies had signs up stating any allergens that their products might contain, but be sure to double check with the stall holders before you sample anything – they were all really friendly and more than willing to help.

image

Meeting the lovely ladies at Delicious Alchemy

There were also other things to do at the show besides shopping, including cooking and baking demonstrations and a ‘speakers corner’ where people could share their experiences. There was also an activity for children called ‘Allergy Adventures’ which helped educate children with allergies on how to stay safe and healthy.

In the same hall there were two other food shows, the Love V show (for Vegetarians & Vegans) and the Love Natural Love Organic Show – both of which you could also attend if you had tickets to the Allergy and Free From Show.

Overall, I was highly impressed with the amount the show had to offer and I had such a lovely time meeting like minded people and chatting to the companies about their products. This year you could get hold of free tickets for the show which meant more to spend on bargains so it was totally worth attending! I heartily recommend this show to everyone, including those who might have friends or family who suffer from food allergies, Coeliacs Disease or IBS.

image

Just a few of the bargains I picked up at the show!

Tomorrow (Sunday 5th July) is the last day you can catch the show at London Olympia but if you miss it, there is also a show in Liverpool on the 7th and 8th of November 2015 and according to their website they are planning to launch a show in Scotland in March 2016.

For more information visit: http://www.allergyshow.co.uk/london/ or for a full list of exhibitors click here.