Gluten Free Strawberries and Cream Cheesecake Jars

It’s been a little too hot to bake recently, as here in the UK we’ve been experiencing a heatwave – I do like to see the sun out at last, but our country is not built to cope with heat… and neither are us Brits!

So, I’ve been eating a lot of lazy food; lots of salads (my particular favourite is a watermelon, cucumber and feta salad) and cured meats, like salami and prosciutto – basically anything that doesn’t involve standing in front of a hot stove.

I have been feeling a little sick of ice cream, so I wanted to come up with a quick, easy and refreshing no bake dessert to satisfy my sweet tooth.

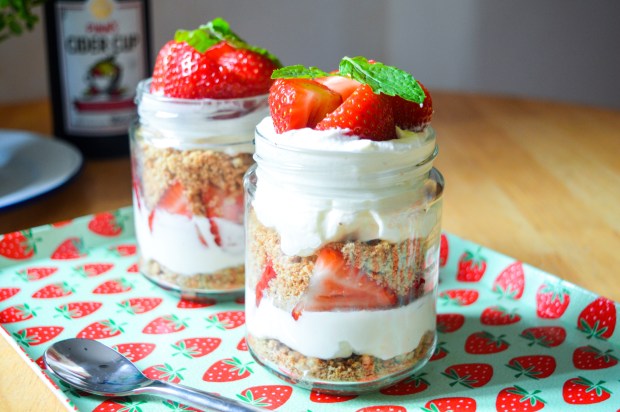
My Gluten Free Strawberries and Cream Cheesecake Jars tick all the boxes – they take a matter of minutes to put together, there is no baking required and they don’t  need to be left to set.

IMG_5468

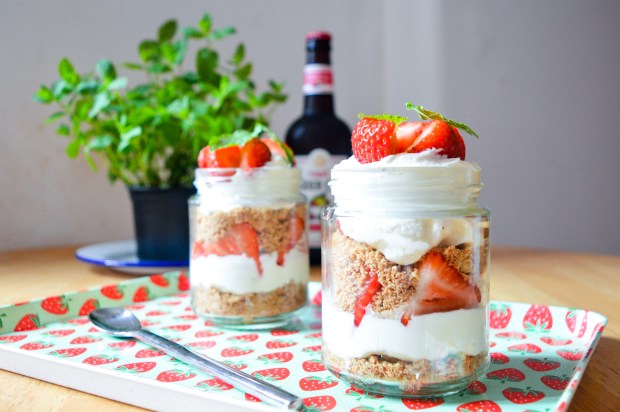
Strawberries are at their best right now and I absolutely adore them – but you could also use Raspberries or a mix of both if you prefer.

For the biscuit layer, I used Schär Gluten Free Digestive Biscuits – I prefer this brand because they are also free from oats, but you can use any kind of biscuits you like.

IMG_5473

These Cheesecake jars are best served right away, but they can be made ahead of time and popped in the fridge. They are also ideal for a picnic as they are portable – simply put the lids on and pop them in a cool bag to keep them fresh!

IMG_5471

Strawberries and Cream Cheesecake Jars – GF/EF

Makes 4 (depending on the size of your jars)

Ingredients

180g Philadelphia cheese, cold
330ml whipping cream
1 tsp vanilla extract
2 tablespoons icing sugar
150g gluten free digestive biscuits (I prefer ones by Schär, as they are also free from oats)
500g fresh strawberries, halved
Fresh mint to decorate

Method

1. Blitz the biscuits in a food processor (or crush them by hand) until they are the consistency of breadcrumbs.

2. In a large bowl, gently mix the cream cheese, icing sugar and vanilla extract together until combined. Add the whipping cream and whisk using a electric hand mixer until the ingredients form soft peaks.

3. Add a layer of the biscuit crumbs to the base of each jar, followed a layer of cream and a layer of strawberries. Repeat until the jars are full and top with mint leaves to decorate.

IMG_5474

I love seeing your take on my bakes, so remember to share your a picture of your Cheesecakes over on Facebook, twitter or Instagram using the hashtag #titchytonbakes.


Sweet and Salted Peanut Butter Popcorn Squares

These Sweet and Salted Peanut Butter Popcorn Squares are the perfect treat to enjoy on a Sunday afternoon, snuggled up on the sofa in your pyjamas while you watch a film Marathon. Be careful though, they are super moorish!

IMG_6387


Sweet and Salted Peanut Butter Popcorn Squares – GF/EF/DF options

Ingredients

For the popcorn squares:
60g butter (or dairy free alternative)
100g gluten free salted and sweet popcorn
180g white mini marshmallows
3 tbsp chunky peanut butter

To decorate:
50g milk and dark chocolate (or dairy free alternative)

Method

1) Grease and line a square cake tin with baking paper.

2) Place a large heavy bottomed pan over a low to medium heat, then add the butter and marshmallows and heat them until they have completely melted.

3) Fold the peanut butter through the marshmallow mixture, then add the popcorn and stir until fully coated.

4) Working quickly, spoon the mixture into the prepared tin and smooth it out using a greased palate knife until it starts to reach corners of the tin.

5) Place a large square of grease proof paper over the top of the mixture, then use your hands to press the mixture right down into the tin.

6) Peel off the greaseproof paper and leave the mixture to set for a few hours.

7) Once the mixture has set, turn it out of the tin and cut it into bite size squares.

8) Next, melt the chocolate in heat proof bowl over a pan of simmering water. Transfer the chocolate into a piping bag and pipe a zig-zag pattern over each popcorn squares.

IMG_6385

Store the popcorn squares in an airtight container and they should last for up to a week.

Gluten Free Rocky Road

During the dark and cold month of January, I am usually found seeking out delicious comfort foods to perk up my mood.

For me, nothing quite beats curling up on the sofa with a good book, a cuppa and slice of my Gluten Free Rocky Road, which is packed full of delicious sweet treats and is certain to banish those winter blues!

image


Most traditional Rocky Road recipes are not Gluten Free because they usually include biscuits, so instead of Biscuits I decided to use Nature’s Store Puffed Rice Cereal as a substitute. Puffed rice is 100% Gluten Free and a healthier option than biscuits as it contains no sugar. You can of course use Gluten Free Biscuits if you’d prefer, but I honestly prefer using puffed rice as it still provides crunch expected from Rocky Road.

This is recipe is wonderfully simple and so easily adaptable so if you fancy changing it up, why not use raisins or cranberries instead of cherries? It is also a no bake recipe (perfect if you are feeling a little bit lazy), simply pop it in the fridge and let the magic happen – what’s not to like?

Gluten Free Rocky Road – GF/DF/EF

Ingredients

300g milk or dark chocolate (or dairy free alternative)
125g butter, softened (or dairy free spread)
100g pink and white mini Marshmallows (plus an extra handful for the top)
75g glacé cherries cut in half
25g Rude Health Brown puffed rice
25g almonds
3 tbsp golden syrup

Icing Sugar to dust

Method

1) Grease and line a square tin with greaseproof paper.

2) Melt the chocolate in large heat proof bowl over a pan of simmering water.

3) In a separate pan melt together the butter and golden syrup, then add this to the melted chocolate and stir continuously until all the ingredients are combined.

4) Stir in the marshmallows, puffed rice, almonds and cherries until they are coated in a thick layer of the chocolate.

5) Pour the mixture into the prepared tin and use a greased palate knife to flatten down the mixture down and smooth it right to the corners of the tin.

6) Place a sheet of greaseproof paper on top of the mixture and press down firmly to help tightly pack the mixture into into the tin. Peel off the greaseproof paper and dot across the extra marshmallows.

7) Chill the Rocky Road in the fridge for at least two hours.

8) Use the greaseproof paper to help remove the slab of Rocky Road from the tin, then carefully cut it into equal pieces.

9) Lightly dust the Rocky Road with a little icing sugar and  enjoy!

Rocky Road should keep for up to a week stored in an airtight container, or you can keep it in the fridge if your home is a little warm.

image

If you want to keep up to date with my kitchen adventures on instagram, you can find me @titchyton.