Gluten Free Iced Gems

Recently I’ve been feeling nostalgic for the bakes of my childhood – so far this year I’ve posted a gluten free version of Jammy Dodgers and Party Rings, and now I’ve come up with a recipe for Gluten Free Iced Gems.

DC854A1F-BBDC-4BCE-B39C-BFA7FB7E11B1

Ice Gems may be small, but they aren’t fiddly or faffy to make. They would make an easy homemade gift or a great rainy project for the kids, as there are no difficult techniques involved – you could even save on washing up by putting all the different colours of icing in the same piping bag and making multicoloured ice gems!

485FA9FA-5250-432F-BF6B-8240B10A4F1C

These biscuits kept really well for about 5 days in an airtight container. The royal icing took about 24 hours to set completely, but they were fine to eat after a few hours.


Iced Gem Biscuits (GF/DF options)

For the Biscuits:

75g golden caster sugar
75g unsalted butter, cold (or dairy free alternative, like Stork Margarine Block)
140g gluten free all purpose flour (I used Schär All Purpose Baking Mix)
1 small egg (you might not need it all)
1 tsp vanilla extract

For the Icing:

275g icing sugar
1 egg white plus Food Colouring (I prefer using a gel or paste)

Method:
1) To make the biscuit dough: In a large bowl combine the gluten free flour and sugar, then rub in the cold butter until you have a breadcrumb like texture.

2) Whisk together the egg and vanilla in a separate bowl, then add this bit by bit to the breadcrumb like mixture whilst bringing the ingredients together with your hands – you might not need all the egg.

3) Tip the contents of the bowl out onto a lightly floured surface, then use your hands to work the ingredients into a soft dough. Don’t worry if the dough seems a little sticky as it will be refrigerated which help it to firm up – don’t be tempted to add more flour!

4) Wrap the dough in cling film and place in the fridge for at least an hour.

5) Preheat the oven to 170 C/150 C fan/gas mark 4 and line a baking tray with greaseproof paper.
8) Dust a clean surface with flour and roll out the dough until it is 0.5mm thick. Cut out small circles using the bottom of a piping nozzle as a cookie cutter and  transfer the cookies to the tray lined with greaseproof paper using a palate knife.

9) Bake the cookies for 10 – 12 minutes or until the cookies are firm and a light golden brown – be sure to keep an eye on them as they could quickly over-bake.

10) Once baked, leave the cookies to cool slightly on the trays to before transferring them to wire racks to finish cooling.

11) To make the royal Royal icing: place 1 egg white in a bowl, then slowly sift in the icing sugar in batches. In between the batches of icing sugar, stir the ingredients with a wooden spoon or a balloon whisk until the icing thickens up – you can use a dash of water to encourage the ingredients to come together if necessary.

12) Divide the icing between 4 bowls, add a few drop of food colouring to each one depending on what colours you want the icing to be – you can leave one bowl of icing white if you want white iced gems.

13) Transfer the icing to 4 piping bags, each one fitted with a 1 inch star nozzle, then pipe a blob of icing onto the centre of each biscuit.

14) Leave the icing to set, then enjoy!

5D6B1DEF-71DB-4C54-86F3-9A89C9F4551B

I love seeing your take on my recipes, so remember to share a snap of your Iced Gems over on Facebook, twitter or Instagram using the hashtag #titchytonbakes.


Gluten Free Easter: Marmalade Simnel Cake

Today I am going to share with you my Gluten Free Marmalade Simnel Cake recipe.

IMG_4506For me, it simply wouldn’t be Easter without Simnel Cake – a traditional cake made up of a lightly spiced fruit sponge with a hidden marzipan layer. It is topped with 11 marzipan balls which are said to represent the 11 apostles, minus Judas.

My recipe is a slight twist on the traditional Simnel Cake. I have added a little more liquid in order to create a moist sponge, as Gluten Free Flour requires more moisture than normal flour – Simnel cakes are usually slowly baked on a low temperature for a long time, so the extra moisture is necessary to prevent a dry cake.

I also used Orange Zest instead of Lemon zest and instead of apricot jam I brushed the cake in a generous layer of marmalade.

IMG_4516

Simnel Cake would make a beautiful centrepiece for a special Easter Sunday meal, it is also easily prepared in advance and will comfortably feed a large family.

Orange and Marmalade Simnel Cake – GF/DF options

Ingredients

For the cake:

200g butter, softened (or dairy free butter/spread)
200g light brown sugar
1/2 tsp baking powder
200g gluten free self raising flour, sifted
3 large eggs, whisked
500g sultanas, raisins, mixed peel
Zest 1 orange, plus 2 tbsp of juice
2 tbsp marmalade, gently warmed
2 tsp ginger
1 tsp cinnamon
300g Marzipan, for the centre

To decorate:
2 tbsp Marmalade
500g Marzipan, to decorate

Method:

1) Preheat the oven to 140 C/120 C fan/gas mark 1 and grease and line a loose-bottomed cake tin.

2) In a large bowl cream together the butter and sugar with an electric hand mixer or a wooden spoon.

3) In a separate bowl mix together the dry ingredients: sift together the flour, baking powder and spices, then fold through the fruit and the orange zest.

4) Add the eggs one at a time to the wet ingredients along with a tablespoon of dry ingredients to stop the mixture from splitting. Ensure each egg is fully combined before adding the next one.

5) Fold in all the remaining dry ingredients, then add the marmalade and orange juice and mix until fully combined.

6) Spoon half the mixture into the prepared cake tin and smooth out with a spatula.

7) Roll out 300g of marzipan into a circle large enough to fit the tin and place it on top of the cake mixture

8) Spoon the remaining mixture on top of the marzipan and smooth out with spatula.

9) Bake in a preheated oven for 1 hour 40 – 50 minutes, until the cake is deep golden brown and firm to touch.

10) Leave the cake to cool in the tin slightly before turning it out onto a cooling rack to cool completely.

11) Once cake is cool, brush the top with a generous amount of marmalade which which will help the cake to stay moist.

12) Roll out 400g of Marzipan into a circle large enough to cover the top of the cake.

13) Place the marzipan on top of the cake and divide the remaining marzipan into 11 equal pieces. Roll the pieces into 11 balls and arrange them around the edge of the cake in a circle.

14) Place the cake under a grill high heat for a minute or so until the marzipan is golden brown – watch it like a hawk or the marzipan could burn!

15) Place the cake onto a serving plate and wrap it in a pretty ribbon.

You are now ready to proudly display your beautiful and entirely gluten free Easter centre piece for all the family to admire!

IMG_4512

I love seeing your take on my bakes, so remember to share your a picture of your bakes over on Facebook, twitter or Instagram using the hashtag #titchytonbakes.

Gluten Free Chouquettes

Out of all the cuisines the world has to offer, I have to admit (albeit with some trepidation) that French food is an area that I have left largely unexplored.

Maybe I am unsophisticated, or perhaps I’ve just been misled by the notion that French food is a little tricky – at this point I am thinking about my miserable attempts at Petit Four or Macarons…

After watching Rachel Khoo’s ‘Little Paris Kitchen’ (which is currently being re-aired on BBC 2) I’ve been feeling a little more enthusiastic about revisiting French cuisine – thanks to the show I’ve achieved the gooiest of Chocolate Fondants and have fine tuned my gluten free Choux pastry recipe.

Speaking of Choux, I have made it in the past – and quite successfully (see my Profiteroles recipe) – but this time I definitely feel like I have perfected it.

One of the recipes on the show was Chouquettes – a petit viennoiserie, consisting of  Choux pastry which are most often topped with pearl sugar or chocolate chips, although sometimes you might come across Chouquettes which have been dipped in chocolate or filled with mousse.

image

I decided to go for the traditional Chouquettes sprinkled with Pearl Sugar (or nib sugar) which I found in my local Waitrose and I also used Rachel Khoo’s recipe from the show, but with some vital tweaks to make the recipe work gluten free.

image

Chouquettes are definitely best eaten on the day they are baked, and I will be very surprised if they don’t gobbled up immediately!


Gluten Free Chouquettes

Recipe adapted from Rachel Khoo’s Little Paris Kitchen (recipe found on Almost Always Hungry).

Ingredients: 

170ml water

170ml semi skimmed milk

1 tsp salt

1 tsp sugar

100g butter

170g gluten free self-raising flour

1 tsp baking powder

3 eggs

Icing sugar for sprinkling

Pearl sugar to decorate (I found this in my local Waitrose).

Method:

1. Preheat the oven to 200c/ 180c fan/gas mark 6 and line two trays with greaseproof paper.

2. In a heavy bottomed pan, stir together the water, milk, salt and sugar. Place the pan over a medium heat, then add the butter and bring the ingredients to the boil. Once the butter has melted bring the pan off the heat.

3. In a separately bowl, stir together the gluten free flour and the baking powder. Add the flour mixture to the wet ingredients and beat vigorously until no flour remains and you are left with a smooth dough.

4. Transfer the dough to a bowl and leave it to cool for a few minutes. Stir the dough to help release the steam – once  the mixture has cooled down add the eggs, one at a time, beating until dough is smooth, glossy and elastic.

5. Place dough into a piping bag fitted with a plain nozzle and pipe bite-sized dollops onto a lined baking tray.

6. Sprinkle each dollop with icing sugar and pearl sugar, then give them another sprinkling of icing sugar.

7. Bake the Chouquettes in the oven for 25-30 minutes or until evenly browned. In the last few minutes, pierce the bottom of the Chouquettes with cocktail stick to help the insides to dry out – this will stop them from going soggy and help them to stay crisp.

8. Transfer the Chouquettes to a wire rack to finish cooling.

image

I love seeing your take on my bakes, so remember to share your a picture of your Chouquettes over on Facebook, twitter or Instagram using the hashtag #titchytonbakes.


Gluten Free Cocoa Pops Recipe

Every year I make it my New Years Resolution to eat breakfast every single day – but, every year I fail miserably and just end up  feeling pretty bad about myself and my lack of willpower. So this year, instead of coming up with resolutions I know I won’t keep, I decided to challenge myself to come up with fun breakfast ideas and to just enjoy food more.

My breakfast of choice used to be cereal and wouldn’t just eat it for breakfast, I’d have it as an after school snack or for a late night feast – now, I can’t eat most cereals as a lot of popular brands aren’t gluten free, and haven’t found many gluten free cereals which I really like or that don’t contain copious amount of sugar and additives.

This morning I had a huge craving for Coco Pops, so I decided to try to make my own homemade version and I’m very pleased with how they turned out.imageThese homemade Cocoa Pops are super easy to make – you only need four very basic ingredients and they can whipped up in less than 20 minutes. The recipe uses a natural alternative to refined sugar and is both dairy and gluten free, but I promise they are delicious and taste just as good, if not better than the shop variety!

image


Cocoa Pops – GF/DF/EG

Ingredients

3 cups puffed rice
60 ml maple syrup
30 ml sunflower oil
1 tbsp cocoa powder

Method

1. Preheat the oven to 160 C/140 C/gas mark 3 and line two large baking trays with greaseproof paper.

2. Place the maple syrup, oil and cocoa powder into a sauce pan and place it over a low heat. Stir the ingredients with a wooden spoon until no lumps remain, then fold through the puffed rice until it is fully coated in the cocoa mixture.

3. Spread the mixture into a thin layer across the two baking trays. Bake for 6 – 8 minutes, until the puffed rice becomes crisp – make sure to give the cereal a stir half way through the bake time.

4. Leave the cereal to cool on the baking trays for a few minutes, then it’s ready to enjoy!

image

Gluten Free Christmas: Gingerbread Wreath

We are 12 days into advent and I finally feel as though I’m getting into the full swing of the festivities. So far most of Advent has been spent in the kitchen working on festive bakes, most of which have involved copious amounts of edible glitter which I keep finding everywhere, including in my hair, on the floor, on the cat…

Today I’m going to share with you my recipe for this gingerbread wreath which is definitely an excuse to get out the edible glitter.

img_3316

The Gingerbread wreath is completely edible (except for the Red Ribbon) and although it looks impressive and difficult to achieve, it was actually incredibly easy! You don’t need any fancy equipment, just a large dinner plate, a sharp knife and a few different sized cookie cutters. Whipping up the gingerbread dough takes only a matter of minutes and the construction of the wreath isn’t too daunting, as long as you follow the instructions step by step. The wreath is not really design to be used as a decoration as the ribbon won’t support the weight of a wreath – but it would make a lovely edible Christmas gift.

img_3321


Gluten Free Gingerbread Wreath – GF/DF options

This recipe is inspired by Cassie Best’s Gingerbread Wreath for BBC Good Food

Ingredients

For the Gingerbread:
125g gluten free self raising flour blend
200g rice flour, plus extra for dusting
1 tsp bicarbonate of soda
2 tsp ground ginger
2 tsp cinnamon
125g unsalted butter (or dairy free alternative)
150g soft dark brown sugar
2 tbsp golden syrup
1 tbsp black treacle
1 large egg

To Decorate:
200g Ready to roll Icing
30 ml cold water
250g icing sugar
1 egg white
Edible glitter

You will also need:
A sharp knife
1 x large dinner plate
1 x inch piping nozzle
1 x 9cm round cutter
1 x small star cutter
1 x medium star cutter
1 x large star cutter
1 x small angel cutter
1 red ribbon

Method

1) In a large bowl, sift together the flours, bicarbonate of soda, ginger and cinnamon. Using your hands, rub the butter into the dry ingredients until it becomes like fine bread crumbs and then stir through the dark brown sugar.

2) In a separate bowl whisk the egg with a fork, then add this to the cookie mixture along with the golden syrup and black treacle. Mix until the ingredients come together. The cookie dough will appear quite wet at this stage but don’t be tempted to add more flour or you will dry out the dough!

3) Gently knead the dough on a floured surface with floured hands until it turns into a smooth, soft and slightly sticky ball of dough. Dust the dough with flour as you knead to stop it sticking to the work surface. Wrap the dough in cling film and leave to chill in the fridge for at least 2 hours – chilling helps the dough to firm up so it can be rolled out.

4) Preheat the oven to 180 C/160 fan/gas mark 4. Roll half of the dough out in between two sheets of greaseproof paper until it is the thickness of a 1 pound coin. Remove the top layer of greaseproof paper, then place a large dinner plate face down into the centre of the dough and use a sharp knife to cut out a large circular disc of gingerbread.

5) Transfer the gingerbread onto a baking tray (you can use the bottom sheet of baking paper to line your tray) then use a 9 cm circular cutter to cut out a circle of dough from the centre of the gingerbread disc and a 1 cm piping nozzle to cut out a hole for the ribbon.

6) Bake the base of your wreath for 10 to 12 minutes – watch out for the edges catching.
Once baked, leave the wreath to firm up on the baking tray for a few minutes before transferring it to wire rack to finish cooling.

7) Roll out the remaining dough and cut out 5 large stars, 4 medium stars, 11 small stars and 2 angel shapes. Arrange the shapes onto a baking tray and bake for 10 to 12 minutes – the smaller cookies will need checking after 8 minutes.

8) Once baked, leave the cookies to firm up on the baking tray for a few minutes bering transferring them to wire rack to finish cooling.

9) While the cookies cool, make the royal icing: place 1 egg white in a bowl and slowly sift icing sugar in batches. In between each batch of sugar, stir the icing with a wooden spoon or a balloon whisk until the icing thickens up, then transfer the icing into a piping bag fitted with a small writing nozzle.

10) Next, make the fondant icing: break the ready to roll icing into pieces and place them in a bowl. Add a splash of water and use a spatula to break up the icing until it starts to become more paste like, then add the rest of the water and beat with an electric hand mixer until the fondant becomes runny.

11) Spread the fondant icing over the 5 large star shapes and sprinkle each one with edible glitter. Decorate the remaining pieces with the royal icing and leave all the pieces to dry for about an hour before you assemble the wreath.

12) Use the remaining royal icing to stick the biscuits to the wreath. Sprinkle the wreath with edible glitter and thread a red ribbon through the hole to finish.

img_3343


There will be plenty of festive bakes coming your way really soon. Meanwhile, why not come and see what else I’m getting up to over the festive season by following me on Instagram or Facebook. Remember, If you give this recipe take a snap of it and share it with me on Instagram, Facebook or Twitter using the hashtag #titchytonbakes and I will share my favourites on my Facebook page!

Gluten Free Red Velvet Cupcakes

Today I’m going to share with you a recipe for one of my favourite bakes – Gluten Free Red Velvet Cupcakes.

image

My love affair with Red Velvet Cake started a few years ago when my little sister asked me to make a Red Velvet Cake for her Birthday. I had never eaten or made Red Velvet Cake before, but I was nevertheless happy to oblige – my Mum was less happy when my first attempt erupted all over the oven because I’d used shallow tins and too much bicarbonate of soda… sorry Mum!

It wasn’t until my first taste of Red Velvet Cake I realised what I had been missing – Chocolate sponge flavoured with sharp buttermilk, topped off with cream cheese frosting. What’s not to like?

Making a Red Velvet Cake can be quite time consuming, especially if you are going for the traditional three or more layers, so I’ve adapted my Red Velvet Cake recipe to a more simple cupcake recipe, so that you can get your Red Velvet fix much quicker!

image


Red Velvet Cupcakes – GF

Ingredients

For the Cupcakes:
100g gluten free self raising flour
10g cocoa powder
100g caster sugar
50g butter
1 large egg
100ml buttermilk
1 tsp vanilla extract
1/2 tsp red food colouring (gel not liquid)
1/2 tsp cider vinegar
1/2 tsp bicarbonate of soda

For the Cream Cheese Topping:
250g mascarpone cheese
150ml double cream
50g icing sugar
1/2 tsp vanilla extract

To Decorate:
Freeze dried raspberry pieces

Method

1) Preheat the oven to 170 C/150 C fan/gas mark 3) and a cupcake tray with cupcake cases.

2) In a large bowl sieve together the flour and cocoa powder, then set aside for later.

3) In a separate bowl cream the butter, vanilla extract and sugar together with an electric hand mixer until light and fluffy.

4) Scrape down the sides of the bowl with a spatula. With the mixer on a low speed, add the egg a bit at a time along with a tablespoon of the flour mixture. Once the egg is fully combined, add the rest of the flour.

5) Pour your buttermilk into a measuring jug, then add the red food colouring a little at a time until it turns a turns a deep red –  I found about half a teaspoon did the trick, but you may find you need more or less depending on the food colouring you are using.

6) With the mixture on a low speed, add the buttermilk to your cake mixture a bit at a time, keep mixing until all the buttermilk is combined.

7) In a small bowl mix together the bicarbonate of soda and vinegar until it starts to fizz, then quickly fold it into the cake mixture.

8) Working quickly, spoon two teaspoons of the mixture into each cupcake case

9) Bake for 15 – 18 minutes. The cupcakes are ready when they are firm to touch.

10) Leave the cupcakes to cool in the tin for a few minutes, then transfer them to a wire rack to finish cooling while you prepare the cream cheese topping.

11) Sift the icing sugar into a large bowl, add the vanilla extract and mascarpone then mix with a wooden spoon until the ingredients are just combined.

12) In a separate bowl whisk the double cream with an electric hand mixer until it almost reaches soft peaks, add the mascarpone and whisk for a couple of seconds until it is just combined.

13) Transfer the frosting into a piping bag fitted with a large star nozzle. Pipe the frosting onto each cupcake, then decorate with a sprinkling of freeze dried raspberry pieces.

image

If you give this recipe a try, or any of the other recipes on my blog remember to take a snap of your creation and share it with me on Instagram, Facebook or Twitter using the hashtag #titchytonbakes.

Gluten Free Bakewell Tart (Inspired by ‘The Great British Bake Off’)

Today I’m going to share with you my gluten free take on Mary Berry’s Bakewell Tart, as featured on the latest episode of ‘The Great British Bake Off’.

image

This week the bakers had to tackle pastry and they were tasked with making Danish Pastries, Filo Pastry Amuse Bouches and a Bakewell Tart, which was this week’s technical challenge.

There was some controversy on Twitter after the show aired that Mary’s bake was not a Bakewell Tart, but in fact a Cherry Bakewell because it was topped with an almond flavoured icing – apparently a traditional Bakewell Tart is supposed to be topped with layer of flaked almonds, not icing.

It may annoy traditionalists, but I decided to stay true to Mary’s recipe and go for a layer of icing…  but I did add some flaked almonds for good measure!

image

The challenge making a gluten free version of this bake is coming with a good shortcrust pastry recipe.

Gluten free pastry can tend to be a little on the crumbly side, so it’s important that there is enough liquid in the mixture to help bind the ingredients together. My recipe uses a combination of egg yolks and butter to achieve this, but if the mixture is being little stubborn, a drop of water can be added to help bring it together.

It’s also incredibly important to chill your pastry before using it, as it this really does help to make it more pliable.

Finally, a good quality non stick tart or flan tin with a loose base is essential, or you will struggle to get your tart of its tin!

image

Gluten Free Cherry Bakewell Tart – GF/DF/

(Recipe inspired by Mary Berry’s Bakewell Tart recipe from ‘The Great British Bake Off’)

You will need a 8″ inch fluted flan or tart tin with a loose base.

Ingredients

For the Pastry:

200g plain gluten free flour

50g ground almonds

75g  icing sugar

2 egg yolks

125g butter (Or gluten free alternative like Stork Baking Block)

A drop of water

For the filling:

4 tbsp seedless raspberry jam

150g butter, softened (or gluten free alternative)

150g caster sugar

150g ground almonds

1 large free-range egg, beaten

1 tsp almond extract

For the icing: 

300g icing sugar

1 tsp almond extract

A handful of toasted flaked almonds to finish

Method

1) To make the pastry, stir together the flour, ground almonds and icing sugar in a large mixing bowl.

2) Rub together the flour mixture and the butter, add the egg yolks and start to bring the mixture together your hands.

3) Tip the contents of the bowl out onto a floured work surface and knead the dough until it comes together in a smooth ball – you can add a few drops of water to help, if necessary.

4) Wrap the pastry in cling film and put it in the fridge to cool for about 30 minutes to an hour – this is very important as the colder the pastry is, the easier it is to work with.

5) Preheat the oven to 180 C/160 C fan/gas mark 4, then throughly grease your tart tin with butter.

6) Roll out the chilled pastry between two sheets of greaseproof baking paper (this will prevent the pastry from sticking to your work surface) until it is about the thickness of a 1 pound coin.

7) Use greaseproof paper to help you get the pastry into the tin safely. Firstly, peel off the top layer of baking paper, place the tin upside down into the middle of the pastry then carefully flip the pastry over with the help of the bottom sheet of baking paper. Peel off the bottom baking sheet and gently press the pastry down into the tin, insuring it’s pressed right into each groove – don’t panic if you do get any tears or any holes, just neatly patch it up with some spare pastry.

8) Trim off any excess pastry. Place some baking paper into the case and fill it baking beans (any dried beans or rice will do) then blind bake the pastry case for 10 minutes. Remove the baking beans and bake the case for a further 5 minutes to help dry it out.

9. Meanwhile make the Frangipane: cream together the butter and sugar until light and fluffy. Beat in the egg, ground almonds and almond extract until the ingredients are combined.

10. Leave the pastry case to cool down slightly before spreading the jam over the base of the case in an even layer. Next, spoon the Frangipane into the case and smooth it out with a palate knife.

11. Bake the tart for 25 – 30 minutes or until the Frangipane is golden brown and firm to touch. If the pastry starts to get a little too much colour, put some tin foil over the tart, this will prevent it from burning.

12. Leave the tart to cool completely before decorating. While you are waiting, toast your flaked almonds by spreading them over a lined baking sheet and baking them at 180 degrees for about 5 minutes until toasted.

13. To make the icing, sift the icing sugar into a bowl. Add the almond extract and 2 to 3 tablespoons of cold water and mix until you are left with a thick but spreadable icing.

14. Spread the icing over the cooled tart using a palate knife. Sprinkle over the toasted almonds, then serve!

image

I hope you enjoy this recipe and all other recipes I have recreated during this series of ‘The Great British Bake Off’ so far.

I love seeing your bakes, so if you try any of my recipes please take a snap and share it on Instagram or Twitter by using the hashtag #titchytonbakes or post a picture on my Facebook page.


Gluten Free Churros (Inspired by ‘The Great British Bake Off’)

Over the past week there has been an uproar over the news that the BBC has lost the rights to host ‘The Great British Bake Off’ and that as of the next series it’s new home will be channel 4, after they paid double the amount than the BBC had offered to take the show. Mel and Sue stepped down from hosting the show saying that they are ‘not going with the dough’ and today Mary Berry has also announced that she will be exiting the show, leaving fans worried about the future of their favourite programme  – it’s been more dramatic than series 5, when Ian dumped his Baked Alaska in the bin!

I, for one, am absolutely gutted that this is the end of Bake Off as we know it, but I have a huge amount of respect for Mel, Sue & Mary for not selling out. I don’t know whether I will continue to watch the show over on channel 4, but I am determined to enjoy every second of the current series, while it lasts.

To help cheer everyone up, today I’m going to share my Gluten Free Churros Recipe, inspired by the showstopper challenge from this year’s Batter Week.

image

Batter week saw the bakers tackle stuffed Yorkshire puds, delicate lacey Pancakes and a simple Spanish street food called Churros, out of which they were expected to create a spectacular showstopper.

To achieve perfect Churros the bakers were tasked with making a choux pastry like dough that would be soft enough to pipe, but firm enough to keep its distinctive shape during frying. The Churros also had to be crisp on the outside and cooked to perfection on the inside, so it was essential to get the oil at the right temperature otherwise you may end up with uncooked dough inside… oh, and they had to be uniform in size!

Last year I worked a lot on perfecting my gluten free choux pastry, so as I already had a recipe which I thought would work, I decided I would give Churros a try.

image

My Churros plan – does anyone else make notes whilst watching bake off?

It took a few attempts to find the perfect balance of ingredients. I made my first batch of dough following my gluten free choux pastry recipe, but the result was a dough that was slightly too soft – perfect for choux buns, but not stiff enough to keep its shape in hot oil.

My second batch was much better as I used less egg which helped to give the dough a much firmer consistency. I also discovered that the pinch of baking powder I’d added to my choux pastry recipe was not required for Churros as it made them puff up and split during frying.

Getting the oil to the right temperature without a deep fat fryer was tricky, although not impossible – it’s a good idea to do a few testers first and adjust the temperature accordingly. I also found I had better success piping the Churros straight into the pan (as opposed to piping them onto parchment paper) which is fine as long as you don’t mind them not being uniform!

I’m pleased to say that once I had ironed out all these issues, the result was Churros which were beautifully crispy and light and fluffy on the inside.

image
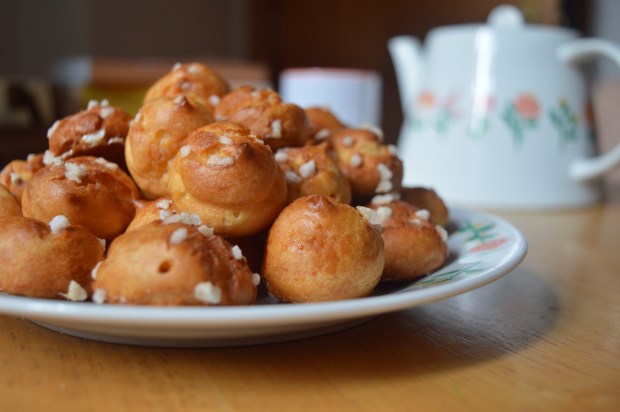
I recommend eating them fresh as they don’t keep all that well. I served mine with a rich chocolate dipping sauce and together I think they would make a fantastically unique dessert for a dinner party.

Gluten Free Churros with Chocolate Dipping Sauce – GF/DF options

Ingredients

For the Churros:

60g gluten free self-raising flour

1 tbsp caster sugar

55g unsalted butter (or dairy free alternative)

110ml cold water

1 egg

1/2 tsp vanilla extract

For the Churro coating:

1 tsp cinnamon

2 tbsp caster sugar

Plus 1-litre sunflower oil for frying the Churros.

For the chocolate dipping sauce:

100g good quality milk or dark chocolate (or dairy free alternative)

100ml double cream (dairy free alternative)

1 tbsp golden syrup

Method

1. Place a heavy-bottomed saucepan over a low to medium heat, then add the water, sugar and butter and bring the ingredients to a gentle simmer.

2. Once the butter has melted, remove the pan from the heat and quickly beat in the flour until all the ingredients come together in a smooth ball. It’s important to cook out all the flour, so if you can still see some flour keeping beating.

3. Transfer the dough to a large mixing bowl and beat it gently for a few seconds with a wooden spoon to help release some steam – this will help the mixture to cool down.

4. In small bowl whisk the egg to break up the yolk.

5. Once the pastry mixture is cool, add the vanilla extract and then the egg a bit at a time whilst beating with an electric hand mixer – don’t add the egg whilst the mixture is hot or you will end up with scrambled eggs!

6. At first the mixture will look a little bit lumpy but keep beating and adding the egg bit by bit until it becomes a smooth and stiff dough.

7. Transfer the mixture to piping bag fitted with a star nozzle then  place the dough in the fridge to chill for 15 minutes.

8. Meanwhile, slowly heat up the oil in a large saucepan over a medium to high heat while you make the chocolate sauce.

9. To make the chocolate dipping sauce, together the chocolate, cream and golden syrup slowly in a heatproof bowl over a pan of simmering water. Gently stir until all the ingredients together, then set aside the sauce to cool.

10. Once the dough has chilled, you can fry your churros – you’ll know the oil is ready when the surface starts to shimmer.

To double check the temperature of the oil, test a little bit of the mixture and adjust the heat accordingly. If it takes more than a few minutes for the dough to turn golden brown, your oil needs to be slightly hotter, but if the dough turns a deep golden brown after about 30 seconds it’s too hot and the oil needs to cool down slightly. The perfect Churros should be ready within 4 to 5 minutes and should be crispy.

Whatever you do, don’t leave leave the hot oil unattended at any point.

11. Pipe 3 to 4 Churros directly into the hot oil and use scissors to snip off each one. Don’t cook too many at once as this can reduce the temperature of the oil and your Churros will take longer to cook – the longer they take to cook means they are exposed to the oil for longer, this can make them soggy!

Fry each Churro for 4 to 5 minutes, turning them over occasionally with kitchen tongs to make sure they are cooked on all sides. Transfer them to kitchen paper to soak up any excess oil. Keep going until all the dough is used up.

12. Mix together your caster sugar and cinnamon, then roll each Churro in the mixture until they are coated.

13. Serve immediately accompanied with the chocolate dipping sauce.


Gluten Free Viennese Whirls (Inspired by ‘The Great British Bake Off’)

Bake Off is finally back on our TV screens, so queue the nationwide baking frenzie and attempts to recreate bakes from the show at home – sometimes with varing success!

This was certainly the case when I attempted to make a gluten free version of Viennese Whirls, the technical challenge from this year’s Biscuit Week.

image

I discovered Mary Berry’s recipe on the BBC Food website and decided to give it a whirl (see what I did there?) – I thought a gluten free version would work quite well and that all I needed to do was change the flour… I was quite wrong!

I followed Mary’s recipe to the letter and all the the tips the bakers mentioned on the show, including insuring the butter was soft enough and chilling the whirls before baking. Unfortunately, they turned out a crumbly mess and I couldn’t even get them off the baking tray without them disintegrating into a million pieces

The recipe definitely required a few further tweaks to work gluten free, so it was back to the drawing board.

I think that the first attempt went wrong because the mixture was too soft and a bit oily which resulted in the mixture melting in oven, despite the fact that I’d chilled the whirls in the freezer for 15 minutes prior to baking.

On my second attempt I decided to use margarine instead of butter, which combatted some of the oiliness, and I added a touch more dry ingredients, which resulted in a firm but pipeable mixture. Again, I  chilled the whirls before baking which helped them to keep their shape.

This time they came out overbaked, which I think is due to the oven temperature being quite high in Mary’s recipe – if you don’t check the biscuits every 30 seconds after the first 13 minutes, you might accidentally overbake them and I definitely wouldn’t recommend leaving them for the full 15 minutes without checking them!

By the third attempt, I knew I had found the right balance of ingredients but decided to drop the oven temperature from 190 degrees to 180 to help to slow down any potential overbaking.

It was definitely third time lucky. The result was a whirl that had kept its shape, was golden but not over baked and was actually stable enough to get off baking tray and be filled. They also tasted delicious and melted in the mouth – heaven!

image

Viennese Whirls – GF/EF/DF OPTIONS

Recipe adapted from Mary Berry’s Viennese Whirl Recipe from ‘The Great British Bake Off’ found on the BBC Food website.

Ingredients

For the biscuits:

250g soft margarine (or dairy free alternative)

70g icing sugar

225g gluten free self raising flour

50g cornflour

1/2 tsp vanilla extract

For the filling:

Strawberry Jam (Mary’s recipe said Raspberry, but I prefer Strawberry)

100g unsalted butter (or dairy free alternative)

200g icing sugar, plus extra for dusting

1/2 tsp vanilla extract

Method

1. Preheat the oven to 180 C/160 C fan/gas mark 4.

2. Line 3 baking trays with baking paper, then use a 5cm cutter to draw 8 circles onto each sheet of paper, making sure they are well spaced out. Turn the paper over so the circles are underneath.

3. In large bowl, cream together the margarine, sugar and vanilla with an electric hand mixer until light and fluffy. Add the gluten free flour and cornflour and beat with the hand mixer until all the ingredients are fully combined.

4. Transfer the mixture into a piping bag fitted with a medium star nozzle – I like to use plastic disposable piping bags because I think they are easier to use.

5. Pipe 24 swirls inside the circles on the baking sheets. Place the baking sheets in the freezer for 10 – 15 minutes to help the swirls firm up before baking.

6. Bake for 13—15 minutes, until  pale golden-brown in colour. I reccomend checking them every 30 seconds after the first 13 minutes as the edges can catch and they can easily overbake.

7. Leave the whirls to cool on the baking sheets for a few minutes then transfer them to wire rack to cool completely.

8. To make the butter cream, beat the butter, icing sugar and vanilla extract with an electric hand mixer until light and fluffy and almost white in colour. Transfer into a piping bag fitted with a large star nozzle.

9. To decorate: Spoon a little jam onto the flat side of half of the biscuits, then pipe a swirl of buttercream over the top. Place a biscuit on top of each one to create a sandwich, then dust with a little icing sugar to finish.

image

Gluten Free Torta Della Nonna Recipe

Today I’m going to share with you my gluten free take on a classic Italian dessert called Torta della Nonna, which in English means ‘Grandma’s Cake’.

image

Torta della Nonna is a traditional dessert cake, not unlike a custard tart, which consists of a sweet shortcrust pastry case, filled with creme patisserie and topped with almonds or pine nuts.

3268CC9F-DD30-4619-BDB5-8E9FB9A809C8
Gluten free pastry can be notoriously tricky to get right, but with a few experiments I have come up with a simple recipe and a few tips and tricks which make handling the pastry much easier.

Torta della Nonna – GF/DF options

Ingredients

Pastry:

300g plain gluten free flour

100g icing sugar

3 egg yolks

150g butter (or dairy free alternative)

Creme Patisserie:

Zest of 1 small unwaxed lemon

400ml milk (or dairy free alternative)

3 egg yolks

1 tsp vanilla extract

30g cornflour

100g caster sugar

Topping:

Milk, for glazing (or dairy free alternative)

A handful of almonds or pine nuts

Method:

1) To make the pastry: Stir together the flour and icing sugar. Add the egg yolks and butter, rub the ingredients together until they start to form a dough. Tip the contents of the bowl out onto a lightly floured work surface, knead the dough for a few minutes until it forms a smooth ball of pastry.

2) Wrap the pastry in cling film and put it in the fridge to chill for about 30 minutes to an hour. This is very important as the colder gluten free pastry is, the easier it is to work with.

3) While the pastry is chilling it’s time to make the creme patissiere. Start by placing 300 ml of milk, vanilla extract and lemon zest into a heavy bottomed pan – remember to save 100 ml of the milk as you will need it in a moment.

4) Warm the milk over a low heat but do not let it boil. Once the milk is hot strain it through a sieve to get rid of the lemon zest.

5) Next, place the remaining milk, egg yolks, cornflour and sugar into a separate bowl then whisk until combined.

6) Add this mixture to the hot milk by pressing it through a sieve to get rid of any lumps.

7) Increase the heat slightly to bring the mixture to a boil, keep stirring until the mixture thickens and remove from the heat.

8) Pour the creme patissiere into a bowl and allow it to cool slightly before covering it with cling film and popping it in the fridge for later.

9) Once the pastry has been chilled it’s time to assemble the tart. Preheat your oven to 180 C/160 C fan/gas mark 4, then grease an 8 inch loose bottomed flan or tart tin with butter – remember to throughly grease the sides of the tin or you will struggle to remove your tart at the end.

10) Take your pastry out of the fridge and cut it in half. Keep one half for the base of the tart and place the other half back in the fridge to keep cool – this will be used to make the lid later.

11) The best way to roll out gluten free pastry is between two sheets of greaseproof baking paper which will prevent the pastry from sticking to your work surface.

12) Use greaseproof paper to help get the pastry into the tin safely. Firstly, peel off the top layer of baking paper, place the tin upside down into the middle of the pastry then carefully flip the pastry over with the help of the bottom sheet of baking paper. Peel off the bottom baking sheet and gently press the pastry down into the tin, insuring it’s pressed right into each groove – don’t panic if you do get any tears or any holes, just neatly patch it up with some spare pastry.

13) Trim off any excess pastry. Place some baking paper into the case and fill it baking beans (any dried beans or rice will do) then blind bake the pastry case for 10 minutes. Remove the baking beans and bake the case for a further 5 minutes to help dry it out.

14) Once the pastry case has been blind baked, allow it cool for a few minutes before spooning the creme patissiere into the pastry case until it’s almost full.

15) Roll out the pastry for the lid between two baking sheets, exactly the same way as you did the base. I often struggle getting lids on pies and tarts without the pastry tearing, so I like to pop the pastry lid into the freezer for a few minutes once it’s been rolled out which makes it much easier to handle and less likely to tear. To get the lid on your tart safely, use the bottom baking sheet to help flip the pastry upside down on top of the tart, then carefully  peel off the baking paper and trim off the excess pastry.

16) Press down around the edge of the tart and prick the lid with a fork to prevent air bubbles forming. Using a pastry brush, glaze the top of the tart with milk and sprinkle on a few handfuls of either almonds or pine nuts.

17) Bake the tart in the preheated oven for 45 – 50 minutes or until the top is golden brown and the nuts are lightly toasted.

18) Once the tart has cooled, sprinkle it with a dusting of icing sugar and serve with either vanilla ice cream, double cream, or you can have it plain with a cup of coffee!

Torte della Nonna is best stored in the fridge and will keep for a few days – if it lasts that long!

CE882DBA-D6EB-4CCA-8D8E-CF77FBBB8F8D

I love seeing your take on my recipes, so remember to share a snap of your Torta della Nonna over on Facebook, twitter or Instagram using the hashtag #titchytonbakes.