Gluten Free Blueberry and Almond Muffins

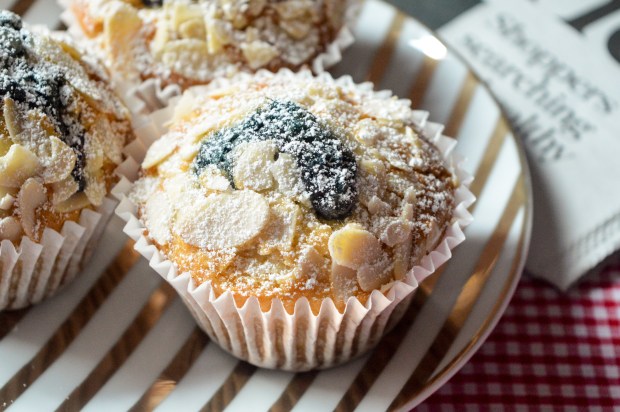
Today I am going to share with you my recipe for my favourite weekend breakfast treat – Gluten Free Almond and Blueberry Muffins.

blueberry

When it comes to breakfast muffins, I think Blueberry muffins are right at the top of my list, but the flavour combination of almond and blueberry muffins is sheer heaven and are perfect with a frothy cappuccino.

bb2

These muffins are an ideal weekend bake – good for mornings where you typically have a bit more time to spare, but want a  treat which can whipped up quickly enough, leaving plenty of time to do that crossword in the morning paper.


Gluten Free Blueberry and Almond Muffins – GF/DF options
Makes 8

Ingredients:

300g gluten free self raising flour
1 tsp baking powder
1/2 tsp bicarbonate of soda
150g caster sugar
2 large eggs
75 ml sunflower oil
200ml milk
1 tsp vanilla extract
150g flaked almond
8 tsp blueberry jam

Method:

1. Preheat the oven to 180 C/160 C fan/gas mark 4 and line a muffin tin with 8 muffin cases.

2. In a large bowl, sift together the flour, baking powder and bicarbonate of soda, then stir through 100g of the almonds.

3. In separate bowl, whisk together eggs, sugar, oil, milk and vanilla extract until combined then add this to the dry ingredients.

4. Gently mix the ingredients together until they form a batter which is only just combined (don’t worry too much if there are any lumps).

5. Spoon approximately 1 and a half tablespoons of batter into each case, followed by a teaspoon of jam then fill the muffin cases with a further tablespoon of batter, ensuring the jam is fully covered. Top each muffin with the remaining flaked almonds.

6. Bake the muffins for 25 minutes, until golden brown.

7. Enjoy warm, or leave them to cool on a wire rack before storing in an airtight container. Finish the muffins off with a dusting of icing sugar, if you wish.

bb4

I love seeing your take on my recipes, so remember to share a snap of your muffins over on Facebook, twitter or Instagram using the hashtag #titchytonbakes.

Gluten Free American Style Pancakes with Chocolate Sauce

Today I’m going to share with you my recipe for Gluten Free American Style Pancakes and Chocolate Sauce – the perfect pancake recipe for the perfect Pancake Day!

image

I recently purchased a crêpe pan, so every day in February has been pancake day and this recipe has been more than triple tested!

When I put together this recipe my   scales had run out of battery, so I had to rely on measuring cups which I don’t often do with gluten free flour – but I think with batter recipes there is a little give and take with the ingredients and the recipe be easily adjusted if you accidentally add too much flour or milk.

Every time I made this batter it was spot on, but if you think your batter is a little thick and doesn’t spread out in the pan, add a little bit more milk, or, if it’s a little runny add a tablespoon of flour.

For a totally foolproof Pancake Day I highly recommend purchasing a crêpe pan or a good quality non stick frying pan – I speak from experience, as of my pancake day plans have been thwarted by a lack of a good frying pan!

image


American Pancakes with Homemade Chocolate Sauce – GF/DF options

Ingredients

For the Pancakes:

1 cup of gluten free self raising flour
1 tsp baking powder
2 tbsp caster sugar
1 tsp vanilla extract
2 tbsp melted butter, plus extra for frying (or dairy free alternative)
2  eggs
1 cup of semi skimmed milk

For the Chocolate Sauce:

100g good quality milk or dark chocolate (or dairy free alternative)
100ml double cream

You’ll also need a good quality non stick crêpe or frying pan. 

Method:

1. In a large bowl, mix together the gluten free flour, sugar and baking powder.

2. Add the egg and vanilla extract, then using a whisk start to bring the ingredients together.

3. Add the milk and butter and continue to whisk until you’re left with a smooth lump free batter.

4. Heat the oven to 100 degrees C/gas mark 1.

5. Leave the batter to stand while you heat up a non stick crêpe or frying pan. Brush the crêpe pan with butter using a pastry brush and wipe away any excess butter with kitchen towel. Place the pan over a medium to high heat until hot.

6. Spoon half a laddle of batter into the pan. Fry the pancake until bubbles form on top (this should take between 1 and 2 minutes) then flip your pancake over and cook the other side for a further minute or until golden brown. Place the pancake onto a non stick tray in the  preheated oven so that it stays warm.

7. Repeat with the remaining batter, brushing your pan with butter in between each pancake.

8. To make the chocolate sauce, gentle melt together the chocolate and the cream in heatproof bowl over a pan of simmering water. Stir until the ingredients are combined and then bring the bowl off the heat.

9. Serve the pancakes with the toppings of your choice – I highly reccomend strawberrries and chopped hazelnuts as they compliment the chocolate sauce beautifully.

image

I love seeing your take on my bakes, so remember to share your a picture of your perfect pancakes over on Facebook, twitter or Instagram using the hashtag #titchytonbakes.

Gluten Free Cocoa Pops Recipe

Every year I make it my New Years Resolution to eat breakfast every single day – but, every year I fail miserably and just end up  feeling pretty bad about myself and my lack of willpower. So this year, instead of coming up with resolutions I know I won’t keep, I decided to challenge myself to come up with fun breakfast ideas and to just enjoy food more.

My breakfast of choice used to be cereal and wouldn’t just eat it for breakfast, I’d have it as an after school snack or for a late night feast – now, I can’t eat most cereals as a lot of popular brands aren’t gluten free, and haven’t found many gluten free cereals which I really like or that don’t contain copious amount of sugar and additives.

This morning I had a huge craving for Coco Pops, so I decided to try to make my own homemade version and I’m very pleased with how they turned out.imageThese homemade Cocoa Pops are super easy to make – you only need four very basic ingredients and they can whipped up in less than 20 minutes. The recipe uses a natural alternative to refined sugar and is both dairy and gluten free, but I promise they are delicious and taste just as good, if not better than the shop variety!

image


Cocoa Pops – GF/DF/EG

Ingredients

3 cups puffed rice
60 ml maple syrup
30 ml sunflower oil
1 tbsp cocoa powder

Method

1. Preheat the oven to 160 C/140 C/gas mark 3 and line two large baking trays with greaseproof paper.

2. Place the maple syrup, oil and cocoa powder into a sauce pan and place it over a low heat. Stir the ingredients with a wooden spoon until no lumps remain, then fold through the puffed rice until it is fully coated in the cocoa mixture.

3. Spread the mixture into a thin layer across the two baking trays. Bake for 6 – 8 minutes, until the puffed rice becomes crisp – make sure to give the cereal a stir half way through the bake time.

4. Leave the cereal to cool on the baking trays for a few minutes, then it’s ready to enjoy!

image

Gluten Free Peanut Butter & Chocolate Chip Granola

It’s a well known fact that I love Peanut Butter and that I would put it in everything and anything, if I could!

In my opinion, granola is made infinitely better with the presence of peanut butter which not only delicious, but dairy free too. To make this granola recipe completely dairy free, just miss out the chocolate chips or use chunks of dairy free dark chocolate instead.

The recipe is easily adaptable, so you can change up the ingredients depending on what you fancy and it’s also lovely healthy way to start to the day, as the oats will give you that energy boost to get through until lunch time!

image

Gluten Free Peanut Butter Granola  – GF/DF/EF

Ingredients:
250g gluten free oats
3 tbsp Smooth Peanut Butter (preferably one containing only natural sugars)
1 tbsp Sunflower Oil
2 tbsp Maple Syrup
50g Dark Chocolate Chips (or dairy free alternative)
A handful of chopped unsalted peanuts

Method:

1) Preheat Oven to 180 C/160 C fan/gas mark 4.

2) In a large heavy bottomed pan mix the peanut butter, oil and maple syrup over a low heat, then add the oats and stir until combined.

3) Spread the oats into a thin layer across a baking tray lined with greaseproof paper, then scatter across the chopped peanuts.

4) Bake the mixture for 5 minutes, give the oats a a quick stir with a wooden spoon, then return them to the oven and to bake for a further 5 minutes or until golden brown.

5. Once the Granola has cooled completely, stir through the chocolate chips (optional).

If you want to keep up to date with my kitchen adventures you can find me on Instagram @titchyton or on my Facebook page.

Gluten Free ‘HP Sauce’

Today I had a bacon Sandwich with HP Sauce for the first time in almost 3 years… it was glorious!

DSC_0125

If you asked me which foods I miss the most since giving up gluten, top of my list would be HP Sauce – a staple condiment on the British dinner table.

It has always been my favourite, and is a firm fixture on my family’s dinner table. In fact, we couldn’t live without it so much that we would take it on holiday to Italy with us – that, and Yorkshire Tea!

I was upset once I realised I could no longer eat HP Sauce as it contains malt vinegar… but, I am a firm believer that with creativity it’s possible to eat everything thing I used to before, and so, I decided it was finally time to attempt making my own HP Sauce. The aim? To make it as close to the real deal as possible.

DSC_0126

Gluten Free HP Sauce – GF/DF/EF

This recipe makes approximately 500ml.

You will need one 550ml Glass Preserve Bottle or a Twist Top Bottle which you will need to Sterilise as follows:

1. Remove the wax seal or lid. Wash the bottle in hot soapy water, rinse well then and leave to dry.
2. Place the bottle in an oven on a low temperature (140 degrees C/ Gas Mark 1) for 15 minutes, do this shortly before the sauce is ready so that the bottle remains warm.
3. Sterilise the wax seal or lid in a pan of boiling water for 10 minutes.
4. If you are using a clip top bottle, replace the wax seal once the bottle has been sterilised.

Ingredients:

1 tbsp olive oil
4 shallots, finely chopped
2 garlic cloves, finely chopped
65g dates, with the stones removed and chopped.
2 tbsp tomato puree
250 ml water
1 tsp ground ginger
1 tsp ground cinnamon
1/2 tsp turmeric powder
1 tsp ground pepper
50ml apple juice
150ml cider vinegar
50ml balsamic vinegar
1 tbsp molasses or black Treacle
1/2 tbsp dark brown sugar
1 tbsp cornflour

Method:

1) Heat the olive oil in a large heavy bottomed pan over a medium heat.

2) Fry the shallots and garlic for 4 -5 minutes until soft, then add the dates and 150 ml of the water.

3) Using a hand blender, blend the ingredients into a thick paste.

4) Add the another 50 ml water (you should still have 50 ml left for later), tomato puree, ginger, cinnamon, ground pepper, and turmeric powder. Give it a good stir and then simmer the ingredients over a low heat for 10 minutes.

5) Remove the pan from the heat, then press the mixture through a sieve with a wooden spoon into a clean pan.

6) Add the remaining water, apple juice, cider vinegar, balsamic vinegar, molasses and sugar then return the pan to the heat and boil the sauce for 5 minutes.

7) Place the cornflour into a small bowl, then add a few tablespoon of liquid from the sauce to to make a paste.

8) Add the cornflour paste to the sauce and then whisk with a balloon whisk to ensure there are no lumps.

9) Boil the sauce for a further 4 minutes whilst whisking continuously.

Tip. Don’t worry if there are a few lumps after you’ve added the cornflour – just sieve the sauce again.

10) Remove the sauce from the heat and leave to cool slightly before carefully pouring the sauce into your sterilised bottle –  you may need to use a funnel to help you do this safely.

11) Leave the sauce to cool before storing -the sauce should keep up to 3 – 4 weeks in the fridge.

I hope you give my recipe a try this weekend. If you are looking for Gluten Free inspiration you can check out all the recipes I have posted to date on my Recipes page.

Remember that you can also keep up to date with all my kitchen adventures on:
Instagram or on my Facebook page.

Gluten Free Baked Beans

Hooray, it’s the weekend! And what could be a more perfect weekend recipe than homemade Gluten Free Baked Beans?
image
I know what you are thinking – ‘You can get baked beans out of a tin!’ – but nothing beats homemade baked beans, especially as part of a lovely English Breakfast at the weekend. Some tinned baked beans often include lots of additives and not all brands are gluten free.

The recipe is incredibly quick, so if you are looking for an easy and effort free way to make your weekends breakfasts more special, you’ve found it!

Gluten Free Baked Beans – GF/DF/EF

Ingredients:
1 tbsp sunflower Oil
1 onion, finely chopped
1 garlic clove, finely chopped
1 400g tin of plum tomatoes
1 tbsp of tomato purée
200 ml of gluten free vegetable stock
1 tsp paprika
1 tsp brown sugar
1 tsp English mustard
1 tbsp red wine vinegar
400g (x 2 tins drained) haricot beans
Salt & pepper to season.

Method:

1) Blend the tomatoes in a food processor and set aside for later.

2) Heat the oil in a large sauce pan over a medium heat then fry the onion and garlic until the onions are soft.

3) Add the tomato purée, tomatoes, stock, paprika, sugar, mustard and red wine vinegar then cook the sauce at a gentle simmer for 5 minutes to help the sauce thicken.

4) Drain the beans then add them to sauce. Continue to simmer for a further 5 minutes until the sauce has thickened.

5) Season with salt and pepper, then your baked beans are then ready to serve!

I served mine as part of a delicious English Breakfast, but you could serve them with chips, wedges, jacket potatoes or just plain old beans on toast!

This recipe makes quite a nice large batch, so leftovers can be frozen in individual portions, which are handy to have stashed in the freezer for when you are in a rush.