No Churn Nutella Ice Cream

Get ready for the heatwave and cool down with my No Churn Nutella Ice Cream!

889255B3-A424-46E5-A527-0DA4E7CF428E

This recipe is inspired by my trip to Torino where I ate some the best Gelato EVER. My favourite flavour was probably cioccolato e nocciole (chocolate and hazelnut) as the ice cream was made with hazelnuts grown in the Piedmont region (which is famous for its hazelnuts).

E78532A1-0BC0-45CA-ABE8-69AFF189BDA6

My recipe is a no-churn recipe which is a super quick and easy way of making homemade ice cream without an ice cream maker – this recipe also only needs 5 ingredients.

The secret to making excellent homemade ice cream is adding a little liquid glucose – this magic ingredient stops the ice cream from freezing too solidly, which means it can be scooped as soon as you take it out of the freezer.


No Churn Nutella Ice Cream – GF/EF

Ingredients: 

100g Nutella 

1 x 397g tin condensed milk 

300 ml double cream 

2 tsp liquid glucose 

A few handfuls of Chopped hazelnuts 

Method:

1) In a large bowl, mix together the Nutella and condensed milk.

2) Pour in the cream and add the liquid glucose, then whisk the ingredients using an electric whisk until it begins to thicken.

3) Transfer the mixture to a freezer safe container and freeze for a least 6 hours.

4) Once the ice cream has frozen scatter across the hazelnuts, then serve!

8FDAE051-FDDC-46D1-916A-CA93BB542D75

I love seeing your take on my recipes, so remember to share a snap of your Nutella Ice Cream over on Facebook, Twitter or Instagram using the hashtag #titchytonbakes

Gluten Free Strawberries and Cream Cheesecake Jars

It’s been a little too hot to bake recently, as here in the UK we’ve been experiencing a heatwave – I do like to see the sun out at last, but our country is not built to cope with heat… and neither are us Brits!

So, I’ve been eating a lot of lazy food; lots of salads (my particular favourite is a watermelon, cucumber and feta salad) and cured meats, like salami and prosciutto – basically anything that doesn’t involve standing in front of a hot stove.

I have been feeling a little sick of ice cream, so I wanted to come up with a quick, easy and refreshing no bake dessert to satisfy my sweet tooth.

My Gluten Free Strawberries and Cream Cheesecake Jars tick all the boxes – they take a matter of minutes to put together, there is no baking required and they don’t  need to be left to set.

IMG_5468

Strawberries are at their best right now and I absolutely adore them – but you could also use Raspberries or a mix of both if you prefer.

For the biscuit layer, I used Schär Gluten Free Digestive Biscuits – I prefer this brand because they are also free from oats, but you can use any kind of biscuits you like.

IMG_5473

These Cheesecake jars are best served right away, but they can be made ahead of time and popped in the fridge. They are also ideal for a picnic as they are portable – simply put the lids on and pop them in a cool bag to keep them fresh!

IMG_5471

Strawberries and Cream Cheesecake Jars – GF/EF

Makes 4 (depending on the size of your jars)

Ingredients

180g Philadelphia cheese, cold
330ml whipping cream
1 tsp vanilla extract
2 tablespoons icing sugar
150g gluten free digestive biscuits (I prefer ones by Schär, as they are also free from oats)
500g fresh strawberries, halved
Fresh mint to decorate

Method

1. Blitz the biscuits in a food processor (or crush them by hand) until they are the consistency of breadcrumbs.

2. In a large bowl, gently mix the cream cheese, icing sugar and vanilla extract together until combined. Add the whipping cream and whisk using a electric hand mixer until the ingredients form soft peaks.

3. Add a layer of the biscuit crumbs to the base of each jar, followed a layer of cream and a layer of strawberries. Repeat until the jars are full and top with mint leaves to decorate.

IMG_5474

I love seeing your take on my bakes, so remember to share your a picture of your Cheesecakes over on Facebook, twitter or Instagram using the hashtag #titchytonbakes.


Gluten Free Christmas: Gingerbread Wreath

We are 12 days into advent and I finally feel as though I’m getting into the full swing of the festivities. So far most of Advent has been spent in the kitchen working on festive bakes, most of which have involved copious amounts of edible glitter which I keep finding everywhere, including in my hair, on the floor, on the cat…

Today I’m going to share with you my recipe for this gingerbread wreath which is definitely an excuse to get out the edible glitter.

img_3316

The Gingerbread wreath is completely edible (except for the Red Ribbon) and although it looks impressive and difficult to achieve, it was actually incredibly easy! You don’t need any fancy equipment, just a large dinner plate, a sharp knife and a few different sized cookie cutters. Whipping up the gingerbread dough takes only a matter of minutes and the construction of the wreath isn’t too daunting, as long as you follow the instructions step by step. The wreath is not really design to be used as a decoration as the ribbon won’t support the weight of a wreath – but it would make a lovely edible Christmas gift.

img_3321


Gluten Free Gingerbread Wreath – GF/DF options

This recipe is inspired by Cassie Best’s Gingerbread Wreath for BBC Good Food

Ingredients

For the Gingerbread:
125g gluten free self raising flour blend
200g rice flour, plus extra for dusting
1 tsp bicarbonate of soda
2 tsp ground ginger
2 tsp cinnamon
125g unsalted butter (or dairy free alternative)
150g soft dark brown sugar
2 tbsp golden syrup
1 tbsp black treacle
1 large egg

To Decorate:
200g Ready to roll Icing
30 ml cold water
250g icing sugar
1 egg white
Edible glitter

You will also need:
A sharp knife
1 x large dinner plate
1 x inch piping nozzle
1 x 9cm round cutter
1 x small star cutter
1 x medium star cutter
1 x large star cutter
1 x small angel cutter
1 red ribbon

Method

1) In a large bowl, sift together the flours, bicarbonate of soda, ginger and cinnamon. Using your hands, rub the butter into the dry ingredients until it becomes like fine bread crumbs and then stir through the dark brown sugar.

2) In a separate bowl whisk the egg with a fork, then add this to the cookie mixture along with the golden syrup and black treacle. Mix until the ingredients come together. The cookie dough will appear quite wet at this stage but don’t be tempted to add more flour or you will dry out the dough!

3) Gently knead the dough on a floured surface with floured hands until it turns into a smooth, soft and slightly sticky ball of dough. Dust the dough with flour as you knead to stop it sticking to the work surface. Wrap the dough in cling film and leave to chill in the fridge for at least 2 hours – chilling helps the dough to firm up so it can be rolled out.

4) Preheat the oven to 180 C/160 fan/gas mark 4. Roll half of the dough out in between two sheets of greaseproof paper until it is the thickness of a 1 pound coin. Remove the top layer of greaseproof paper, then place a large dinner plate face down into the centre of the dough and use a sharp knife to cut out a large circular disc of gingerbread.

5) Transfer the gingerbread onto a baking tray (you can use the bottom sheet of baking paper to line your tray) then use a 9 cm circular cutter to cut out a circle of dough from the centre of the gingerbread disc and a 1 cm piping nozzle to cut out a hole for the ribbon.

6) Bake the base of your wreath for 10 to 12 minutes – watch out for the edges catching.
Once baked, leave the wreath to firm up on the baking tray for a few minutes before transferring it to wire rack to finish cooling.

7) Roll out the remaining dough and cut out 5 large stars, 4 medium stars, 11 small stars and 2 angel shapes. Arrange the shapes onto a baking tray and bake for 10 to 12 minutes – the smaller cookies will need checking after 8 minutes.

8) Once baked, leave the cookies to firm up on the baking tray for a few minutes bering transferring them to wire rack to finish cooling.

9) While the cookies cool, make the royal icing: place 1 egg white in a bowl and slowly sift icing sugar in batches. In between each batch of sugar, stir the icing with a wooden spoon or a balloon whisk until the icing thickens up, then transfer the icing into a piping bag fitted with a small writing nozzle.

10) Next, make the fondant icing: break the ready to roll icing into pieces and place them in a bowl. Add a splash of water and use a spatula to break up the icing until it starts to become more paste like, then add the rest of the water and beat with an electric hand mixer until the fondant becomes runny.

11) Spread the fondant icing over the 5 large star shapes and sprinkle each one with edible glitter. Decorate the remaining pieces with the royal icing and leave all the pieces to dry for about an hour before you assemble the wreath.

12) Use the remaining royal icing to stick the biscuits to the wreath. Sprinkle the wreath with edible glitter and thread a red ribbon through the hole to finish.

img_3343


There will be plenty of festive bakes coming your way really soon. Meanwhile, why not come and see what else I’m getting up to over the festive season by following me on Instagram or Facebook. Remember, If you give this recipe take a snap of it and share it with me on Instagram, Facebook or Twitter using the hashtag #titchytonbakes and I will share my favourites on my Facebook page!

Gluten Free Christmas: Stollen Muffins

It’s beginning to look a lot like Christmas… and I don’t know about you, but I’m rather glad. It’s been a scary and rather uncertain year with everything that has been going on in the world, so I’m grateful for a distraction and I hope that a bit of Christmas cheer will help to take my mind off it… and yours too!

So, get ready for my first Christmas recipe of the year and prepare to feel fabulously festive.

image

My Gluten Free and Dairy Free Stollen Muffins are every bit as tasty as actual Stollen and are the perfect way to get your Stollen fix, without the hassle of making bread.

Stollen is a German Christmas bread which usually contains dried fruit, almonds, marzipan and spices, such as cinnamon. These muffins are chock full of everything you’d find in traditional stollen, but with a dash of my favourite tipple for good measure, because it’s Christmas!

image


Stollen Muffins – GF/DF

Ingredients

2 – 3 tbsp Cointreau (you could also use Brandy, Rum or Amaretto)
200g mixed dried fruit (I used sultanas/raisins/cherries/mixed peel)
300g gluten free self raising flour
Zest of an orange
1 tsp ground cinnamon
1/2 tsp ground ginger
1 tsp baking powder
1/2 tsp bicarbonate of soda
150g ready to roll marzipan (chopped into small pieces)
100g caster sugar
50g light brown sugar
2 large eggs
100 ml sunflower oil
200 ml almond milk
1 tsp almond extract
1/2 vanilla extract
50g flaked almonds

Method

1) Leave the mixed fruit to soak in Cointreau overnight.

2) Preheat the oven to 180 C/160 C fan/gas mark 4 and line a muffin tin with muffin cases.

3) In a large bowl, stir together the flour, baking powder, bicarbonate of soda, orange zest, cinnamon and ginger, then stir through marzipan.

4) In a separate bowl, whisk together eggs, sugar, oil, almond milk, vanilla extract and almond extract until combined, then add this to the dry ingredients.

5) Gently mix together all the ingredients using a wooden spoon until you are left with a batter which is only just combined (don’t worry too much if there are any lumps), then stir through the dried fruit and the flaked almonds.

6) Spoon approximately 2 tablespoons of batter into each muffin case, then bake for 25 minutes, until golden brown.

7) Leave the muffins to cool completely on a wire rack, before dusting them with icing sugar to finish.

Be sure to store the muffins in an air tight container and they will last for 4 to 5 days.

image

Keep your eyes peeled for lots more Christmas recipes coming soon, but in the meantime why not try some of my Christmas recipes from previous years:

Gluten Free Gingerbread Cookies

Gluten Free Hazelnut, Cranberry and Orange Biscotti

Gluten Free Cointreau Christmas Cake

Gluten Free Kransekake (Traditional Scandinavian Cake)

Sweet and Salted Peanut Butter Popcorn Squares

These Sweet and Salted Peanut Butter Popcorn Squares are the perfect treat to enjoy on a Sunday afternoon, snuggled up on the sofa in your pyjamas while you watch a film Marathon. Be careful though, they are super moorish!

IMG_6387


Sweet and Salted Peanut Butter Popcorn Squares – GF/EF/DF options

Ingredients

For the popcorn squares:
60g butter (or dairy free alternative)
100g gluten free salted and sweet popcorn
180g white mini marshmallows
3 tbsp chunky peanut butter

To decorate:
50g milk and dark chocolate (or dairy free alternative)

Method

1) Grease and line a square cake tin with baking paper.

2) Place a large heavy bottomed pan over a low to medium heat, then add the butter and marshmallows and heat them until they have completely melted.

3) Fold the peanut butter through the marshmallow mixture, then add the popcorn and stir until fully coated.

4) Working quickly, spoon the mixture into the prepared tin and smooth it out using a greased palate knife until it starts to reach corners of the tin.

5) Place a large square of grease proof paper over the top of the mixture, then use your hands to press the mixture right down into the tin.

6) Peel off the greaseproof paper and leave the mixture to set for a few hours.

7) Once the mixture has set, turn it out of the tin and cut it into bite size squares.

8) Next, melt the chocolate in heat proof bowl over a pan of simmering water. Transfer the chocolate into a piping bag and pipe a zig-zag pattern over each popcorn squares.

IMG_6385

Store the popcorn squares in an airtight container and they should last for up to a week.

Gluten Free Viennese Whirls (Inspired by ‘The Great British Bake Off’)

Bake Off is finally back on our TV screens, so queue the nationwide baking frenzie and attempts to recreate bakes from the show at home – sometimes with varing success!

This was certainly the case when I attempted to make a gluten free version of Viennese Whirls, the technical challenge from this year’s Biscuit Week.

image

I discovered Mary Berry’s recipe on the BBC Food website and decided to give it a whirl (see what I did there?) – I thought a gluten free version would work quite well and that all I needed to do was change the flour… I was quite wrong!

I followed Mary’s recipe to the letter and all the the tips the bakers mentioned on the show, including insuring the butter was soft enough and chilling the whirls before baking. Unfortunately, they turned out a crumbly mess and I couldn’t even get them off the baking tray without them disintegrating into a million pieces

The recipe definitely required a few further tweaks to work gluten free, so it was back to the drawing board.

I think that the first attempt went wrong because the mixture was too soft and a bit oily which resulted in the mixture melting in oven, despite the fact that I’d chilled the whirls in the freezer for 15 minutes prior to baking.

On my second attempt I decided to use margarine instead of butter, which combatted some of the oiliness, and I added a touch more dry ingredients, which resulted in a firm but pipeable mixture. Again, I  chilled the whirls before baking which helped them to keep their shape.

This time they came out overbaked, which I think is due to the oven temperature being quite high in Mary’s recipe – if you don’t check the biscuits every 30 seconds after the first 13 minutes, you might accidentally overbake them and I definitely wouldn’t recommend leaving them for the full 15 minutes without checking them!

By the third attempt, I knew I had found the right balance of ingredients but decided to drop the oven temperature from 190 degrees to 180 to help to slow down any potential overbaking.

It was definitely third time lucky. The result was a whirl that had kept its shape, was golden but not over baked and was actually stable enough to get off baking tray and be filled. They also tasted delicious and melted in the mouth – heaven!

image

Viennese Whirls – GF/EF/DF OPTIONS

Recipe adapted from Mary Berry’s Viennese Whirl Recipe from ‘The Great British Bake Off’ found on the BBC Food website.

Ingredients

For the biscuits:

250g soft margarine (or dairy free alternative)

70g icing sugar

225g gluten free self raising flour

50g cornflour

1/2 tsp vanilla extract

For the filling:

Strawberry Jam (Mary’s recipe said Raspberry, but I prefer Strawberry)

100g unsalted butter (or dairy free alternative)

200g icing sugar, plus extra for dusting

1/2 tsp vanilla extract

Method

1. Preheat the oven to 180 C/160 C fan/gas mark 4.

2. Line 3 baking trays with baking paper, then use a 5cm cutter to draw 8 circles onto each sheet of paper, making sure they are well spaced out. Turn the paper over so the circles are underneath.

3. In large bowl, cream together the margarine, sugar and vanilla with an electric hand mixer until light and fluffy. Add the gluten free flour and cornflour and beat with the hand mixer until all the ingredients are fully combined.

4. Transfer the mixture into a piping bag fitted with a medium star nozzle – I like to use plastic disposable piping bags because I think they are easier to use.

5. Pipe 24 swirls inside the circles on the baking sheets. Place the baking sheets in the freezer for 10 – 15 minutes to help the swirls firm up before baking.

6. Bake for 13—15 minutes, until  pale golden-brown in colour. I reccomend checking them every 30 seconds after the first 13 minutes as the edges can catch and they can easily overbake.

7. Leave the whirls to cool on the baking sheets for a few minutes then transfer them to wire rack to cool completely.

8. To make the butter cream, beat the butter, icing sugar and vanilla extract with an electric hand mixer until light and fluffy and almost white in colour. Transfer into a piping bag fitted with a large star nozzle.

9. To decorate: Spoon a little jam onto the flat side of half of the biscuits, then pipe a swirl of buttercream over the top. Place a biscuit on top of each one to create a sandwich, then dust with a little icing sugar to finish.

image

Gluten Free Battenberg featuring Delicious Alchemy’s Gluten Free Vanilla Sponge Mix

There is less than a week until ‘The Great British Bake Off’ returns to our screens, and even though it’s been delayed slightly thanks to the Rio Olympics, I am no less excited to see what surprises lie in store this year.

The return of Bake Off means that Delicious Alchemy’s Gluten Free Magic Bake Off is also back for another year and to celebrate I’m going to share with you my Gluten Free Battenberg Cake which I made using Delicious Alchemy’s Vanilla Sponge Mix

image

image

Back in 2014 I entered Delicious Alchemy’s Gluten Free Magic Bake Off for a bit of fun with a Gluten Free Red Velvet Cake that I made for my sister’s birthday. I ended up making it to the final three bakers and although I didn’t win the overall competition, I was chuffed to bits to make it that far. I hadn’t been on a gluten free diet that long and it gave me the confidence boost I needed to start writing that gluten free food blog my friends were always nagging me to write… the very blog you’re reading now!

Regular readers of my blog will know that I am an enormous fan of Delicious Alchemy’s products, particularly their baking mixes and I always have a few stashed away in cupboard for emergencies just incase I need to whip up something super quick.

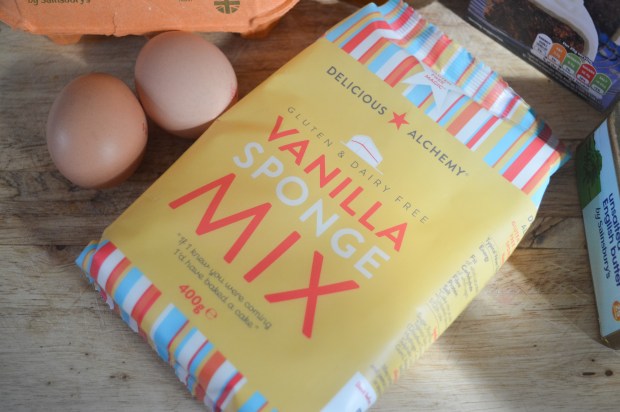
Their Gluten Free Vanilla Cake Mix is perfect for this Battenberg Cake as it makes the process much simpler – you need very few ingredients, whipping up the mixture for the sponge takes only a matter of minutes and the construction of the cake isn’t too daunting as long as you follow the instructions step by step!


image

My top tip when making a Battenberg Cake is to use food colouring which is bake stable – I recommend using either a gel or a paste as many liquid food colourings aren’t bake stable which means the sponge won’t retain its colour when baked.


Gluten Free Battenberg (GF/DF options)

Ingredients

You will need one packet of Delicious Alchemy Vanilla Sponge Mix (400g) spilt into two 200g portions.

Yellow Sponge:
200g Delicious Alchemy Gluten Free Vanilla Sponge Mix
100g softened butter (or dairy free alternative)
2 eggs
2 tbsp milk (or dairy free alternative)
A few drops of a yellow food colouring (make sure it’s bake stable)

Pink Sponge:
200g Delicious Alchemy Gluten Free Vanilla Sponge Mix
100g softened butter (or dairy free alternative)
2 eggs
2 tbsp milk (or dairy free alternative)
A few drops of pink food colouring (make sure it’s bake stable)

For assembling the cake:
400g ready to roll white marzipan
3 tbsp apricot jam

Method:

1) Preheat the oven to 180 degrees C/gas mark 4 then grease and line a square tin with baking paper.

To save time (and washing up) I decided to bake both sponges in the same tin. To do this, I made a divider out tin foil and placed it down the centre of tin. The divider should fit snuggly into the tin which and should be sturdy enough to stand up by itself. Make sure you grease the divider too so that you can remove the cake more easily.

3) Firstly make the yellow sponge: Place half (200g) of the Delicious Alchemy vanilla sponge mix in a large bowl with the butter, eggs and milk, then beat with a electric hand mixer for 15 seconds. Scrape down the sides of the bowl, add the yellow food colouring and mix for a further 10 – 15 seconds ensuring the food colouring is fully incorporated.

4) Next, make the pink sponge: Place the remaining half of the Delicious Alchemy vanilla sponge mix into a large bowl with the butter, eggs and milk, then beat with a electric hand mixer for 15 seconds. Scrape down the sides of the bowl, add the pink food colouring and mix for a further 10 – 15 seconds ensuring the food colouring is fully incorporated.

5) Carefully spoon the mixtures into the prepared tin ensuring the divider properly separates them.

6. Bake the sponges for 20 – 25 mins. Check the sponges are cooked by inserting a skewer into the middle of each sponge, if the skewer comes out clean then the sponges are ready.

7. Leave the sponges to cool in the tin for a moment and then transfer the cakes onto a wire rack to cool completely – If you attempt to assemble the cakes whilst they are still warm they will crumble.

8. Once your cake has cooled, trim the tops with a sharp knife or a cake wire to ensure they are flat and even in height.

9. Place the sponges on top of each other and trim the edges so that they are nice and neat.

10. Cut the sponges in half, straight down the middle so you are left with four long pieces of sponge.

11. Gently heat the jam in a pan or a microwave to make it easier to spread.

12. Take one of the yellow and one of the pink pieces of sponge, brush the top and sides lightly with the apricot jam then place them side by side. Brush the next two pieces of sponge with jam and then place them on top so that they create the iconic checked pattern.

13. Knead the marzipan in icing sugar until it becomes more pliable then roll it out into a large square which is longer than the length of the cake and wide enough to wrap around the cake.

14. Make sure the cake is evenly covered in apricot jam to ensure that the marzipan sticks to the sponge. Place the cake onto the marzipan and tightly wrap it around the cake.

15. Trim off the the excess marzipan to create neat edges and leave the ends exposed so the  checked pattern can clearly be seen.

16. Serve!

image

You can find out more about Delicious Alchemy’s Gluten Free Magic Bake Off, including how to enter, on their website.

They also have 25% off their baking and bread mixes on their online shop until the 4th October 2016 to celebrate the start of GFMBO so you can stock up and get practicing your skills!

Gluten Free Buckwheat and Peanut Butter Flapjacks (No Oats)

Today I’m going share with you my Gluten Free Buckwheat and Peanut Butter Flapjack recipe.

image

I have been working on this recipe for a while, after a kind request from a friend who struggles to tolerate oats. The objective was simple: create a flapjack that looks and tastes like a traditional flapjack but that doesn’t contain any oats, not even gluten free ones.

I happily excepted the challenge because there are many Coeliacs who struggle to tolerate gluten free oats (despite the fact that they are considered to be okay) and there are many looking for an alternative that will work for them.

When I was looking for an oat subsitute I came across some gluten free Buckwheat flakes in my local health food shop; they are slightly paler in colour than oats but are similar in size and texture so I thought they would work well – If you think you can tolerate buckwheat then this recipe might be worth a shot.

It took a few attempts to get the recipe just right. The first attempt resulted in a flapjack that was so crumbly that I couldn’t even cut it into squares and the second attempt was a complete disaster when I accidentally over baked them and they turned out as hard as rocks – oops!

It was definitely third time lucky. The final attempt resulted in the perfect buttery, and chewy flapjack which didn’t crumble at the slightest touch – result!

image

I deviated slightly from the brief and used peanut butter which I know isn’t particularly traditional, but I love the flavour! If you’d prefer a more traditional flapjack or have a nut allergy you can miss out this ingredient and they will work just as well.

Free Buckwheat and Peanut Butter Flapjacks – (GF/EG/DF options)

Makes approximately 16 flapjacks

Ingredients

175g unsalted butter (or dairy free alternative)
2 tbsp crunchy peanut butter
2 tbsp golden syrup
150g soft brown sugar
300g buckwheat flakes

Method

1. Preheat the oven to 150 C/130 C fan/gas mark 2, then throughly grease and line a square tin (20cm x 20cm) with greaseproof paper.

2. Melt the butter in a large heavy bottomed pan over a medium heat. Once the butter has melted add the peanut butter, golden syrup and brown sugar then stir until the sugar has completely dissolved and you can no longer feel any grains scraping the bottom of the pan.

3. Add the Buckwheat flakes and mix until all the ingredients are fully combined. Spoon the mixture into the prepared tin, spreading it right into the corners and pressing it down flat with the back of a spatula.

4. Bake for about 20 to 25 minutes. The flapjack is ready when the top becomes a beautiful golden brown and is soft to touch – do not be tempted to bake it for longer; although the flapjack will seem too soft, it will firm up as it cools down.

5. Leave the flapjack to cool completely before cutting into squares (5cm x 5cm) – if you attempt to cut the flapjacks before they are properly cold they will crumble, so patience is definitely a virtue!

I hope you like this recipe and give it try!

If you want to keep up to date with my kitchen adventures you can find me on Instagram @titchyton or on my Facebook page.

No Churn Raspberry and Mascarpone Ice Cream

After what has seemed like months of endless grey clouds and drizzle, the sun finally decided to grace the UK with its presence and Britain has just enjoyed a week of uncharacteristically warm weather, which some of us Brits are quite frankly not used to.

Despite the fact it has been uncomfortably hot at points, I have tried to make the most of the sunshine as it will be over all too soon and at the weekend I had my first (and probably last) barbecue of the year and made homemade ice cream.

image

When I think of summer one of the first things that pops into my mind is ice cream. When I was a little girl my dad worked as an ice cream man and the summer holidays consisted of playing outside with my sisters, endless supplies of ice cream and ice lollies and the occasional trip out in the ice cream van, if I was good!

So, I’m sure you’ll understand why the hot weather meant that I just had to have ice cream and what could be a more perfect excuse to make my own? It’s also surprisingly  easy – it’s a no churn recipe, so you don’t need an ice cream machine but an electric whisk is always a good idea.

When it came to choosing flavours, I decided to use mascarpone cheese as a nod to my Dad (he’s Italian so it seemed like the perfect ingredient) and raspberry which is a lovely sharp contrast to the creamy mascarpone – this recipe is incredibly versatile though, so you can go to town creating tonnes of interesting flavour combinations!

No Churn Mascarpone And Raspberry Ice Cream

For the Raspberry Sauce:
125g fresh raspberries
1 tbsp caster sugar
25 ml cold water

For the Ice Cream:
250g cheese mascarpone, room temperature
397g can sweetened condensed milk
600 ml double cream
1 tsp vanilla extract

Method: 

1. To make the raspberry sauce: place the raspberries, sugar and water into a food processor and blend to a puree. Push the purée through a sieve to remove the seeds then set it aside for later.

2. For the ice cream, soften the mascarpone cheese with an electric whisk until it is very soft, add the condensed milk and vanilla extract then whisk until the mixture is smooth. In a separate bowl, whisk the double cream until it forms soft peaks, gently fold through the condensed milk and mascarpone mixture without knocking too much volume from the cream, but ensuring that all the ingredients are combined.

3. Drizzle half of the raspberry sauce over the ice cream mixture but don’t fold it through. Spoon the mixture into a large freezable container and place in the freezer for at least 6 hours or overnight and refrigerate the remaining raspberry sauce.

4. Thaw the ice cream before serving with the remaining raspberry sauce.

Honey Roasted Chicken, Feta and Quinoa Salad with Sticky Sautéd Tomatoes

Today I’m going to share with you one of my most favourite creations, my Chicken, Feta and Quinoa Salad with Sticky Sautéd Tomatoes. This is a recipe which I come back to time and time again because it’s super easy to prepare and incredibly tasty.

image

I made this for my sister on her most recent trip to London, I had offered to make us both lunch and wanted to serve something more interesting than your usual lunchtime fodder.

Personally I think this salad ticks all the boxes. For a start, there is not a bland lettuce leaf in sight which instantly makes it infinitely more appealing. The base of my salad is made up of quinoa, a grain which is a fantastic source of protein and dietary fibre, and if prepared in the right way can be incredibly flavoursome.

The rest of the ingredients are far from boring, the chicken breast is roasted in sweet and sticky honey which contrasts wonderfully to the salty feta and refreshing cucumber, but without a doubt the absolute star of this dish is my sticky sautéd tomatoes which I am completely obesessed with – you’ll know why, once you’ve tried them!

The salad is topped off with a handful of pomegranate seeds and a bunch of parsley… I tried to get some leaves in there, somewhere!

Honey Roasted Chicken, Feta and Quinoa Salad with Sticky Sautéd Tomatoes – GF/EF

Serves 2 – 3 

For the Salad:
120g Quinoa, rinsed (I used a mix of white/black/red quinoa)
500ml water, brought to the boil
1 chicken stock cube
400g diced chicken breast
1 tbsp olive oil
2 tbsp honey
1/2 a cucumber, deseeded and chopped into half moon shapes.
50g Feta cheese
A bunch of fresh parsley
12 cherry tomatoes
1 tbsp red wine vinegar
1/2 tsp caster sugar
A handful of pomegranate seeds (optional)

For the Dressing:
Lemon juice
Olive Oil
Salt and Pepper to season

Method:

1. Preheat oven to 180 degrees C/160 fan/gas mark 4.

2. Coat the chicken in olive oil and honey, then season it with black pepper.

3. Bake the chicken in the preheated oven for 20 minutes. To check the chicken is cooked, make sure the meat is white and that no pink remains.

4. Whilst the chicken is cooking, place the quinoa into pan of boiling water and crumble over a stock cube. Stir and reduce the pan to simmer, then cook for 15 minutes until the quinoa is soft.

5. Drain quinoa and leave it cool slightly.

6. To make the sticky tomatoes: heat up a dash of olive oil in a frying pan over a medium heat. Add the cherry tomatoes and cook for a minute or two, until they start to become slightly wrinkly. Add the red wine vinegar and sugar, then stir to coat the tomatoes until they become sticky.

7. Serve your salad on a large serving plate. Start with the quinoa on the bottom, layer up the slices of cucumber, feta, chicken and tomatoes, then top with fresh parsley and pomegranate seeds.

8. Drizzle over olive oil and a squeeze of lemon. Season with black pepper and serve with wedge of lemon on the side.

image