Gluten Free & Dairy Free Jammy Dodger Recipe

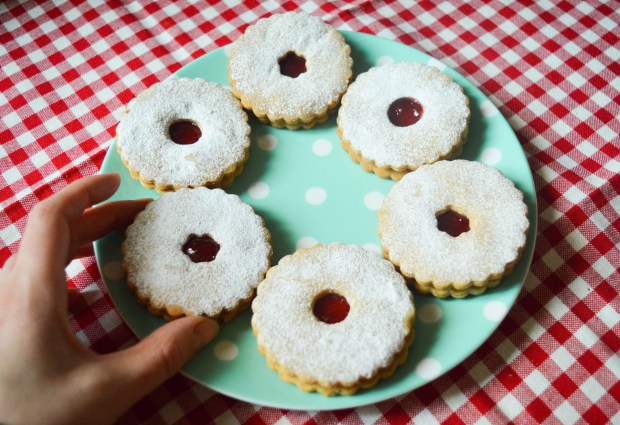
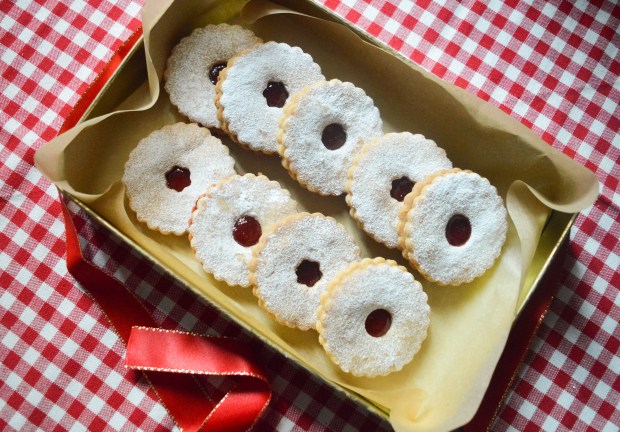
Today I’m going to share with you my Gluten Free & Dairy Free Jammy Dodger Recipe – this recipe is also free from eggs and so is suitable for vegans.

image

I found gluten free biscuits a little tricky at first, but I’ve discovered over the course of many biscuit based experiments that success comes down to two things:

1. What type of flour(s) you use.

2. How you bind your ingredients.

I’ve found that good gluten free biscuits require a mix of different flours. I usually start with gluten free self raising flour as my base, then add other types of flour depending what kind of texture I want the finished bake to have. For biscuits, I wouldn’t recommend using self raising flour alone, as the biscuits will rise too much and be more cake like. Gluten free self raising flour is a useful base though, as it usually has added raising and binding agents, like Xanthan gum which helps to bind the ingredients together. To the self raising flour I like to add cornflour, which also helps bind the ingredients together, and ground almonds to add some bulk  – although I don’t like to add too much, as this could cause the biscuits to crumble.

In most of my cookie recipes I usually add an egg yolk to help bind the ingredients together – without an egg, I usually find that the dough is too crumbly and too difficult to handle. This time I decided to experiment with golden syrup, which in my opinion did the job just as well as an egg yolk – great news for vegans!

image


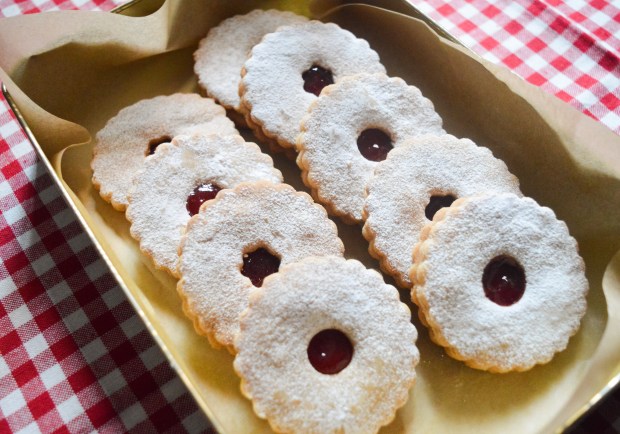
Jammy Dodgers – Gluten Free/Dairy Free/Egg Free/Vegan

Makes approximately 18 cookies

Ingredients

For the biscuits:

250g gluten free self raising flour

60g cornflour

40g ground almonds

100g caster sugar

150g dairy free spread

2 tbsp golden syrup

2 tsp vanilla extract

For the filling:

200g strawberry or seedless raspberry jam

1 tbsp cold water

Icing sugar for dusting

Method

1. In a large bowl, stir together the gluten free self raising flour, cornflour, ground almonds and sugar.

2. Rub the dairy free spread into the flour mixture until it starts to form a bread crumb like texture. Add the vanilla extract and golden syrup then start to bring the mixture together with your hands until it forms a dough – don’t worry if the dough seems quite soft at this point.

3. Wrap the dough in cling film then leave it to chill in a refrigerator for at least 30 minutes.

4. Whilst the dough chills, preheat the oven to 170 degrees C/gas mark 3 and line two large baking trays with baking parchment.

5. Roll out the dough onto a floured surface. Using a 6cm crimped scone or pastry cutter, stamp out 36 cookies – transfer the cookies to the baking trays using a palate knife or splatula.

6. Once the cookies are on the tray, cut holes in the centre of half the biscuits using small cookie cutters in any shape you fancy – I used a tiny flower cutters and a piping nozzle to cut out circles.

7. Bake the cookies for approximately 10 to 12 minutes or until golden brown – don’t worry if the cookies are a little soft, they will firm up when they cool down.

8. Leave the cookies to cool and firm up on the baking tray for a few minutes, then transfer them to a wire rack to finish cooling.

9. In a small bowl mix together strawberry jam (or the jam of you choice) with some cold water to make it more spreadable.

10. Lightly dust the cookies with the hole in the centre with icing sugar.

11. Spread the jam over the base of  the cookies without the holes, then sandwich them together the remaining cookies, so that the jam peeks through!

image


Gluten Free Cocoa Pops Recipe

Every year I make it my New Years Resolution to eat breakfast every single day – but, every year I fail miserably and just end up  feeling pretty bad about myself and my lack of willpower. So this year, instead of coming up with resolutions I know I won’t keep, I decided to challenge myself to come up with fun breakfast ideas and to just enjoy food more.

My breakfast of choice used to be cereal and wouldn’t just eat it for breakfast, I’d have it as an after school snack or for a late night feast – now, I can’t eat most cereals as a lot of popular brands aren’t gluten free, and haven’t found many gluten free cereals which I really like or that don’t contain copious amount of sugar and additives.

This morning I had a huge craving for Coco Pops, so I decided to try to make my own homemade version and I’m very pleased with how they turned out.imageThese homemade Cocoa Pops are super easy to make – you only need four very basic ingredients and they can whipped up in less than 20 minutes. The recipe uses a natural alternative to refined sugar and is both dairy and gluten free, but I promise they are delicious and taste just as good, if not better than the shop variety!

image


Cocoa Pops – GF/DF/EG

Ingredients

3 cups puffed rice
60 ml maple syrup
30 ml sunflower oil
1 tbsp cocoa powder

Method

1. Preheat the oven to 160 C/140 C/gas mark 3 and line two large baking trays with greaseproof paper.

2. Place the maple syrup, oil and cocoa powder into a sauce pan and place it over a low heat. Stir the ingredients with a wooden spoon until no lumps remain, then fold through the puffed rice until it is fully coated in the cocoa mixture.

3. Spread the mixture into a thin layer across the two baking trays. Bake for 6 – 8 minutes, until the puffed rice becomes crisp – make sure to give the cereal a stir half way through the bake time.

4. Leave the cereal to cool on the baking trays for a few minutes, then it’s ready to enjoy!

image

Gluten Free Christmas: Coconut Snow Cupcakes

It’s almost Christmas Day! It’s been a busy festive season for me, but I still have one Christmas recipe to share with you this year –  my Gluten Free Coconut Snow Cupcakes.imageThese cupcakes are a little different to your traditional Christmas bakes, perfect for anyone who isn’t a big fan of dried fruit but still festive enough to be served on Christmas Day – I think they would also be lovely served at a New Years Eve party! imageI got these cute star decorations from HEMA – they are actually cocktail sticks but I thought they would make cute cupcake toppers, but you can use any cupcake toppers or edible decorations of your choosing!


Coconut Snow Cupcakes – GF/DF options

Ingredients

For the sponge:

200g golden caster sugar

200g butter, softened (or dairy free alternative)

200 gluten free self raising flour

2 tbsp dessicated coconut

1 tsp baking powder

3 tbsp milk (or dairy free alternative)

1/2 vanilla pod deseeded (or 2 tsp of vanilla extract)

1/2 tsp coconut extract (optional)

2 large eggs

For the buttercream icing:

150g unsalted butter, softened (or dairy free alternative)

250g icing sugar, plus extra for dusting

1 tsp vanilla extract

To  decorate:

3 tbsp dessicated coconut

edible glitter (optional)

Method

1) Preheat the oven to 160 C/140 c fan/gas mark 3 and line a cupcake tray with cupcake cases.

2) In a large bowl, stir together the flour, baking powder and bicarbonate of soda.

3) In a separate bowl cream the butter, vanilla extract and sugar together with an electric hand mixer until light and fluffy.

4) Scrape down the sides of the bowl with a spatula. With the mixer on a low speed, add the egg a bit at a time along with a tablespoon of the flour mixture.

5) Once the egg is fully combined, add the rest of the flour and the milk until you are left with a smooth mixture.

6) Spoon approximately one and a half tablespoons of the mixture into each cupcake case, being careful not to overfill them.

7) Bake for approximately 20 – 22 minutes – the cupcakes are ready when they are golden brown and firm to touch.

8) Leave the cupcakes to cool in the tin for a few minutes, then transfer them to a wire rack to finish cooling while you prepare the buttercream icing.

9) To make the buttercream, beat the butter, icing sugar and vanilla extract with an electric hand mixer until light and fluffy and almost white in colour.

10) Once the cupcakes have cooled, spread the buttercream forest in over each cupcake using a palate knife, then sprinkle each one with desiccated coconut and a touch of edible glitter to finish.

image

That’s it for my Christmas recipes this year! If you’re looking for more gluten free Christmas baking inspiration why not check out my Gluten Free Stollen Muffins, Gluten Free Gingerbread Wreath or you can find a full list of my Christmas recipes over on my Recipes page.


Gluten Free Christmas: Gingerbread Wreath

We are 12 days into advent and I finally feel as though I’m getting into the full swing of the festivities. So far most of Advent has been spent in the kitchen working on festive bakes, most of which have involved copious amounts of edible glitter which I keep finding everywhere, including in my hair, on the floor, on the cat…

Today I’m going to share with you my recipe for this gingerbread wreath which is definitely an excuse to get out the edible glitter.

img_3316

The Gingerbread wreath is completely edible (except for the Red Ribbon) and although it looks impressive and difficult to achieve, it was actually incredibly easy! You don’t need any fancy equipment, just a large dinner plate, a sharp knife and a few different sized cookie cutters. Whipping up the gingerbread dough takes only a matter of minutes and the construction of the wreath isn’t too daunting, as long as you follow the instructions step by step. The wreath is not really design to be used as a decoration as the ribbon won’t support the weight of a wreath – but it would make a lovely edible Christmas gift.

img_3321


Gluten Free Gingerbread Wreath – GF/DF options

This recipe is inspired by Cassie Best’s Gingerbread Wreath for BBC Good Food

Ingredients

For the Gingerbread:
125g gluten free self raising flour blend
200g rice flour, plus extra for dusting
1 tsp bicarbonate of soda
2 tsp ground ginger
2 tsp cinnamon
125g unsalted butter (or dairy free alternative)
150g soft dark brown sugar
2 tbsp golden syrup
1 tbsp black treacle
1 large egg

To Decorate:
200g Ready to roll Icing
30 ml cold water
250g icing sugar
1 egg white
Edible glitter

You will also need:
A sharp knife
1 x large dinner plate
1 x inch piping nozzle
1 x 9cm round cutter
1 x small star cutter
1 x medium star cutter
1 x large star cutter
1 x small angel cutter
1 red ribbon

Method

1) In a large bowl, sift together the flours, bicarbonate of soda, ginger and cinnamon. Using your hands, rub the butter into the dry ingredients until it becomes like fine bread crumbs and then stir through the dark brown sugar.

2) In a separate bowl whisk the egg with a fork, then add this to the cookie mixture along with the golden syrup and black treacle. Mix until the ingredients come together. The cookie dough will appear quite wet at this stage but don’t be tempted to add more flour or you will dry out the dough!

3) Gently knead the dough on a floured surface with floured hands until it turns into a smooth, soft and slightly sticky ball of dough. Dust the dough with flour as you knead to stop it sticking to the work surface. Wrap the dough in cling film and leave to chill in the fridge for at least 2 hours – chilling helps the dough to firm up so it can be rolled out.

4) Preheat the oven to 180 C/160 fan/gas mark 4. Roll half of the dough out in between two sheets of greaseproof paper until it is the thickness of a 1 pound coin. Remove the top layer of greaseproof paper, then place a large dinner plate face down into the centre of the dough and use a sharp knife to cut out a large circular disc of gingerbread.

5) Transfer the gingerbread onto a baking tray (you can use the bottom sheet of baking paper to line your tray) then use a 9 cm circular cutter to cut out a circle of dough from the centre of the gingerbread disc and a 1 cm piping nozzle to cut out a hole for the ribbon.

6) Bake the base of your wreath for 10 to 12 minutes – watch out for the edges catching.
Once baked, leave the wreath to firm up on the baking tray for a few minutes before transferring it to wire rack to finish cooling.

7) Roll out the remaining dough and cut out 5 large stars, 4 medium stars, 11 small stars and 2 angel shapes. Arrange the shapes onto a baking tray and bake for 10 to 12 minutes – the smaller cookies will need checking after 8 minutes.

8) Once baked, leave the cookies to firm up on the baking tray for a few minutes bering transferring them to wire rack to finish cooling.

9) While the cookies cool, make the royal icing: place 1 egg white in a bowl and slowly sift icing sugar in batches. In between each batch of sugar, stir the icing with a wooden spoon or a balloon whisk until the icing thickens up, then transfer the icing into a piping bag fitted with a small writing nozzle.

10) Next, make the fondant icing: break the ready to roll icing into pieces and place them in a bowl. Add a splash of water and use a spatula to break up the icing until it starts to become more paste like, then add the rest of the water and beat with an electric hand mixer until the fondant becomes runny.

11) Spread the fondant icing over the 5 large star shapes and sprinkle each one with edible glitter. Decorate the remaining pieces with the royal icing and leave all the pieces to dry for about an hour before you assemble the wreath.

12) Use the remaining royal icing to stick the biscuits to the wreath. Sprinkle the wreath with edible glitter and thread a red ribbon through the hole to finish.

img_3343


There will be plenty of festive bakes coming your way really soon. Meanwhile, why not come and see what else I’m getting up to over the festive season by following me on Instagram or Facebook. Remember, If you give this recipe take a snap of it and share it with me on Instagram, Facebook or Twitter using the hashtag #titchytonbakes and I will share my favourites on my Facebook page!

Sweet and Salted Peanut Butter Popcorn Squares

These Sweet and Salted Peanut Butter Popcorn Squares are the perfect treat to enjoy on a Sunday afternoon, snuggled up on the sofa in your pyjamas while you watch a film Marathon. Be careful though, they are super moorish!

IMG_6387


Sweet and Salted Peanut Butter Popcorn Squares – GF/EF/DF options

Ingredients

For the popcorn squares:
60g butter (or dairy free alternative)
100g gluten free salted and sweet popcorn
180g white mini marshmallows
3 tbsp chunky peanut butter

To decorate:
50g milk and dark chocolate (or dairy free alternative)

Method

1) Grease and line a square cake tin with baking paper.

2) Place a large heavy bottomed pan over a low to medium heat, then add the butter and marshmallows and heat them until they have completely melted.

3) Fold the peanut butter through the marshmallow mixture, then add the popcorn and stir until fully coated.

4) Working quickly, spoon the mixture into the prepared tin and smooth it out using a greased palate knife until it starts to reach corners of the tin.

5) Place a large square of grease proof paper over the top of the mixture, then use your hands to press the mixture right down into the tin.

6) Peel off the greaseproof paper and leave the mixture to set for a few hours.

7) Once the mixture has set, turn it out of the tin and cut it into bite size squares.

8) Next, melt the chocolate in heat proof bowl over a pan of simmering water. Transfer the chocolate into a piping bag and pipe a zig-zag pattern over each popcorn squares.

IMG_6385

Store the popcorn squares in an airtight container and they should last for up to a week.

Gluten Free Red Velvet Cupcakes

Today I’m going to share with you a recipe for one of my favourite bakes – Gluten Free Red Velvet Cupcakes.

image

My love affair with Red Velvet Cake started a few years ago when my little sister asked me to make a Red Velvet Cake for her Birthday. I had never eaten or made Red Velvet Cake before, but I was nevertheless happy to oblige – my Mum was less happy when my first attempt erupted all over the oven because I’d used shallow tins and too much bicarbonate of soda… sorry Mum!

It wasn’t until my first taste of Red Velvet Cake I realised what I had been missing – Chocolate sponge flavoured with sharp buttermilk, topped off with cream cheese frosting. What’s not to like?

Making a Red Velvet Cake can be quite time consuming, especially if you are going for the traditional three or more layers, so I’ve adapted my Red Velvet Cake recipe to a more simple cupcake recipe, so that you can get your Red Velvet fix much quicker!

image


Red Velvet Cupcakes – GF

Ingredients

For the Cupcakes:
100g gluten free self raising flour
10g cocoa powder
100g caster sugar
50g butter
1 large egg
100ml buttermilk
1 tsp vanilla extract
1/2 tsp red food colouring (gel not liquid)
1/2 tsp cider vinegar
1/2 tsp bicarbonate of soda

For the Cream Cheese Topping:
250g mascarpone cheese
150ml double cream
50g icing sugar
1/2 tsp vanilla extract

To Decorate:
Freeze dried raspberry pieces

Method

1) Preheat the oven to 170 C/150 C fan/gas mark 3) and a cupcake tray with cupcake cases.

2) In a large bowl sieve together the flour and cocoa powder, then set aside for later.

3) In a separate bowl cream the butter, vanilla extract and sugar together with an electric hand mixer until light and fluffy.

4) Scrape down the sides of the bowl with a spatula. With the mixer on a low speed, add the egg a bit at a time along with a tablespoon of the flour mixture. Once the egg is fully combined, add the rest of the flour.

5) Pour your buttermilk into a measuring jug, then add the red food colouring a little at a time until it turns a turns a deep red –  I found about half a teaspoon did the trick, but you may find you need more or less depending on the food colouring you are using.

6) With the mixture on a low speed, add the buttermilk to your cake mixture a bit at a time, keep mixing until all the buttermilk is combined.

7) In a small bowl mix together the bicarbonate of soda and vinegar until it starts to fizz, then quickly fold it into the cake mixture.

8) Working quickly, spoon two teaspoons of the mixture into each cupcake case

9) Bake for 15 – 18 minutes. The cupcakes are ready when they are firm to touch.

10) Leave the cupcakes to cool in the tin for a few minutes, then transfer them to a wire rack to finish cooling while you prepare the cream cheese topping.

11) Sift the icing sugar into a large bowl, add the vanilla extract and mascarpone then mix with a wooden spoon until the ingredients are just combined.

12) In a separate bowl whisk the double cream with an electric hand mixer until it almost reaches soft peaks, add the mascarpone and whisk for a couple of seconds until it is just combined.

13) Transfer the frosting into a piping bag fitted with a large star nozzle. Pipe the frosting onto each cupcake, then decorate with a sprinkling of freeze dried raspberry pieces.

image

If you give this recipe a try, or any of the other recipes on my blog remember to take a snap of your creation and share it with me on Instagram, Facebook or Twitter using the hashtag #titchytonbakes.

Gluten Free Fondant Fancy Cupcakes (Inspired by ‘The Great British Bake Off’)

Today I’m going to share with you my Gluten Free Fondant Fancy Cupcakes recipe which is inspired by the showstopper challenge from the Semi Final of ‘The Great British Bake Off’.

image

Last week’s show saw the remaining four bakers battling it out over Patisserie for a place in final, but sadly Selasi didn’t make the cut. He might not have made it to the final, but he did win over the hearts of the nation and I will definitely miss him during this week’s show. Speaking of this week, the final will be a very bittersweet occasion, as although I am excited to see who wins, I am sad that this is the last episode of GBBO as we know it.

What I’m going to miss most is how the show has inspired me to bake things I’d never thought of trying – this includes fondant fancies, which were featured on last week’s show.

I used to love Fondant Fancies and seeing them on the show has made me feel super nostalgic – I remember having them at my Grandma’s house when I was little and how I always would choose the pink ones, because I liked them best!

I will admit though, Fondant Fancies looked incredibly difficult and fiddly to make, so I decided to go for a more simple approach. My Fondant Fancy cupcakes are much a easier to achieve, but they are every bit as delicate, dainty and delicious as the fondant fancies I remember.

image

These cupcakes would be lovely served at afternoon tea or a birthday party and are sure to impress, despite being deceptively simple.

Fondant Fancy Cupcakes

Makes approximately 16 small cupcakes

Ingredients

For the cupcakes:

150g softened butter (or dairy free alternative)
150g caster sugar
150g gluten free self raising flour
1/2 tsp baking powder
2 eggs
1 tsp vanilla extract
1 tbsp milk (or dairy free alternative)

For the buttercream:

100g softened butter (or dairy free alternative)
100g icing sugar

For the fondant icing:

300g ready to roll icing
50ml cold water
A few drops of pink food colouring

Method

1. Preheat the oven to 160 C/140 C fan/gas mark 3 then line two cupcake trays with 16 cupcake cases.

2. In a large bowl, beat the butter, sugar and vanilla together with an electric hand mixer until light and fluffy.

3. Add a tablespoon of flour, then beat in the eggs a little bit a time before sifting in the remaining flour and baking powder. Add the milk, then beat the ingredients together with the electric hand mixer until combined.

4. Spoon two teaspoons of mixture into each cupcake case, being careful not to overfill them. Bake for 20 to 25 minutes until golden brown and firm to touch.

5. Leave the cupcakes to cool on a wire rack. To make the buttercream, beat the butter with an electric hand mixer until it’s very light and fluffy. Add the icing sugar and continue to beat until all the ingredients are combined, then transfer the buttercream to a piping bag fitted with a medium plain nozzle.

6. Once the cupcakes have cooled, pipe a blob of buttercream onto each cupcake then place them in freezer to firm up while you make the fondant icing.

7. Cut the ready to roll icing into pieces and place them in a large bowl. Add a splash of water and using a spatula start to break up the icing until it starts to become more paste like. Add the rest of the water and beat with an electric hand mixer until the fondant becomes more runny.

8. Save a couple of tablespoons of the white icing to decorate the top of the cupcakes. Add a couple of drops of pink food colouring to the remaining icing and mix until the fondant turns a light pink colour.

9. Remove the cupcakes from the freezer. Spoon a little of the pink fondant icing over each cupcake, then use a palate knife to spread out the icing making sure that the buttercream is covered.

10. Put the left over white icing into a piping bag fitted with a small writing nozzle. Pipe the icing across the top in a zig zag pattern.

image

Gluten Free Bakewell Tart (Inspired by ‘The Great British Bake Off’)

Today I’m going to share with you my gluten free take on Mary Berry’s Bakewell Tart, as featured on the latest episode of ‘The Great British Bake Off’.

image

This week the bakers had to tackle pastry and they were tasked with making Danish Pastries, Filo Pastry Amuse Bouches and a Bakewell Tart, which was this week’s technical challenge.

There was some controversy on Twitter after the show aired that Mary’s bake was not a Bakewell Tart, but in fact a Cherry Bakewell because it was topped with an almond flavoured icing – apparently a traditional Bakewell Tart is supposed to be topped with layer of flaked almonds, not icing.

It may annoy traditionalists, but I decided to stay true to Mary’s recipe and go for a layer of icing…  but I did add some flaked almonds for good measure!

image

The challenge making a gluten free version of this bake is coming with a good shortcrust pastry recipe.

Gluten free pastry can tend to be a little on the crumbly side, so it’s important that there is enough liquid in the mixture to help bind the ingredients together. My recipe uses a combination of egg yolks and butter to achieve this, but if the mixture is being little stubborn, a drop of water can be added to help bring it together.

It’s also incredibly important to chill your pastry before using it, as it this really does help to make it more pliable.

Finally, a good quality non stick tart or flan tin with a loose base is essential, or you will struggle to get your tart of its tin!

image

Gluten Free Cherry Bakewell Tart – GF/DF/

(Recipe inspired by Mary Berry’s Bakewell Tart recipe from ‘The Great British Bake Off’)

You will need a 8″ inch fluted flan or tart tin with a loose base.

Ingredients

For the Pastry:

200g plain gluten free flour

50g ground almonds

75g  icing sugar

2 egg yolks

125g butter (Or gluten free alternative like Stork Baking Block)

A drop of water

For the filling:

4 tbsp seedless raspberry jam

150g butter, softened (or gluten free alternative)

150g caster sugar

150g ground almonds

1 large free-range egg, beaten

1 tsp almond extract

For the icing: 

300g icing sugar

1 tsp almond extract

A handful of toasted flaked almonds to finish

Method

1) To make the pastry, stir together the flour, ground almonds and icing sugar in a large mixing bowl.

2) Rub together the flour mixture and the butter, add the egg yolks and start to bring the mixture together your hands.

3) Tip the contents of the bowl out onto a floured work surface and knead the dough until it comes together in a smooth ball – you can add a few drops of water to help, if necessary.

4) Wrap the pastry in cling film and put it in the fridge to cool for about 30 minutes to an hour – this is very important as the colder the pastry is, the easier it is to work with.

5) Preheat the oven to 180 C/160 C fan/gas mark 4, then throughly grease your tart tin with butter.

6) Roll out the chilled pastry between two sheets of greaseproof baking paper (this will prevent the pastry from sticking to your work surface) until it is about the thickness of a 1 pound coin.

7) Use greaseproof paper to help you get the pastry into the tin safely. Firstly, peel off the top layer of baking paper, place the tin upside down into the middle of the pastry then carefully flip the pastry over with the help of the bottom sheet of baking paper. Peel off the bottom baking sheet and gently press the pastry down into the tin, insuring it’s pressed right into each groove – don’t panic if you do get any tears or any holes, just neatly patch it up with some spare pastry.

8) Trim off any excess pastry. Place some baking paper into the case and fill it baking beans (any dried beans or rice will do) then blind bake the pastry case for 10 minutes. Remove the baking beans and bake the case for a further 5 minutes to help dry it out.

9. Meanwhile make the Frangipane: cream together the butter and sugar until light and fluffy. Beat in the egg, ground almonds and almond extract until the ingredients are combined.

10. Leave the pastry case to cool down slightly before spreading the jam over the base of the case in an even layer. Next, spoon the Frangipane into the case and smooth it out with a palate knife.

11. Bake the tart for 25 – 30 minutes or until the Frangipane is golden brown and firm to touch. If the pastry starts to get a little too much colour, put some tin foil over the tart, this will prevent it from burning.

12. Leave the tart to cool completely before decorating. While you are waiting, toast your flaked almonds by spreading them over a lined baking sheet and baking them at 180 degrees for about 5 minutes until toasted.

13. To make the icing, sift the icing sugar into a bowl. Add the almond extract and 2 to 3 tablespoons of cold water and mix until you are left with a thick but spreadable icing.

14. Spread the icing over the cooled tart using a palate knife. Sprinkle over the toasted almonds, then serve!

image

I hope you enjoy this recipe and all other recipes I have recreated during this series of ‘The Great British Bake Off’ so far.

I love seeing your bakes, so if you try any of my recipes please take a snap and share it on Instagram or Twitter by using the hashtag #titchytonbakes or post a picture on my Facebook page.


Gluten Free Viennese Whirls (Inspired by ‘The Great British Bake Off’)

Bake Off is finally back on our TV screens, so queue the nationwide baking frenzie and attempts to recreate bakes from the show at home – sometimes with varing success!

This was certainly the case when I attempted to make a gluten free version of Viennese Whirls, the technical challenge from this year’s Biscuit Week.

image

I discovered Mary Berry’s recipe on the BBC Food website and decided to give it a whirl (see what I did there?) – I thought a gluten free version would work quite well and that all I needed to do was change the flour… I was quite wrong!

I followed Mary’s recipe to the letter and all the the tips the bakers mentioned on the show, including insuring the butter was soft enough and chilling the whirls before baking. Unfortunately, they turned out a crumbly mess and I couldn’t even get them off the baking tray without them disintegrating into a million pieces

The recipe definitely required a few further tweaks to work gluten free, so it was back to the drawing board.

I think that the first attempt went wrong because the mixture was too soft and a bit oily which resulted in the mixture melting in oven, despite the fact that I’d chilled the whirls in the freezer for 15 minutes prior to baking.

On my second attempt I decided to use margarine instead of butter, which combatted some of the oiliness, and I added a touch more dry ingredients, which resulted in a firm but pipeable mixture. Again, I  chilled the whirls before baking which helped them to keep their shape.

This time they came out overbaked, which I think is due to the oven temperature being quite high in Mary’s recipe – if you don’t check the biscuits every 30 seconds after the first 13 minutes, you might accidentally overbake them and I definitely wouldn’t recommend leaving them for the full 15 minutes without checking them!

By the third attempt, I knew I had found the right balance of ingredients but decided to drop the oven temperature from 190 degrees to 180 to help to slow down any potential overbaking.

It was definitely third time lucky. The result was a whirl that had kept its shape, was golden but not over baked and was actually stable enough to get off baking tray and be filled. They also tasted delicious and melted in the mouth – heaven!

image

Viennese Whirls – GF/EF/DF OPTIONS

Recipe adapted from Mary Berry’s Viennese Whirl Recipe from ‘The Great British Bake Off’ found on the BBC Food website.

Ingredients

For the biscuits:

250g soft margarine (or dairy free alternative)

70g icing sugar

225g gluten free self raising flour

50g cornflour

1/2 tsp vanilla extract

For the filling:

Strawberry Jam (Mary’s recipe said Raspberry, but I prefer Strawberry)

100g unsalted butter (or dairy free alternative)

200g icing sugar, plus extra for dusting

1/2 tsp vanilla extract

Method

1. Preheat the oven to 180 C/160 C fan/gas mark 4.

2. Line 3 baking trays with baking paper, then use a 5cm cutter to draw 8 circles onto each sheet of paper, making sure they are well spaced out. Turn the paper over so the circles are underneath.

3. In large bowl, cream together the margarine, sugar and vanilla with an electric hand mixer until light and fluffy. Add the gluten free flour and cornflour and beat with the hand mixer until all the ingredients are fully combined.

4. Transfer the mixture into a piping bag fitted with a medium star nozzle – I like to use plastic disposable piping bags because I think they are easier to use.

5. Pipe 24 swirls inside the circles on the baking sheets. Place the baking sheets in the freezer for 10 – 15 minutes to help the swirls firm up before baking.

6. Bake for 13—15 minutes, until  pale golden-brown in colour. I reccomend checking them every 30 seconds after the first 13 minutes as the edges can catch and they can easily overbake.

7. Leave the whirls to cool on the baking sheets for a few minutes then transfer them to wire rack to cool completely.

8. To make the butter cream, beat the butter, icing sugar and vanilla extract with an electric hand mixer until light and fluffy and almost white in colour. Transfer into a piping bag fitted with a large star nozzle.

9. To decorate: Spoon a little jam onto the flat side of half of the biscuits, then pipe a swirl of buttercream over the top. Place a biscuit on top of each one to create a sandwich, then dust with a little icing sugar to finish.

image

Gluten Free Torta Della Nonna Recipe

Today I’m going to share with you my gluten free take on a classic Italian dessert called Torta della Nonna, which in English means ‘Grandma’s Cake’.

image

Torta della Nonna is a traditional dessert cake, not unlike a custard tart, which consists of a sweet shortcrust pastry case, filled with creme patisserie and topped with almonds or pine nuts.

3268CC9F-DD30-4619-BDB5-8E9FB9A809C8
Gluten free pastry can be notoriously tricky to get right, but with a few experiments I have come up with a simple recipe and a few tips and tricks which make handling the pastry much easier.

Torta della Nonna – GF/DF options

Ingredients

Pastry:

300g plain gluten free flour

100g icing sugar

3 egg yolks

150g butter (or dairy free alternative)

Creme Patisserie:

Zest of 1 small unwaxed lemon

400ml milk (or dairy free alternative)

3 egg yolks

1 tsp vanilla extract

30g cornflour

100g caster sugar

Topping:

Milk, for glazing (or dairy free alternative)

A handful of almonds or pine nuts

Method:

1) To make the pastry: Stir together the flour and icing sugar. Add the egg yolks and butter, rub the ingredients together until they start to form a dough. Tip the contents of the bowl out onto a lightly floured work surface, knead the dough for a few minutes until it forms a smooth ball of pastry.

2) Wrap the pastry in cling film and put it in the fridge to chill for about 30 minutes to an hour. This is very important as the colder gluten free pastry is, the easier it is to work with.

3) While the pastry is chilling it’s time to make the creme patissiere. Start by placing 300 ml of milk, vanilla extract and lemon zest into a heavy bottomed pan – remember to save 100 ml of the milk as you will need it in a moment.

4) Warm the milk over a low heat but do not let it boil. Once the milk is hot strain it through a sieve to get rid of the lemon zest.

5) Next, place the remaining milk, egg yolks, cornflour and sugar into a separate bowl then whisk until combined.

6) Add this mixture to the hot milk by pressing it through a sieve to get rid of any lumps.

7) Increase the heat slightly to bring the mixture to a boil, keep stirring until the mixture thickens and remove from the heat.

8) Pour the creme patissiere into a bowl and allow it to cool slightly before covering it with cling film and popping it in the fridge for later.

9) Once the pastry has been chilled it’s time to assemble the tart. Preheat your oven to 180 C/160 C fan/gas mark 4, then grease an 8 inch loose bottomed flan or tart tin with butter – remember to throughly grease the sides of the tin or you will struggle to remove your tart at the end.

10) Take your pastry out of the fridge and cut it in half. Keep one half for the base of the tart and place the other half back in the fridge to keep cool – this will be used to make the lid later.

11) The best way to roll out gluten free pastry is between two sheets of greaseproof baking paper which will prevent the pastry from sticking to your work surface.

12) Use greaseproof paper to help get the pastry into the tin safely. Firstly, peel off the top layer of baking paper, place the tin upside down into the middle of the pastry then carefully flip the pastry over with the help of the bottom sheet of baking paper. Peel off the bottom baking sheet and gently press the pastry down into the tin, insuring it’s pressed right into each groove – don’t panic if you do get any tears or any holes, just neatly patch it up with some spare pastry.

13) Trim off any excess pastry. Place some baking paper into the case and fill it baking beans (any dried beans or rice will do) then blind bake the pastry case for 10 minutes. Remove the baking beans and bake the case for a further 5 minutes to help dry it out.

14) Once the pastry case has been blind baked, allow it cool for a few minutes before spooning the creme patissiere into the pastry case until it’s almost full.

15) Roll out the pastry for the lid between two baking sheets, exactly the same way as you did the base. I often struggle getting lids on pies and tarts without the pastry tearing, so I like to pop the pastry lid into the freezer for a few minutes once it’s been rolled out which makes it much easier to handle and less likely to tear. To get the lid on your tart safely, use the bottom baking sheet to help flip the pastry upside down on top of the tart, then carefully  peel off the baking paper and trim off the excess pastry.

16) Press down around the edge of the tart and prick the lid with a fork to prevent air bubbles forming. Using a pastry brush, glaze the top of the tart with milk and sprinkle on a few handfuls of either almonds or pine nuts.

17) Bake the tart in the preheated oven for 45 – 50 minutes or until the top is golden brown and the nuts are lightly toasted.

18) Once the tart has cooled, sprinkle it with a dusting of icing sugar and serve with either vanilla ice cream, double cream, or you can have it plain with a cup of coffee!

Torte della Nonna is best stored in the fridge and will keep for a few days – if it lasts that long!

CE882DBA-D6EB-4CCA-8D8E-CF77FBBB8F8D

I love seeing your take on my recipes, so remember to share a snap of your Torta della Nonna over on Facebook, twitter or Instagram using the hashtag #titchytonbakes.