Gluten Free Easter: Mini Egg Brownies

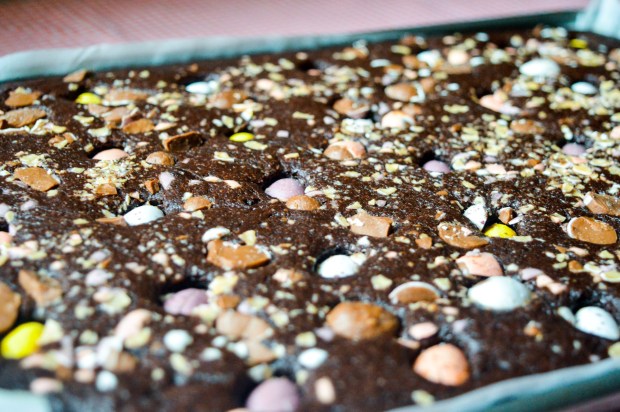
What could be more perfect for Easter than Brownies? Especially my Gluten Free Mini Egg Brownies, which are packed so full of chocolate they are guaranteed to satisfy even the fussiest of chocoholics.

BROWNIES2

I honestly don’t know what I’d do if Mini Eggs weren’t gluten free as they are my favourite Easter treat – they are also a great addition to brownies as they add a bit of crunch.

Be aware that Cadbury’s mini eggs contain Maltodextrin, which whilst being a gluten free ingredient can sometimes prove troublesome for Coeliacs. But the good news is, there are a couple of supermarket alternatives out there which don’t contain maltodextrin, including Micro Easter Eggs from Sainsbury’s and Chicky Choccy Eggs from M&S.

I have also been informed, that whilst Mini Eggs are definitely gluten free in the UK, in the US they may contain gluten due to potential cross-contamination risks during the manufacturing process.

BROWNIES

Gluten Free Brownies – GF/DF options

Ingredients

200g unsalted butter
200g Dark Chocolate (85% Cocoa solids)
80g gluten free self-raising flour
60g cocoa powder
250g light brown caster sugar
4 large eggs
2 x 90g packets of Cadbury Mini Eggs, chilled

Method

1) Preheat the oven to 180 C/160 C fan/gas mark 4, then grease and line a rectangular baking tray with baking parchment.

2) Heat the butter, chocolate and sugar together in a large saucepan over a low heat. Leave to cool slightly, then stir in the flour and cocoa powder.

3) Add the eggs one a time, beating the mixture vigorously in between each addition. Once the mixture has turned thick and glossy transfer it to the prepared tray, then scatter across the chilled mini eggs.

4) Bake for 25 to 30 minutes or until the brownies are firm to touch. Leave to cool completely before cutting into squares.

BROWNIES3

I love seeing your take on my recipes, so remember to share a snap of your Mini Egg Brownies over on Facebook, Twitter or Instagram using the hashtag #titchytonbakes.

Gluten Free Easter – Hot Cross Bun Muffins

Easter is fast approaching and although the weather has been unseasonably cold I have still been enjoying all the delightful treats the season has to offer.

One of my favourite Easter treats is a hot cross bun slathered in butter; and although I am quite keen on making a lot of my food from scratch I have little time and patience for attempting gluten free bread.

This is where my Hot Cross Bun Muffins come in…

125FE8CC-CA5A-449B-8C2E-5523F068F466

Some may consider it lazy, but making Hot Cross Buns in muffin form is the easiest way to get your Hot Cross Buns fix without the hassle of actually making bread.

As well as being gluten free, this recipe can easily be made dairy free by changing the milk for a dairy free alternative.

6E0CE377-9BA6-4860-941E-ACD484BEA31BHot Cross Bun Muffins – GF/DF options

Ingredients

For the muffins:

200g mixed dried fruit (I used sultanas/raisins/mixed peel)
300g gluten free self raising flour
Zest of an orange (save the juice for the icing)
1 tsp ground cinnamon
1 tsp mixed spice
1 tsp baking powder
1/2 tsp bicarbonate of soda
150g light brown sugar
2 large eggs
100 ml sunflower oil
200 ml milk (or dairy free alternative)

For the crosses:

100g icing sugar

1 – 2 tbsp of orange juice

Method:

1) Preheat the oven to 180 C/160 C fan/gas mark 4, then line a muffin tin with muffin cases.

2) In a large bowl, stir together the flour, baking powder, bicarbonate of soda, orange zest, cinnamon and mixed spice.

3) In a separate bowl, whisk together eggs, sugar, oil and milk until combined.

4) Gently mix together all the ingredients using a wooden spoon until you are left with a batter which is only just combined (don’t worry too much if there are any lumps), then stir through the dried fruit.

5) Spoon approximately 2 tablespoons of batter into each muffin case, then bake for 25 minutes, until golden brown.

6) Leave the muffins to cool completely on a wire rack, while you make icing.

7) To make the icing, mix the icing sugar with 1 – 2 tablespoons of orange juice or water, then mix until the ingredients form a pipeable paste.

8) Transfer the icing to a piping bag and pipe a cross onto each muffin.

Be sure to store the muffins in an air tight container and they will last for 4 to 5 days!

CDD15BDD-2C1C-42E3-A0A9-FA457CF08254

I love seeing your take on my recipes, so remember to share a snap of your Hot Cross Bun Muffins over on Facebook, Twitter or Instagram using the hashtag #titchytonbakes.

Gluten Free Easter Chocolate Log

My final Easter recipe this is year is my Gluten Free Easter Chocolate Log recipe – the perfect bake for chocoholics and a beautiful centrepiece for any Easter Sunday gathering.

IMG_4661   
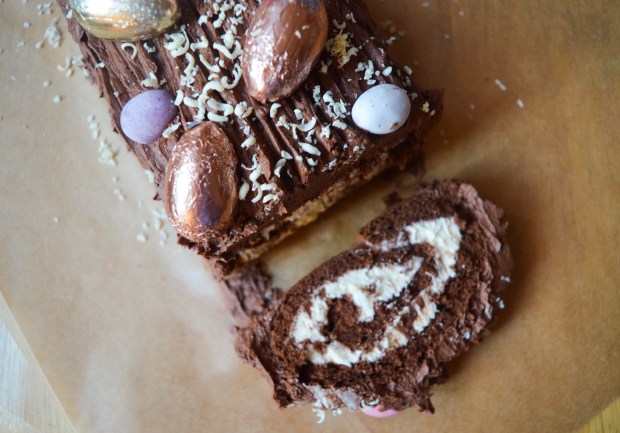
I know chocolate logs are more traditionally eaten at Christmas, but I think this fun update on a classic works for Easter too!

IMG_4704

I promise you that this recipe is much easier to make than it looks – the trick is to make sure whip up your eggs and sugar until they are super voluminous!


Easter Chocolate Log – GF

For the Swiss Roll:

80g golden caster sugar
3 large eggs
60g gluten free self raising flour
20g cocoa powder
20g butter, melted and cooled.

For the Icing:

350g butter, softened
350g icing sugar
2 tbsp cocoa powder
2 tsp vanilla extract
White chocolate, for decorating.

Method

1. Preheat the oven to 200 C/180 C fan/gas mark 6, then grease and line a Swiss roll tin or a baking tray with slightly raised sides with baking parchment.

2. Sift together the gluten free flour and cocoa powder in a large bowl then set aside.

3. Place the eggs and sugar into large bowl and beat the ingredients using an electric hand mixer for about 5 minutes, until the ingredients are pale, fluffy and have tripled in volume. Make sure the mixture has reached ‘ribbon stage’, which means that when you remove the whisk the mixture falling from the whisk leaves a ribbon like trail.

4. Fold in the flour mixture bit by bit, being careful not to knock out the air from the mixture.

5. Carefully fold through the cooled melted butter.

6. Pour the mixture into the prepared tray or tin, tilting the tray to level out he mixture.

7. Bake for 8-10 minutes, until the sponge starts to shrink away from the sides of the tin and the top is firm to touch.

8. Place a large sheet of baking paper onto a work surface. While the cake is still hot, place it upside down onto the paper, then carefully remove the tray and the baking paper.

9. Roll up the cake so that the paper is inside in the Swiss roll, then leave to cool completely.

10. To make the icing, beat the softened butter and icing sugar together until light and fluffy. Split the mixture between two separate bowls – into one mix the vanilla extract and into the other mix the cocoa powder.

11. Carefully unroll your Swiss Roll and spread the vanilla icing over the sponge, then gently roll it back up.

12. Place the Swiss Roll onto a serving plate, then cover it with the chocolate icing using a palate knife. Use a fork to make a ‘bark like’ affect, then decorate with chocolate eggs of your choice and grated chocolate.

IMG_4657

I love seeing your take on my bakes, so remember to share your a picture of your bakes over on Facebook, twitter or Instagram using the hashtag #titchytonbakes.

I hope everyone has a fantastic Easter!


Gluten Free Easter: Marmalade Simnel Cake

Today I am going to share with you my Gluten Free Marmalade Simnel Cake recipe.

IMG_4506For me, it simply wouldn’t be Easter without Simnel Cake – a traditional cake made up of a lightly spiced fruit sponge with a hidden marzipan layer. It is topped with 11 marzipan balls which are said to represent the 11 apostles, minus Judas.

My recipe is a slight twist on the traditional Simnel Cake. I have added a little more liquid in order to create a moist sponge, as Gluten Free Flour requires more moisture than normal flour – Simnel cakes are usually slowly baked on a low temperature for a long time, so the extra moisture is necessary to prevent a dry cake.

I also used Orange Zest instead of Lemon zest and instead of apricot jam I brushed the cake in a generous layer of marmalade.

IMG_4516

Simnel Cake would make a beautiful centrepiece for a special Easter Sunday meal, it is also easily prepared in advance and will comfortably feed a large family.

Orange and Marmalade Simnel Cake – GF/DF options

Ingredients

For the cake:

200g butter, softened (or dairy free butter/spread)
200g light brown sugar
1/2 tsp baking powder
200g gluten free self raising flour, sifted
3 large eggs, whisked
500g sultanas, raisins, mixed peel
Zest 1 orange, plus 2 tbsp of juice
2 tbsp marmalade, gently warmed
2 tsp ginger
1 tsp cinnamon
300g Marzipan, for the centre

To decorate:
2 tbsp Marmalade
500g Marzipan, to decorate

Method:

1) Preheat the oven to 140 C/120 C fan/gas mark 1 and grease and line a loose-bottomed cake tin.

2) In a large bowl cream together the butter and sugar with an electric hand mixer or a wooden spoon.

3) In a separate bowl mix together the dry ingredients: sift together the flour, baking powder and spices, then fold through the fruit and the orange zest.

4) Add the eggs one at a time to the wet ingredients along with a tablespoon of dry ingredients to stop the mixture from splitting. Ensure each egg is fully combined before adding the next one.

5) Fold in all the remaining dry ingredients, then add the marmalade and orange juice and mix until fully combined.

6) Spoon half the mixture into the prepared cake tin and smooth out with a spatula.

7) Roll out 300g of marzipan into a circle large enough to fit the tin and place it on top of the cake mixture

8) Spoon the remaining mixture on top of the marzipan and smooth out with spatula.

9) Bake in a preheated oven for 1 hour 40 – 50 minutes, until the cake is deep golden brown and firm to touch.

10) Leave the cake to cool in the tin slightly before turning it out onto a cooling rack to cool completely.

11) Once cake is cool, brush the top with a generous amount of marmalade which which will help the cake to stay moist.

12) Roll out 400g of Marzipan into a circle large enough to cover the top of the cake.

13) Place the marzipan on top of the cake and divide the remaining marzipan into 11 equal pieces. Roll the pieces into 11 balls and arrange them around the edge of the cake in a circle.

14) Place the cake under a grill high heat for a minute or so until the marzipan is golden brown – watch it like a hawk or the marzipan could burn!

15) Place the cake onto a serving plate and wrap it in a pretty ribbon.

You are now ready to proudly display your beautiful and entirely gluten free Easter centre piece for all the family to admire!

IMG_4512

I love seeing your take on my bakes, so remember to share your a picture of your bakes over on Facebook, twitter or Instagram using the hashtag #titchytonbakes.

Gluten Free Mini Egg Rocky Road

Mini Egg season is upon on us, and I couldn’t resist the urge to use one of my favourite Easter confectionaries in one of my all time favourite sweet treats.

IMG_4198
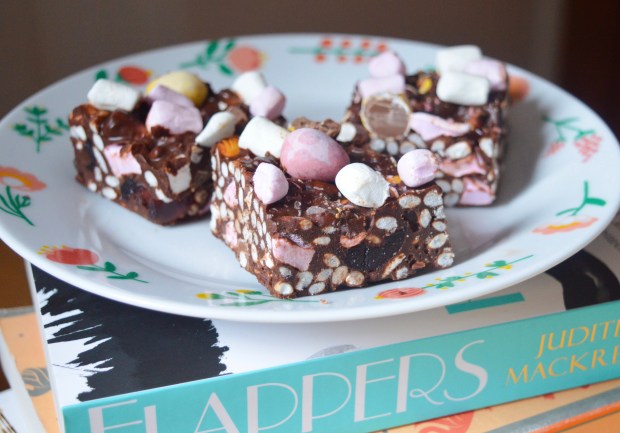
This Mini Egg Rocky Road recipe is a seasonal take on my Gluten Free Rocky Road recipe which I posted last year. The recipe substitutes biscuits for puffed rice,  but you can use Gluten Free Biscuits if you prefer (I just quite like the texture the puffed rice provides).

IMG_4195

Whilst mini eggs are gluten free, they do contain maltodextrin which can  prove troublesome for some Coeliacs. But don’t fret, there are a couple of supermarket alternatives out there which don’t contain maltodextrin including  Sainbury’s ‘Micro Easter Eggs‘ and ‘Chicky Choccy Eggs’ from M&S. ‘Galaxy Golden Eggs‘ are also gluten free and would create and interesting finish, albeit not as colourful!

IMG_4212

It’s also worth mentioning that whilst Minio Eggs are definitely gluten free here the U.K, in the U.S they come with a ‘may contain gluten’ warning due to potential cross contamination risks during the manufacturing process – this could have changed since last year though, so it’s definitely worth double checking.


Gluten Free Mini Egg Rocky Road

Ingredients

300g gluten free milk or dark chocolate
125g butter
100g pink and white mini Marshmallows (plus an extra handful for the top)
75g glacé cherries cut in half
25g Rude Health Brown puffed rice
270 mini eggs (x3 90g bags)
3 tbsp golden syrup

Method

1) Grease and line a square tin with greaseproof paper.

2) Melt the chocolate in large heat proof bowl over a pan of simmering water.

3) In a separate pan melt together the butter and golden syrup, then add this to the melted chocolate and stir continuously until all the ingredients are combined. Leave to cool slightly.

4) Transfer most of the mini eggs to a plastic food bag (save back a few whole ones to scatter across the top), then carefully bash the mini eggs with a rolling pin to break them up.

5) Stir the marshmallows, puffed rice, cherries and most of the crushed mini eggs through the cooled chocolate mixture until all the ingredients are coated.

6) Pour the mixture into the prepared tin and use a greased palate knife to flatten down the mixture down and smooth it right to the corners of the tin.

7) Place a sheet of greaseproof paper on top of the mixture and press down firmly to help tightly pack the mixture into into the tin. Peel off the greaseproof paper and dot across the extra marshmallows, the remaining crushed mini eggs and the remaining whole mini eggs.

8) Cover with cling film and chill the Rocky Road in the fridge for at least two hours.

10) Use the greaseproof paper to help remove the slab of Rocky Road from the tin, then carefully cut it into equal pieces.

Rocky Road should keep for up to a week stored in an airtight container, or you can keep it in the fridge if your home is a little warm.

IMG_4206

I love seeing your take on my bakes, so remember to share your a picture of your bakes over on Facebook, twitter or Instagram using the hashtag #titchytonbakes.

Gluten Free Easter: Carrot Cake Recipe

Today, I’m going to share with you my Gluten Free Carrot Cake Recipe – perfect for those of you who aren’t too keen on chocolate but still want something sweet to celebrate the Easter weekend.  
image

I love Carrot cake, and whilst it isn’t necessarily thought of as a traditional Easter bake, I really can’t think of a better time of year to enjoy it. After all… Easter, Spring, Bunnies… it all makes sense really!

image

This cake is really quite simple to make and keeps really well –  In fact, it tasted as good, if not better a few days later. It can also be kept at room temperature, although, if your house is a bit warm it may be best kept in the fridge.

Carrot Cake with Cream Cheese Frosting – GF

Ingredients

For the cake:
300g gluten free self raising flour
1 tsp baking powder
1 tsp bicarbonate of soda
2 tsp ground cinnamon
1 tsp ground ginger
200g grated carrots
50g walnuts, roughly chopped
175g light brown sugar
1 tbsp maple syrup
150ml sunflower oil
3 large eggs

For the frosting:
2 x 180g tub philadelphia cheese
1 x 250g tub mascarpone cheese
4 tbsp icing sugar, sifted
1 tsp vanilla extract

Plus decorations, I used these House of Cake Carrot Sugar Decorations from Sainsbury’s.

Method:

1. Preheat the oven to 180 C/160 C fan/gas mark 4 and grease and line a round 7″ tin with greaseproof paper.

2. In a large bowl, sift together the flour, baking powder, bicarbonate of soda and spices, then stir through the grated carrots and chopped walnuts.

3. In a separate bowl, whisk together the eggs, sugar, sunflower oil and maple syrup, then add this to the dry ingredients, mixing until the ingredients are just combined.

4. Spoon the ingredients into the prepared tin and then bake for 50 – 55 minutes or until a skewer inserted through the middle comes out clean.

5. Remove the cake from the tin and leave to cool completely before assembling. `

6. For the frosting, gently mix together the Philadelphia, Mascarpone and vanilla extract then gently fold through the icing sugar.

7. Carefully cut the cake into two halves using a sharp knife or cake cutting wire.

8. Place the base of the cake onto a serving plate, cover it with and even layer of frosting then place the second piece of cake on top. Spread remaining frosting across the top using a palate knife and finish off the cake with your chosen decorations.

I hope you have a wonderful Easter weekend. If you are looking for any more Easter baking inspiration why not check out my Gluten Free Mini Egg Ice Cream recipe which can be found over on The Daily Spectacle website. It’s a no churn recipe and it can be prepared ahead – the perfect dessert for Easter Sunday Lunch.

image
There are lots of other Easter recipes for you to try here on my blog too, including my Mini Egg Millionaire Shortbread, Chocolate Nest Cupcakes and Easter Sugar Cookies or you can see what else I get up to over the Easter weekend over on my Instagram or Facebook Page.


Gluten Free Easter: Vanilla Sugar Cookies with Royal Icing

Easter Sunday may only be one day away but there is still enough time to get baking some delicious Easter treats.

Today I am going to share with you a recipe which is so easy to whip up at the last minute and requires very few ingredients: Vanilla Sugar Cookies with Royal Icing.
image

The recipe is so simple and easy to make – just be sure to chill the cookie dough for a few hours to make it easier to handle. You can make the cookies your own by choosing different shaped cookie cutters and by decorating them however you fancy!

image
They would also make a beautiful Easter gift for anyone you know who isn’t keen on chocolate!

Vanilla Sugar Cookies – GF/DF options

Ingredients:

For the cookies:
150g sugar
150g butter
130g rice flour
150g self raising gluten free flour
1 egg
1 tbsp milk (or dairy free alternative)
1 tsp vanilla extract

For the Royal Icing:
1 egg white
250g icing sugar

Method:

1) In a large bowl, mix the gluten free flour and suagr until combined.

2) Rub in the butter until you have a bread crumb like texture.

3) Add the egg and vanilla essence and start to bring the ingredients together using a wooden spoon.

4) Tip the contents onto a lightly floured surface and use your hands to work the ingredients into a soft dough.

Tip. Don’t worry if the dough seems a little sticky as it will be refrigerated which help it to firm up – don’t be tempted to add more flour!

5) Wrap the dough in cling film and place in the fridge for at least and hour.

6) Preheat the oven to 170 C/150 fan/gas mark 4 and line a baking tray with greaseproof paper.

7) Dust a clean surface with rice flour and roll out the dough using a rolling pin.

8) Cut out the cookie shapes with your chosen cutters and transfer them to the prepared tray using a palate knife.

9) Bake for 10 – 12 minutes or until the biscuits are firm and a light golden brown – be sure to keep an eye on them as they could quickly over-bake.

10) Transfer the biscuits to a wire rack to cool.

11)  To make the Royal icing, place 1 egg white in a bowl and slowly sift in the icing sugar in batches. In between the batches of icing sugar, stir with a wooden spoon or a balloon whisk until the icing thickens up, it is now ready to be used. Transfer the icing into a piping bag, if you are not using your icing straight away cover the bowl with cling film to prevent air getting to it which will cause it to harden. If you wish to decorate the cookies in different colours, simply add a few drops of food colouring to the icing.

12) Decorate the cookies however you fancy!

image
You can see what else I’m getting up to over Easter  over on Instagram or on my Facebook Page.

I hope you all have a lovely Easter weekend and eat plenty of Chocolate!