Gluten Free Buckwheat and Peanut Butter Flapjacks (No Oats)

Today I’m going share with you my Gluten Free Buckwheat and Peanut Butter Flapjack recipe.

image

I have been working on this recipe for a while, after a kind request from a friend who struggles to tolerate oats. The objective was simple: create a flapjack that looks and tastes like a traditional flapjack but that doesn’t contain any oats, not even gluten free ones.

I happily excepted the challenge because there are many Coeliacs who struggle to tolerate gluten free oats (despite the fact that they are considered to be okay) and there are many looking for an alternative that will work for them.

When I was looking for an oat subsitute I came across some gluten free Buckwheat flakes in my local health food shop; they are slightly paler in colour than oats but are similar in size and texture so I thought they would work well – If you think you can tolerate buckwheat then this recipe might be worth a shot.

It took a few attempts to get the recipe just right. The first attempt resulted in a flapjack that was so crumbly that I couldn’t even cut it into squares and the second attempt was a complete disaster when I accidentally over baked them and they turned out as hard as rocks – oops!

It was definitely third time lucky. The final attempt resulted in the perfect buttery, and chewy flapjack which didn’t crumble at the slightest touch – result!

image

I deviated slightly from the brief and used peanut butter which I know isn’t particularly traditional, but I love the flavour! If you’d prefer a more traditional flapjack or have a nut allergy you can miss out this ingredient and they will work just as well.

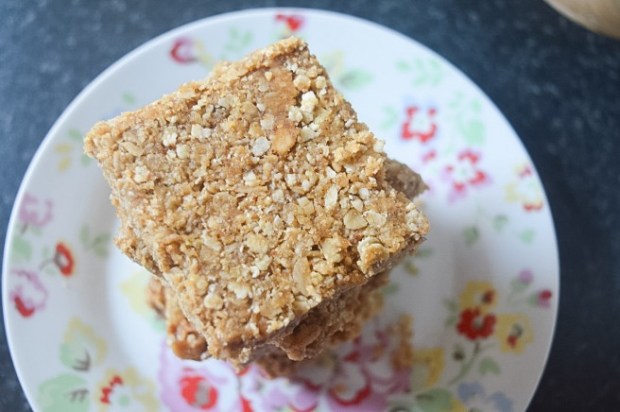
Free Buckwheat and Peanut Butter Flapjacks – (GF/EG/DF options)

Makes approximately 16 flapjacks

Ingredients

175g unsalted butter (or dairy free alternative)
2 tbsp crunchy peanut butter
2 tbsp golden syrup
150g soft brown sugar
300g buckwheat flakes

Method

1. Preheat the oven to 150 C/130 C fan/gas mark 2, then throughly grease and line a square tin (20cm x 20cm) with greaseproof paper.

2. Melt the butter in a large heavy bottomed pan over a medium heat. Once the butter has melted add the peanut butter, golden syrup and brown sugar then stir until the sugar has completely dissolved and you can no longer feel any grains scraping the bottom of the pan.

3. Add the Buckwheat flakes and mix until all the ingredients are fully combined. Spoon the mixture into the prepared tin, spreading it right into the corners and pressing it down flat with the back of a spatula.

4. Bake for about 20 to 25 minutes. The flapjack is ready when the top becomes a beautiful golden brown and is soft to touch – do not be tempted to bake it for longer; although the flapjack will seem too soft, it will firm up as it cools down.

5. Leave the flapjack to cool completely before cutting into squares (5cm x 5cm) – if you attempt to cut the flapjacks before they are properly cold they will crumble, so patience is definitely a virtue!

I hope you like this recipe and give it try!

If you want to keep up to date with my kitchen adventures you can find me on Instagram @titchyton or on my Facebook page.

Honey Roasted Chicken, Feta and Quinoa Salad with Sticky Sautéd Tomatoes

Today I’m going to share with you one of my most favourite creations, my Chicken, Feta and Quinoa Salad with Sticky Sautéd Tomatoes. This is a recipe which I come back to time and time again because it’s super easy to prepare and incredibly tasty.

image

I made this for my sister on her most recent trip to London, I had offered to make us both lunch and wanted to serve something more interesting than your usual lunchtime fodder.

Personally I think this salad ticks all the boxes. For a start, there is not a bland lettuce leaf in sight which instantly makes it infinitely more appealing. The base of my salad is made up of quinoa, a grain which is a fantastic source of protein and dietary fibre, and if prepared in the right way can be incredibly flavoursome.

The rest of the ingredients are far from boring, the chicken breast is roasted in sweet and sticky honey which contrasts wonderfully to the salty feta and refreshing cucumber, but without a doubt the absolute star of this dish is my sticky sautéd tomatoes which I am completely obesessed with – you’ll know why, once you’ve tried them!

The salad is topped off with a handful of pomegranate seeds and a bunch of parsley… I tried to get some leaves in there, somewhere!

Honey Roasted Chicken, Feta and Quinoa Salad with Sticky Sautéd Tomatoes – GF/EF

Serves 2 – 3 

For the Salad:
120g Quinoa, rinsed (I used a mix of white/black/red quinoa)
500ml water, brought to the boil
1 chicken stock cube
400g diced chicken breast
1 tbsp olive oil
2 tbsp honey
1/2 a cucumber, deseeded and chopped into half moon shapes.
50g Feta cheese
A bunch of fresh parsley
12 cherry tomatoes
1 tbsp red wine vinegar
1/2 tsp caster sugar
A handful of pomegranate seeds (optional)

For the Dressing:
Lemon juice
Olive Oil
Salt and Pepper to season

Method:

1. Preheat oven to 180 degrees C/160 fan/gas mark 4.

2. Coat the chicken in olive oil and honey, then season it with black pepper.

3. Bake the chicken in the preheated oven for 20 minutes. To check the chicken is cooked, make sure the meat is white and that no pink remains.

4. Whilst the chicken is cooking, place the quinoa into pan of boiling water and crumble over a stock cube. Stir and reduce the pan to simmer, then cook for 15 minutes until the quinoa is soft.

5. Drain quinoa and leave it cool slightly.

6. To make the sticky tomatoes: heat up a dash of olive oil in a frying pan over a medium heat. Add the cherry tomatoes and cook for a minute or two, until they start to become slightly wrinkly. Add the red wine vinegar and sugar, then stir to coat the tomatoes until they become sticky.

7. Serve your salad on a large serving plate. Start with the quinoa on the bottom, layer up the slices of cucumber, feta, chicken and tomatoes, then top with fresh parsley and pomegranate seeds.

8. Drizzle over olive oil and a squeeze of lemon. Season with black pepper and serve with wedge of lemon on the side.

image


Gluten Free Lemon Drizzle Cake

Last weekend I went to stay with my sister and her boyfriend up in Leeds and on a rather dull and grey sunday afternoon, we decided to bake a Lemon Drizzle cake.

image

My family are not coeliac or on a gluten free diet, but they are always happy to try and critique my gluten free cakes whenever I’m around and I’m happy to report that they think they taste just as good as normal cakes!

image

When I was little, my mum used to make the most delicious lemon flavoured Madeira cake and have I tried to create a gluten free version of her Madeira cake as the base of my Lemon Drizzle.

Here a few snaps of our afternoon:

Lemon Drizzle Cake – GF/DF options

Ingredients

For the cake:

175g caster sugar
175g butter, softened
225g gluten free self raising flour
1 tsp baking powder
3 large eggs
1 tbsp lemon zest from an unwaxed lemon
3 tbsp lemon juice

To decorate:
150g icing sugar
3 – 4 tsp lemon juice
Finely grated lemon zest

Method

1. Preheat oven to 170 C/150 C fan/gas mark 4 then grease and line a 2 lb loaf tin with greaseproof paper.

2. Sift together flour and baking powder then stir through lemon zest.

3. In a separate bowl, cream together the butter and sugar with an electric hand mixer until pale, light and fluffy. Add the eggs one at a time along with one tablespoon of the flour to stop the mixture from curdling.

4. Stir through the remaining flour and lemon juice and mix until all ingredients are fully combined.

5. Spoon the mixture into the prepared loaf tin, then bake for 50 – 55 mins minutes.

Insert a skewer into the middle of the cake to check if it’s cooked– if it comes out clean the cake is ready.

6. Allow the cake to cool in the tin for a few minutes, before turning it out on a wire rack to cool completely before decorating.

7. To make the icing: sift the icing sugar into a bowl, add the water slowly whilst stirring – the icing shouldn’t be too runny but should be spreadable.

8. Spread the icing over the top of the cake, allowing it drip down the sides.

To finish, sprinkle finely grated lemon zest across the top of the cake.

image

Gluten Free Easter: Carrot Cake Recipe

Today, I’m going to share with you my Gluten Free Carrot Cake Recipe – perfect for those of you who aren’t too keen on chocolate but still want something sweet to celebrate the Easter weekend.  
image

I love Carrot cake, and whilst it isn’t necessarily thought of as a traditional Easter bake, I really can’t think of a better time of year to enjoy it. After all… Easter, Spring, Bunnies… it all makes sense really!

image

This cake is really quite simple to make and keeps really well –  In fact, it tasted as good, if not better a few days later. It can also be kept at room temperature, although, if your house is a bit warm it may be best kept in the fridge.

Carrot Cake with Cream Cheese Frosting – GF

Ingredients

For the cake:
300g gluten free self raising flour
1 tsp baking powder
1 tsp bicarbonate of soda
2 tsp ground cinnamon
1 tsp ground ginger
200g grated carrots
50g walnuts, roughly chopped
175g light brown sugar
1 tbsp maple syrup
150ml sunflower oil
3 large eggs

For the frosting:
2 x 180g tub philadelphia cheese
1 x 250g tub mascarpone cheese
4 tbsp icing sugar, sifted
1 tsp vanilla extract

Plus decorations, I used these House of Cake Carrot Sugar Decorations from Sainsbury’s.

Method:

1. Preheat the oven to 180 C/160 C fan/gas mark 4 and grease and line a round 7″ tin with greaseproof paper.

2. In a large bowl, sift together the flour, baking powder, bicarbonate of soda and spices, then stir through the grated carrots and chopped walnuts.

3. In a separate bowl, whisk together the eggs, sugar, sunflower oil and maple syrup, then add this to the dry ingredients, mixing until the ingredients are just combined.

4. Spoon the ingredients into the prepared tin and then bake for 50 – 55 minutes or until a skewer inserted through the middle comes out clean.

5. Remove the cake from the tin and leave to cool completely before assembling. `

6. For the frosting, gently mix together the Philadelphia, Mascarpone and vanilla extract then gently fold through the icing sugar.

7. Carefully cut the cake into two halves using a sharp knife or cake cutting wire.

8. Place the base of the cake onto a serving plate, cover it with and even layer of frosting then place the second piece of cake on top. Spread remaining frosting across the top using a palate knife and finish off the cake with your chosen decorations.

I hope you have a wonderful Easter weekend. If you are looking for any more Easter baking inspiration why not check out my Gluten Free Mini Egg Ice Cream recipe which can be found over on The Daily Spectacle website. It’s a no churn recipe and it can be prepared ahead – the perfect dessert for Easter Sunday Lunch.

image
There are lots of other Easter recipes for you to try here on my blog too, including my Mini Egg Millionaire Shortbread, Chocolate Nest Cupcakes and Easter Sugar Cookies or you can see what else I get up to over the Easter weekend over on my Instagram or Facebook Page.


Gluten Free American Style Chocolate Chip Cookies

Today I’m really excited to share with you my recipe for Gluten Free American Style Chocolate Chip Cookies!
image2-2
I’ve been having really bad cookie cravings since I caught a whiff of freshly baked cookies wafting out from Millie’s Cookies while I was walking around Westfield a few weeks ago…

I know you can buy gluten free cookies from the supermarket, but they’re not the same! You might think I am being picky, but supermarket versions are rather chunky and crunchy, not soft and chewy like the ones you can buy freshly made from bakeries.

I decided the only thing for it was to make my own and although I haven’t had a proper cookie in over three years, these cookies are exactly like what I remember! They have a slightly crunchy outside and a lovely soft and chewy centre bursting with chocolate chips.
image1
The trick to making the best chocolate chip cookies to make sure you don’t over bake them. I accidentally over baked the first few which made them a bit too hard, but if you take them out of the oven while they are still quite soft and leave them to set on the baking tray your cookies will retain their chewy centre.

Gluten Free American Style Chocolate Chip Cookies – GF/DF options

Ingredients
175g gluten free self raising flour
100g rice flour
2 tsp cornflour
A pinch of salt
150g butter, melted (or dairy free alternative like Stork Baking Block)
125g caster sugar
75g light brown sugar
2 tsp vanilla extract
2 egg yolks
1 tbsp milk
150g milk or dark chocolate chips (or dairy free alternative)

Method

1. In a large bowl, mix together the flours and the sugar.

2. Add the melted butter, vanilla extract, egg yolks and milk. Mix until all the ingredients are combined then fold through the chocolate chips.

3. Wrap the cookie dough in cling film, then chill the dough in the fridge for a few hours until it has firmed up.

4. Heat oven to 180 C/160 fan/gas mark 3.

5. Line two large baking trays with baking parchment.

6. Separate the dough into pieces that weigh approximately 35g each and roll each one into a ball shape.

7. Place the balls of dough on the prepared baking trays making sure you leave room for the cookies to spread out as they bake.

8. Bake the cookies for 12 – 15 minutes. The cookies should be golden brown and will remain quite soft – don’t be tempted to bake them for longer.  If the cookies have puffed up a bit, gently press them down with your fingers a few times towards the end of the bake so you don’t end up with cookies which are too dense and cake like.

9. Leave the cookies to firm up on the baking tray then carefully transfer them to a wire rack to cool completely.
image2
Tis almost the season to be jolly, so I will have plenty of Christmas recipes coming real soon. In the meantime, come and follow me over on Instagram or Facebook to see what else I’m getting up to!

Gluten Free Ginger Cake

Autumn is here and as the weather turns colder I look forward to all the flavours the new season has to offer. Gone are the summer fruits, in are the wintery comfort foods and what could be more comforting than slice of warm and spicy ginger cake?

image

In my opinion, comfort food should be as fuss free and simple to achieve as possible. My ginger cake recipe is exactly that and requires no advanced techniques – simply mix the ingredients together and bake!

This cake certainly packs a punch and has a very strong spicy ginger flavour, so feel free to use less ginger if you’d prefer a milder flavour.

image 
Ginger Cake – GF/DF options

Ingredients:
200g gluten free self raising flour
200g light brown sugar
2 – 3 tsp ground ginger
1 tsp bicarbonate of soda
55g unsalted butter, melted (or dairy free alternative)
2 large eggs
1 tbsp golden syrup
1 tbsp black treacle
100ml strong black tea, cooled

Method:

1. Preheat the oven to 180 C/160 C fan/gas mark 4 then grease and line a 2lb loaf tin with baking parchment.

2. In a large bowl: Mix together the flour, sugar, ginger and bicarbonate of soda.

3. In a separate bowl: whisk together the eggs, golden syrup and treacle.

4. Make a well in the centre of the ingredients, add the egg mixture, melted butter and tea then mix until you are left with a smooth and lump-free batter.

5. Pour the mixture into the prepared loaf tin. Bake for 30 – 35 minutes, when the cake is done it should be firm to touch.

6. Turn the cake out onto a wire rack and leave to cool before serving.

image

This cake matures really well and tastes even better after a day or two. If you can wait, wrap your cake in some greaseproof paper and store it in an air tight container for at least 12 hours before you tuck in – the longer you leave his cake, the sticker it gets! This cake will be at it’s best for at least 5 days and keeps for up to 7 days, if stored properly in an airtight container.

Gluten Free Marmalade and Yorkshire Tea Loaf

Happy 1st of August, or, as we Yorkshire folk like to call it – Yorkshire Day!

As a Yorkshire lass I had to come up with something special to celebrate today and what could be more appropriate than this Gluten Free Marmalade and Yorkshire Tea Loaf?
image
This loaf isn’t just the perfect accompaniment to a cup of tea, it actually contains tea, which helps to keep the cake nice and moist – what could be better and than a cake made out of tea?

The cake is also lightly flavoured with spicy ginger and orange and is smothered in a thick layer of marmalade glaze which, again, provides moisture and ensures the cake keeps well.

So, pop t’kettle, sit yer sen down and read on to find out how to make your very own Yorkshire Tea Loaf…

Marmalade and Yorkshire Tea Loaf – GF/DF options

Ingredients

100g sultanas
100ml Yorkshire Tea (hot and strongly brewed)
225g gluten free self raising flour
1 tsp baking powder
100g brown sugar
Zest of 1 orange
2 tsp ginger
50g butter, melted (or dairy free margarine)
3 tbsp, marmalade melted (1 tbsp for glazing the cake)
2 eggs

Method:

1. Preheat the oven to 160 C/140 C fan/gas mark 3 then grease and line a 2lb loaf tin with baking parchment.

2. Place the sultanas in a bowl, pour over the tea then leave to soak.

3. Into a large bowl, sift the flour and baking powder, then stir in the sugar, orange zest and ginger.

4. Add the eggs, melted butter and 2 tablespoons of the melted marmalade to the dry ingredients, then pour over the tea soaked sultanas and beat until all the ingredients are combined.

5. Pour the mixture into the prepared tin – don’t worry if the mixture is a little wetter than a normal tea loaf mixture should be as gluten free flour requires a little more moisture.

6. Bake for about 40 – 45 minutes until the cake is firm to touch.

7. Remove the cake from the oven and leave it to cool in the tin for a few minutes before turning it out onto a wire rack.

8. While the cake is warm spoon over the remaining marmalade – which you can reheat a little if it’s cooled down.

image

Happy Yorkshire Day!

Coeliac Awareness Week: Gluten Free Cheese Scones

Here in the UK it is Coeliac Awareness Week and to help raise awareness of this important campaign I am posting very simple Gluten Free recipes to help any newly diagnosed Coeliacs get started.

My first post was my Victoria Sandwich Recipe and today I will be sharing my recipe for Gluten Free Cheese Scones.
image
Scones are a true classic and a bake that should be in every baker’s repertoire. They are perfect for beginners (they were certainly the first thing I learnt to make) and possible to achieve Gluten Free – you just need to make sure the dough is moist enough!

Gluten Free Cheese Scones – GF/DF options

This recipe makes approximately 8 scones.

Ingredients:
250g gluten free self raising flour
1 tsp baking powder
75g butter, unsalted
A pinch of salt
75g mature cheddar, plus extra for the top.
2 eggs (one for glazing)
75ml milk (or dairy free alternative)

Method:

1) Preheat the oven to 220 C/200 fan C/gas mark 6.

2) In a large bowl, sift together the flour, baking powder and salt.

3) Rub together the butter and flour mixture until you have a breadcrumb like texture, then stir through the cheese.

4) Add an egg and start to bring the mixture together using a wooden spoon.

5) Add the milk bit by bit and use your hands to bring the mixture together in a smooth dough.

6) Lightly dust a work surface with flour then roll out the dough to 3/4cm thick – don’t roll out the dough too flat or you will have very flat scones!

7) Place the scones on a baking tray lined with greaseproof paper. Lightly brush the top of each scone with beaten egg then sprinkle over a little bit more cheese.

8) Bake the scones in a preheated oven for 15 – 18 minutes until they are golden brown.

9) Leave the scones to cool on a wire rack or enjoy warm with lashings of butter! To refresh the scones, sprinkle them with a little cold water and gently warm them in the oven.

Please don’t forget to check out my Victoria Sandwich Recipe for Coeliac Awareness Week or if you are looking for more inspiration take a look at my Recipes Page.

You can also keep up to date with my kitchen adventures on:
Instagram: https://instagram.com/titchyton/
Facebook – https://www.facebook.com/titchyton